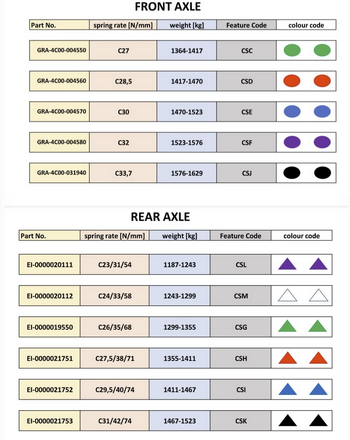
I quoted the wrong price. The spring was $100 each so $200 for the set. Labor was $400.Part number for the springs?
Part number was GAR-4C00-004560 "Red coil spring, winch" on my papers.
Register a free account today to become a member! Once signed in, you'll be able to contribute to the community by adding your own topics, posts, and connect with other members through your own private inbox! INEOS Agents, Dealers or Commercial vendors please contact admin@theineosforum.com for a commercial account.
I quoted the wrong price. The spring was $100 each so $200 for the set. Labor was $400.Part number for the springs?
Presumably you removed a set of green springs?I quoted the wrong price. The spring was $100 each so $200 for the set. Labor was $400.
Part number was GAR-4C00-004560 "Red coil spring, winch" on my papers.
Today I added the Leitner Side Kick Accessory Panels. They are well built and do no require a roof rack. Rotopax mounts are a direct bolt on.
View attachment 7870984
View attachment 7870985
Display controller OOC, installed new one in Colorado. Pulled signal from existing speakers I believe. AudioCraft out of Lubbock installed some nice pillar post speakers.Keep me updated if you don't mind?
Did the installer pull signal from existing speakers or did they try to hook it up to some other output?
I've also found the Grenadier to be sensitive to where you pull ground and positive. Can't piggy back on other wires or the computer gets unhappy.
hi @Ccam ... Can you please provide a translation of what the above two lines mean?Display controller OOC, installed new one in Colorado. Pulled signal from existing speakers I believe. AudioCraft out of Lubbock installed some nice pillar post speakers.

")
I knew I wanted a driver's side grab handle.
I ordered the right hand drive version cars grab handle for the left side from ineos. Works to much better and I prefer to have this handle to get into the car.
Took about 6 weeks to get to the US and my ineos dealer.
Do you have sufficient room to adjust the handbrake cables with the subwoofer in place?Finished fitting a sub (above the handbrake mechanism under the rear seats) and a Wolfbox.
All good, a couple of worthwhile improvements.
Holy cow, that is some absolutely stunning scenery!! If I was there, I may have never left.View attachment 7872397
View attachment 7872399
View attachment 7872398
Local dealer hosts a regular "Trucks & Trees" event. I forgot to count but eight or ten Grenadiers showed up. The drive, weather, scenery and new friends were all really nice. Can't beat fire and hot dogs next to a lake. Thanks to Mark & Darren & Weissach for organizing!

No!Do you have sufficient room to adjust the handbrake cables with the subwoofer in place?
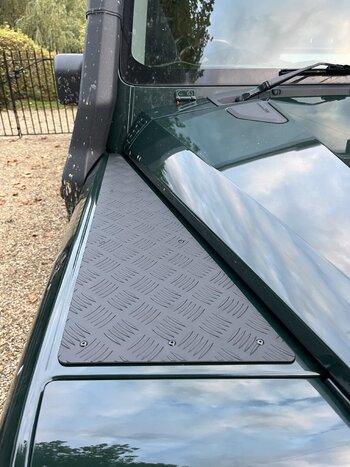
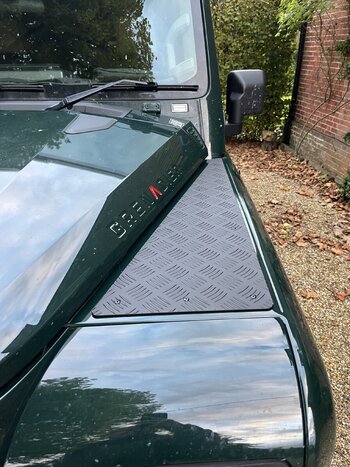
Just the standard rubber strips and silicon on the rivets. Did not want to lock moisture in.did you put something between the chequer plates and the bodywork to prevent damage?
I missed the whale foreskin option, buggerAfter 13 mos of waiting I finally got the wing chequer plate installed. Some things I think (as will most of you with your own particular items) the Gren has to have, lockers, panels, safari windows, sela green, whale foreskin steering wheel hide etc etc. The chequer plate was on the 'must have' list. I al still searching for bonnet chequer.
Thanks to Mr. & Mrs. @Logsplitter for very kindly picking up my OEM plate down in South Africa and for carting it around for weeks. It is definitely the best travelled item on my wagon by a long shot!
Unfortunately due to some EU laws we were denied the option at build, but where there's a will (and a willing friend) there's a way.
Most chuffed.
Black rivets matter.

better than being buggered by a whale foreskin - subjective I knowI missed the whale foreskin option, bugger
Everyone's free to make their own choicesbetter than being buggered by a whale foreskin - subjective I know

Everyone's free to make their own choices
I missed the whale foreskin option, bugger
I wonder if, like the saddle leather, it also develops a rich patina with extended handling?I missed the whale foreskin option, bugger
Where are you trying to steer this?...handle it carefully, pleaseI wonder if, like the saddle leather, it also develops a rich patina with extended handling?