The Grenadier Forum
Register Now for enhanced site access.
INEOS Agents, Dealers or Commercial vendors please contact admin@theineosforum.com for a commercial account.

Wiring ARB twin compressor (Owl kit)

Local time
3:45 PM
Joined
Sep 1, 2024
Messages
24
Reaction score
34
Location
Florida, USA
Edit - solved thanks to the quick responses. I was posting a quick question and appreciate the help.

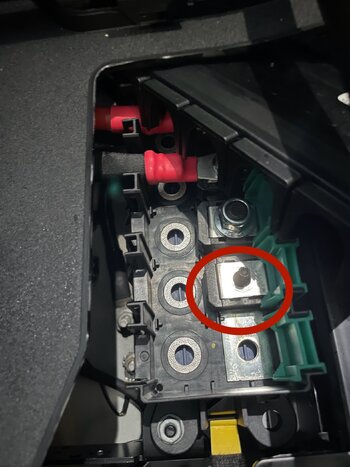
For those also wiring an ARB compressor, with or without the owl kit (which fits great), here is where I found power. I have a LHD NA, non high load equipped model. Next to and slightly behind the starting battery, inboard, on the passenger side, I had a spare 80amp space here with plenty of spare empty lugs on the floorboard for ground. Perfect!
 

Attachments

  • IMG_6814.jpeg
    IMG_6814.jpeg
    643 KB · Views: 72
Last edited:

bakepl

Grenadier Owner
Local time
7:45 AM
Joined
Feb 11, 2022
Messages
554
Reaction score
1,019
Location
Brisbane, Australia
This the under front seat twin arb bracket? Perhaps consider one of the main fuse boxes. There should be a spare to use within the 'S' box as in the image. Best to keep the two 40 amp fuses then use a suitable fuse for both at the block. Neg can be placed on any suitable close by lug that is grounded to the chassis. (great image from forum, can't recall who posted sorry)

1726003494188.jpeg
 

anand

Photo Contest Winner
Forum Moderator
Grenadier Owner
Lifetime Supporter
Local time
4:45 PM
Joined
Mar 12, 2023
Messages
3,212
Reaction score
5,185
Location
Maryland
Directly off the main battery would be ideal, or where the "S" is above as that position does not have a fuse and can support that much current
 
Local time
3:45 PM
Joined
Sep 1, 2024
Messages
24
Reaction score
34
Location
Florida, USA
Great, thank you. I posted in between mounting the compressor and 1 yo child duties, so my research was limited. I wasn’t sure if hooking direct to a battery in these modern vehicles was ok, either, if they’re voltage sensitive. I’ll get to digging in those spots and hook it up. I appreciate the help.
 
Last edited:
Local time
3:45 PM
Joined
Jun 22, 2023
Messages
6
Reaction score
4
Location
USA
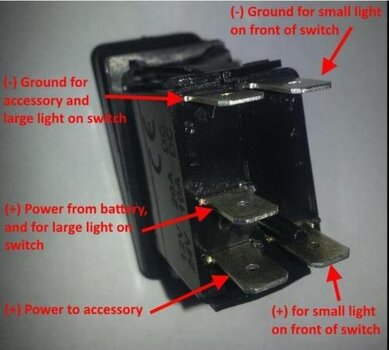
Can you share which color wires were plugged into which number on back of the on/off switch? Thanks
 
Local time
3:45 PM
Joined
Sep 1, 2024
Messages
24
Reaction score
34
Location
Florida, USA
Can you share which color wires were plugged into which number on back of the on/off switch? Thanks
I am curious what is correct, myself. If the back of the switch is facing you, I first tried top black, middle purple, and bottom red on the left side. The switch’s light stayed on constant and the compressor switched on for a second that way, but then I got too hot in the garage and I gave up on this test. I am still working on the best way to power it instead of a direct connection to the starter battery as well.
 
Local time
3:45 PM
Joined
Sep 1, 2024
Messages
24
Reaction score
34
Location
Florida, USA
Taken from elsewhere on the internet. I think I had the purple and red switched. Looks to me like top left black, then red, then purple
 

Attachments

  • IMG_1718.jpeg
    IMG_1718.jpeg
    46.8 KB · Views: 74

LWA55DAL

Grenadier Owner
Forum Donor
Local time
3:45 PM
Joined
Mar 28, 2024
Messages
166
Reaction score
225
Location
San Antonio, TX, USA
So I now have all of the parts - OWL bracket and ARB twin compressors. I am planning to install the main power on the 5th post of the Littlefuse busbar with an 80 amp fuse, but I am going to leave the single 40 amps in the wiring harness in-line as they protect each compressor. The OWL kit doesn’t have an ignition trigger so I am going to run a separate trigger line for the switch to the spare fuse spot as shown on the Agile install.

I think the trigger line for the switch is the middle, but anyone that could confirm would be appreciated.

I also have AUX 1 still open so in theory I could also trigger the switch using the AUX switch that would allow it to be ignition triggered OR triggered when I flip the 500 AMP aux power switch. Open to ideas and feedback. Thanks
 
Back
Top Bottom