He's talking about the 3d printed cubby box for the center armrest he creates.Keep coming back to this post as haven’t a clue as to where in the vehicle you are talking about.
Register a free account today to become a member! Once signed in, you'll be able to contribute to the community by adding your own topics, posts, and connect with other members through your own private inbox! INEOS Agents, Dealers or Commercial vendors please contact admin@theineosforum.com for a commercial account.
He's talking about the 3d printed cubby box for the center armrest he creates.Keep coming back to this post as haven’t a clue as to where in the vehicle you are talking about.
I don't think the riv nut would sit strong enough in that dash. Such a nut is designed for metal sheets not for plastic. I also thought about these anchor screws you mentioned. This could work but my worries are that when I loose it while unscrewing that metal thing could rattle behind the dash. No way to get it out again.Agreed with Krabby on riv nut inserts. I'm not sure how thick the dash plastic is, but alternatively, could something like a Toggle anchor work in an application like this? https://www.amazon.com/dp/B011352954/?tag=globalgrena0b-20. It's made for drywall, but as long as you drill holes and place one in each corner of the mounting plate, I'd think it would be pretty solid. Also, use much shorter screws, than what's shown in the link.
Also, I've never 3D printed anything, but is it possible to apply a texture (similar to that of the dash or the original mat) to the mounting plate? It would make it look more OEM.
These are the people who made the Subie kitchen/drawer system. They specialize in this kinda work and apparently can build to specificationCame across this "promo" for using HDPE instead of wood (or aluminium!) for a rig build-out. As mentioned, it is light and totally resistent to swelling/rotting, etc.
The "subie" kitchen is pretty neat, with a lot of interesting "stacking" in the kitchen, so could give some ideas if anyone is planning to build a kitchen or drawer system.
I will add the link to the manufacturer in comments.
HDPE Provides Perfect Storage Solutions for Overlanding Vehicles
HDPE is an industry leader when it comes to extreme outdoor weather performance, particularly for overlanding and offroading.inadma.com
 www.statworksoverland.com
Omg 200 bucks is a lot of money. You can get a cheap 3d printer for that amount. I would honestly not pay that amount of money.I uploaded the file @chrsbe was kind enough to provide for the cubby insert and the prices were higher than I anticipated. When specifying fill, I'm assuming 100% to make it solid or is it a sheet with the fill being the backside reinforcement material? It defaulted to something like 17% fill. The 100% fill was a few dollars more, but at $200, I want to make exactly sure what I'm ordering! It would almost be cheaper, it seems, to get my own printer from Amazon than just ordering one part to be printed!
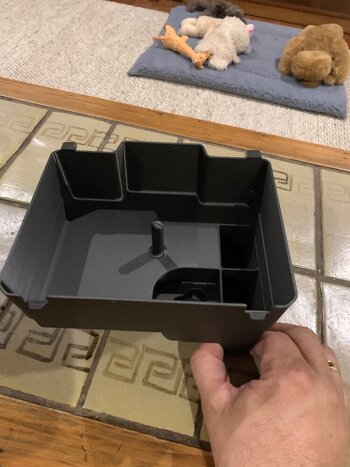
I would be very interested in the file. What a great idea. amp.basecamp@gmail.comYes, it is a 3d print. I made a 3d scan of the inside of the glove box. The drawing is based on this data. I can share the 3d file if it is of any interest. All you need is a 3d printer or a print service.
The other thing you spotted is a cup holder that sits well inside the cup holder.My Yeti mug now fits. It's not perfect yet. I am going to do a second version sometime....
View attachment 7830372
do you have any images of the rack from above? wonder what it looks like with the safari window cutouts. thanks!Added two sideboards from HGM-Rack last week for the Overland Fuel diesel tanks and on the other side the ladder for the RTT.
The sideboards are light and because it consists of one part, it is easy to install.
Mounted the ladder with clamps from Quick fist. They are very solid and recommended for installing items on your grenadier that come off more often.
I would be very interested in the file. What a great idea. amp.basecamp@gmail.com
I have to agree, I can get an Ender 3 V3 SE with rolls of black and orange PLA filament for not much more than the cost of one tray and I can make them for other USA guys (maybe sell for like $50 and it would pay for the setup after 5). I wasn't planning on getting into 3d printing, but it's not cost effective to contract it out. Thank you so much for your design work and advice! I know absolutely nothing about engineering, CAD or anything of the sort.Omg 200 bucks is a lot of money. You can get a cheap 3d printer for that amount. I would honestly not pay that amount of money.
Infill means the density of material between outer and inner wall. Usually 3d prints are not solid in order to save material. There is some sort of honeycomb structure inside. Wall thicknes, type of structure, density of structure etc are usual parameters asked when printing. In our case wall thickness of the box is 2mm. That's why a structure in between makes no sens. In other words 100% infill is what i would opt for.
do you have any images of the rack from above? wonder what it looks like with the safari window cutouts. thanks!
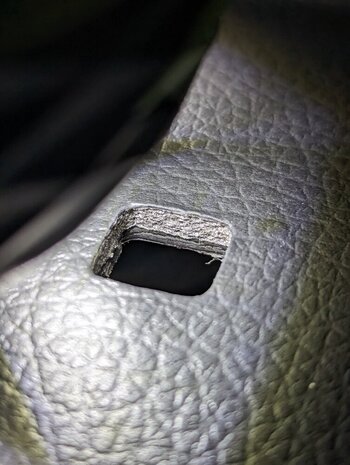
I can see a plastic backing but no metal. The dash is stiff in this area but will not be load bearing. There is about 40 to 50mm clear space behind those holes (1.5 to 2 inches). Can't see the back from below without disassembly so hard to know if a wide nut plate could be installed underneath as a load spreader. Someone with a boroscope would need to investigate further.I don't think the riv nut would sit strong enough in that dash. Such a nut is designed for metal sheets not for plastic. I also thought about these anchor screws you mentioned. This could work but my worries are that when I loose it while unscrewing that metal thing could rattle behind the dash. No way to get it out again.
Wow, that is a lot, I am lucky my son has 3D printers and this is printing as we speak. As I understand it, the “fill” is the density of the material. You definitely don’t need 100% for an application like this, but 17% seems a bit light on. You definitely don’t need more than 50% I would be tempted to use something like 25-30% 17% may be quite flimsy. If you want to go all out do 50%, but my son says for a thin walled piece like this it really doesn’t matter.I uploaded the file @chrsbe was kind enough to provide for the cubby insert and the prices were higher than I anticipated. When specifying fill, I'm assuming 100% to make it solid or is it a sheet with the fill being the backside reinforcement material? It defaulted to something like 17% fill. The 100% fill was a few dollars more, but at $200, I want to make exactly sure what I'm ordering! It would almost be cheaper, it seems, to get my own printer from Amazon than just ordering one part to be printed!
OK, I did a scan of the rubber mat and here is the first 3D-printed prototype for a ram mount base plate. It should go on the dash and replace the rubber pad. The final product will have mounting points for the 9inch RAM mount rail system. View attachment 7832256
View attachment 7832255
There is one problem to be solved and I need your help there. I have designed the snap hooks that lock the mounting plate to the dashboard so they can be locked with a M4 screw. You snap it in an then thread in the screw which then blocks the hooks and prevents the board from coming loose.
My question now is how reliable the material of the dashboard itself is. Will this hooks wear out the holes in the dash? The dashboard is not made for that kind of loads. Think about what forces a heavy Garmin device on the end of a RAM ball head arm distributes when shaking up the whole system on an offroad course. What is underneath the dash? Maybe there is some structure where this whole thing can be mounted to? Has someone already taken off the board? Has someone photos of whats underneath?
Maybe we can also get wires through the holes.
View attachment 7832259
https://www.theineosforum.com/threads/show-us-your-mods.12413129/post-1333226196 here you will see how the dash looks underneath the rubber mat
would double side tape work? It can help distribute the loadOK, I did a scan of the rubber mat and here is the first 3D-printed prototype for a ram mount base plate. It should go on the dash and replace the rubber pad. The final product will have mounting points for the 9inch RAM mount rail system. View attachment 7832256
View attachment 7832255
There is one problem to be solved and I need your help there. I have designed the snap hooks that lock the mounting plate to the dashboard so they can be locked with a M4 screw. You snap it in an then thread in the screw which then blocks the hooks and prevents the board from coming loose.
My question now is how reliable the material of the dashboard itself is. Will this hooks wear out the holes in the dash? The dashboard is not made for that kind of loads. Think about what forces a heavy Garmin device on the end of a RAM ball head arm distributes when shaking up the whole system on an offroad course. What is underneath the dash? Maybe there is some structure where this whole thing can be mounted to? Has someone already taken off the board? Has someone photos of whats underneath?
Maybe we can also get wires through the holes.
View attachment 7832259
https://www.theineosforum.com/threads/show-us-your-mods.12413129/post-1333226196 here you will see how the dash looks underneath the rubber mat.
I am afraid forces would be to high. It requires a mechanical connection.would double side tape work? It can help distribute the load
Thanks for the file, just finished printing my tray and removing the supports. Now all I need is a Grenadier!View attachment 7830335
made an organizer insert for the gloves box today. gives me a second floor and dedicated spots to store the remote, leatherman etc....
Just took mine off the printer as well.Thanks for the file, just finished printing my tray and removing the supports. Now all I need is a Grenadier!
View attachment 7832447
Your own 3d printer or third partyJust took mine off the printer as well.
View attachment 7832454