The Grenadier Forum
Register Now for enhanced site access.
INEOS Agents, Dealers or Commercial vendors please contact admin@theineosforum.com for a commercial account.

Australasia Electric Side Steps

Toot

Grenadier Owner
Forum Donor
Local time
6:57 PM
Joined
May 25, 2024
Messages
7
Reaction score
3
Location
Sag Harbor, NY, USA
Same Here I reached out to Rockslide Engineering. I figured the more Grenadier owners that reach out showing that there is interest the more likely they may start working on them. These would be such a great option for Overlanding and getting the wife back in since I moved to 35"'s. Funny that my Grenadier on 35's makes my Jeep 392 on 37's look small.
View attachment 7867580

View attachment 7867581
I just emailed. Hope others do too these are sweet!
 

SandyChamois

Grenadier Owner
Local time
6:57 PM
Joined
Aug 20, 2023
Messages
171
Reaction score
297
Location
CT, USA
I recently installed the steps from Summer Auto Parts. Their delivery was fast, taking less than a week, and their communication was consistently prompt and responsive. Although the instructions provided were not very comprehensive, requiring some problem-solving on my part, the final outcome was great. The side steps look and perform great, meeting my expectations for good quality and subtle appearance while being ready for use when needed. Initially, I was concerned about their stability since they attach to the body rather than the frame, but after testing, there were no issues at all.

In addition to the shared info in this thread for these steps, I added sealant between the plaque and body where hardware connects, as I had to remove some original water seals. Next, cut the plastic trim for the mechanism to fold; I found 7 inches worked well. Lastly, plan wire placement inside the cabin; I routed mine under the door frame channel where other wires run. For grounding, use the spot behind the driver's side footrest.

Everyone has different preferences for side steps or rock sliders. These fit what I was looking for, and it's great to see the variety increasing so there’s something for everyone.
Did the Lambda Ineos logos come with it or did you add those? Mine do not have those, nice touch
 

alexplore

Grenadier Owner
Local time
3:57 PM
Joined
Jul 2, 2023
Messages
6
Reaction score
9
Location
Seattle, WA, USA
Not who you asked but I did the adjustable and love it. Huge difference.
I did the non adjustable, it improved a lot the driving experience. I have done three improvements for my needs in my Grenadier, the Fox stabilizer, the Wolbox digital mirror and this electric side steps from Summer Auto parts. All of them great additions for me. Super happy with all of them.
 
Last edited:

NEKO

Grenadier Owner
Local time
5:57 PM
Joined
Jul 16, 2024
Messages
6
Reaction score
23
Location
Alabama, USA
Not who you asked but I did the adjustable and love it. Huge difference.
Same here…adjustable version and was absolutely plug and play. 15 min install in my garage.
 

donnygreygrenadier

Grenadier Owner
Lifetime Supporter
Local time
6:57 PM
Joined
Oct 4, 2023
Messages
107
Reaction score
130
Location
New Jersey, USA
Let me know if you have any question during the process, happy to help, it took me a Saturday to install -doing it carefully and taking the time.

  • Some additional tips to keep in mind. Make a test of the motor before any installation, you can do this by connecting the wiring just to power, ground and signal. If they fold, you are good to go and start the real fun. Optionally, you could leave the cable management inside the vehicle at the end, I suggest you focus on the external part first since you will know how much wire is left to hide and identify the right spot. For me it worked well this way, but it is your choice, you can start inside out.
  • To pass the wire inside the vehicle from left to right, remove the center console side panels. It's quite easy to remove them, and the vehicle is designed to be modified! No drama at removing panels, just be careful on the first ones so you get the feeling on how much to put pressure.
  • For the exterior, removing the plastic trim is essential for installing and fixing the mechanism; there's no alternative. The steps for removal the plastic trim is quite simple. Two screws on one side close to the from tires and just pull them out carefully. They come out easily.
  • As you install the hinges, I suggest sealing as you go. You can get that black sealant on any auto parts store that is waterproof.
  • You will install the hinges but do not tight the nuts since you will require to adjust the position once you do some testing.
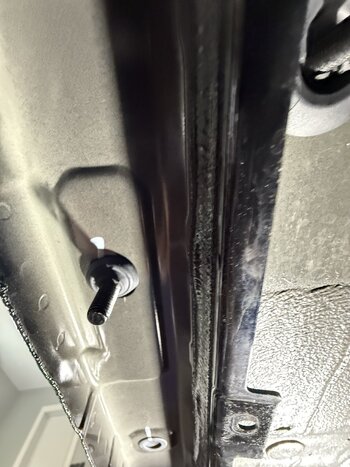
  • Cut the plastic trim, put it back (do not fix the screws you removed initially yet) make a test, if the hinges fold without touching the plastic trim you are ready for adjustment. For me 7 inches depth worked, and you can see in the photo, could be a bit less.

Two adjustments are needed.

  1. Against the plastic the plastic trim. This ensures the step aligns correctly with the plastic trims when closed, so you have equal gap between the step and the plastic trim – and the reason you do not want to tight the nuts yet. Once this is good you can tight the nuts.
  1. The step being centered. You do not tight the chromed screws at fixing the step util you verify this adjustment right to left, you will need to watch it is centered. Once this is done you are good to go and put back the screws to fix the trim.

After completing this, proceed to the wiring step by passing the wire through the drain hole beneath the carpet (if present). To remove the carpet, it's recommended to take off the plastic trim in the door frame. Underneath there is also a black plastic trim, that I suggest you also remove, as this will make it easier to route the wires afterward.

From this point is final wire connection, cable management, and put it back together. It is a fun project, just be patient. Have fun!

Thanks again for these tips. I just got some missing brackets (from China) and am ready for the install. Would you be able to take a photo of the fuse box as connected? Was wondering if you used any of the open fuse locations.
 
Back
Top Bottom