Hi Korg and @FlyersFan76, Many thanks for the clarification and additional info. This will be helpful when I get around to installing the Wolfbox 9000. DaBullAs per @FlyersFan76 response but further detail:
The purple/orange is 12v positive whilst in reverse. If you hook this up to the red lead coming from the Wolfbox reversing camera (you will need to extend it if coming through the rubber grommets of the back door) then the Wolfbox mirror changes view when in reverse to display the guide lines. There are a couple of caveats though: be careful of the exposed positive terminal as per the photo I posted above unless you have disconnected the earth leads on both batteries, the rear table (if fitted) is a pig to remount and really needs two people, lastly the filament lines of the rear demister should be avoided when positioning the rear camera as they should up as a blurred line across the image. The included double sided tape is also crap - use some 3m replacement instead.
The Grenadier Forum
Register a free account today to become a member! Once signed in, you'll be able to contribute to the community by adding your own topics, posts, and connect with other members through your own private inbox! INEOS Agents, Dealers or Commercial vendors please contact admin@theineosforum.com for a commercial account.
You are using an out of date browser. It may not display this or other websites correctly.
You should upgrade or use an alternative browser.
You should upgrade or use an alternative browser.
WolfBox - As A New Vendor, Offering 20% Off Discount!
- Thread starter WolfBox
- Start date
-
- Tags
- backup camera discount wolfbox
Installation guide for Wolfbox (or any reversing camera or dashcam) attached.
Note that the red lead to reversing camera needs to be extended and that you will most likely replace the power lead with a 2m right angled USB lead.

Note that the red lead to reversing camera needs to be extended and that you will most likely replace the power lead with a 2m right angled USB lead.
Attachments
Last edited:
For those with the 67 Design mount, how did you remove the stock mirror from the ball joint? Is it simply just pull it hard as the solution? Asking before I break something.
On a separate note, I was able to successfully snake the camera wire through accordion loom at the base of the rear door. I can provide some tips there. Really great tips from @Korg above!
On a separate note, I was able to successfully snake the camera wire through accordion loom at the base of the rear door. I can provide some tips there. Really great tips from @Korg above!
Last edited:
Tips on snaking the camera wire through the loom at bottom of the door would be appreciated. I’d like to clean up the wiring on mine, and I didn’t want to mess with that loom. Thank you in advance.For those with the 67 Design mount, how did you remove the stock mirror from the ball joint? Is it simply just pull it hard as the solution? Asking before I break something.
On a separate note, I was able to successfully snake the camera wire through accordion loom at the base of the rear door. I can provide some tips there. Really great tips from @Korg above!
My explanation here:Tips on snaking the camera wire through the loom at bottom of the door would be appreciated. I’d like to clean up the wiring on mine, and I didn’t want to mess with that loom. Thank you in advance.
Dashcam Experiences/Recommendations Anybody?
Ah! that's a great idea....mind you, (remembering this is a family forum) I might just say I couldn't ignore the irony of the above with the thought that next week I have an appointment with a man welding an endoscope :oops:... told me not to worry I'd be asleep .... too much...
But I stole some ideas from other people.
For those with the 67 Design mount, how did you remove the stock mirror from the ball joint? Is it simply just pull it hard as the solution? Asking before I break something.
On a separate note, I was able to successfully snake the camera wire through accordion loom at the base of the rear door. I can provide some tips there. Really great tips from @Korg above!
There is a metal retainer ring on the mirror. Marked in Orange. Pry it out towards the ball and you should then be able to remove the mirror. There is some space to put a plastic pry tool or slotted screw driver.
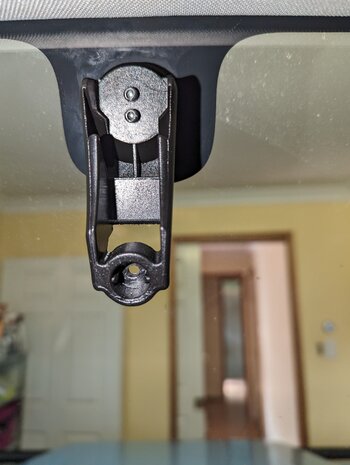
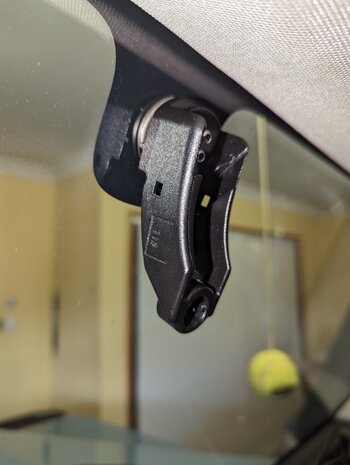
I've cracked the code on a mirror mount arm for MY23 RHD vehicles (not NA, not ADAS). It cost me four different arms as a trial but I finally found the solution. The recommended arm places the mirror at a good height for use and leaves plenty of room for the cables.I may have justed wasted 30 bucks, but I have ordered this arm from Aliexpress to see how close it is to a solution. It's the price Wolfbox will charge anyway.
The mount plate hole spacing is different at 30 x 46mm but I'm working on a hunch that the head can be swapped out for the Wolfbox head (30 x 30mm spacing).
Will advise...
View attachment 7855380
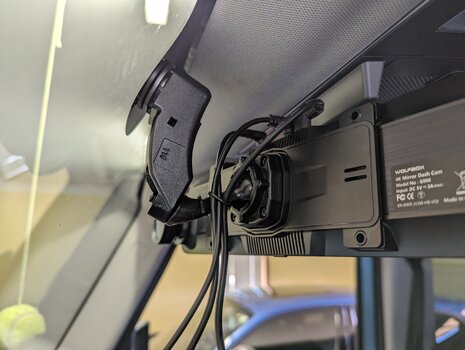
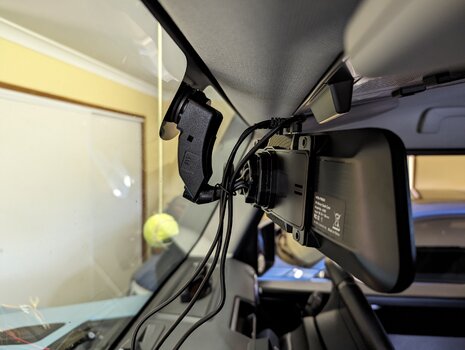
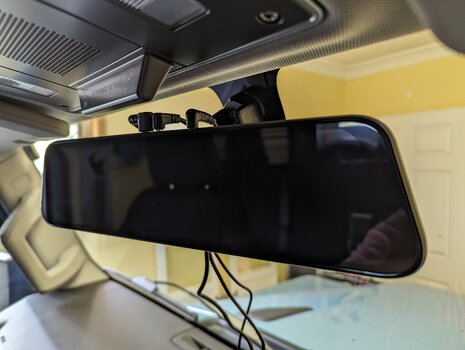
Dashcam/mirror arm No 11, available on Aliexpress here, is a drop in replacement for the D-tab arm supplied by Wolfbox in their OEM mount kit. You will still need the Wolfbox arm kit so you have the backing plate that screws onto the mirror. Once you have fitted the backing plate to the mirror, swap out the Wolfbox D-tab arm for arm #11. The ball head is the same size.
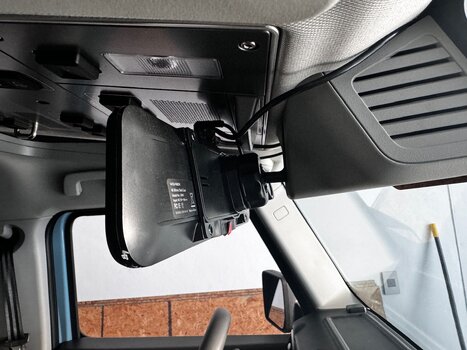
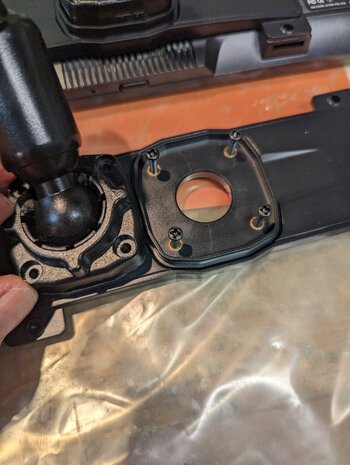
As noted earlier in this thread the screws that come in the Wolfbox arm kit are too long so the ball head is loose on the backing plate (disassembled pic for reference). It's the same problem with arm #11. Your choice is to either shorten the screws about 1.5mm (1/16"), or do as I did and make a packer to sit between the head and the backing plate. I used a piece of heavy card that will compress slightly as a vibration damper. Rubber sheet (e.g. inner tube) or silicone sheet would also work well. Again, this is a fault in the kit supplied by Wolfbox and nothing to do with the swapped arm.
Arm #11 is two-piece. Remove the #2 Phillips joining screw and attach the arm section to the windscreen screen. Attach the ball head and arm section to the mirror. Reassemble the two sections on the windscreen then install the screw from behind. This step is necessary because the arm has to rotate to engage the stud on the windscreen and the mirror is too long to do this as a complete assembly.
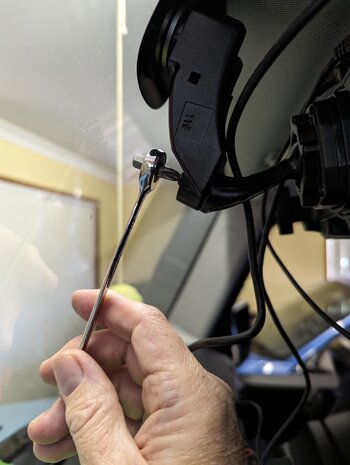
To tighten the screw use a stubby offset #2 Phillips, or a #2 bit and 1/4” ratchet wrench as I did (pic).
To remove the factory mirror wrap a leather riggers glove or similar heavy material around the arm to prevent damage, then grip it firmly with a set of multi-grips (slip-jaws, cobra pliers, etc.) and twist counter clockwise. The factory mirror arm is tight but take your time and grip firmly and it will come off. I put a few dabs of grease on the windscreen stud before fitting the new arm to make the job easier next time (hopefully not necessary..).
@Stu_Barnes If you communicate this arm info to Wolfbox they could package it in place of the D-tab arm as a MY23 Grenadier kit. They also need to supply a packer/gasket or shorter screws as noted.
@nishan
@Cheshire cat
Attachments
-
 PXL_20240602_032614116.jpg2.6 MB · Views: 237
 -
 PXL_20240602_032539837.jpg2.3 MB · Views: 221
 -
 PXL_20240602_032414277.jpg1.9 MB · Views: 214
 -
 PXL_20240602_031713397.MP.jpg5.3 MB · Views: 211
 -
 PXL_20240602_031313004.jpg2.5 MB · Views: 209
 -
 PXL_20240602_031258741.jpg2.4 MB · Views: 206
 -
 PXL_20240602_030504311.jpg3 MB · Views: 263
Last edited:
Well done!I've cracked the code on a mirror mount arm for MY23 RHD vehicles (not NA, not ADAS). It cost me four different arms as a trial but I finally found the solution. The recommended arm places the mirror at a good height for use and leaves plenty of room for the cables.
Dashcam/mirror arm No 11, available on Aliexpress here, is a drop in replacement for the D-tab arm supplied by Wolfbox in their OEM mount kit. You will still need the Wolfbox arm kit so you have the backing plate that screws onto the mirror. Once you have fitted the backing plate to the mirror, swap out the Wolfbox D-tab arm for arm #11. The ball head is the same size.
As noted earlier in this thread the screws that come in the Wolfbox arm kit are too long so the ball head is loose on the backing plate (disassembled pic for reference). It's the same problem with arm #11. Your choice is to either shorten the screws about 1.5mm (1/16"), or do as I did and make a packer to sit between the head and the backing plate. I used a piece of heavy card that will compress slightly as a vibration damper. Rubber sheet (e.g. inner tube) or silicone sheet would also work well. Again, this is a fault in the kit supplied by Wolfbox and nothing to do with the swapped arm.
Arm #11 is two-piece. Remove the #2 Phillips joining screw and attach the arm section to the windscreen screen. Attach the ball head and arm section to the mirror. Reassemble the two sections on the windscreen then install the screw from behind. This step is necessary because the arm has to rotate to engage the stud on the windscreen and the mirror is too long to do this as a complete assembly.
To tighten the screw use a stubby offset #2 Phillips, or a #2 bit and 1/4” ratchet wrench as I did (pic).
To remove the factory mirror wrap a leather riggers glove or similar heavy material around the arm to prevent damage, then grip it firmly with a set of multi-grips (slip-jaws, cobra pliers, etc.) and twist counter clockwise. The factory mirror arm is tight but take your time and grip firmly and it will come off. I put a few dabs of grease on the windscreen stud before fitting the new arm to make the job easier next time (hopefully not necessary..).
@Stu_Barnes If you communicate this arm info to Wolfbox they could package it in place of the D-tab arm as a MY23 Grenadier kit. They also need to supply a packer/gasket or shorter screws as
Hi Clark Kent, Thanks for posting this. Nice work!I've cracked the code on a mirror mount arm for MY23 RHD vehicles (not NA, not ADAS). It cost me four different arms as a trial but I finally found the solution. The recommended arm places the mirror at a good height for use and leaves plenty of room for the cables.
Dashcam/mirror arm No 11, available on Aliexpress here, is a drop in replacement for the D-tab arm supplied by Wolfbox in their OEM mount kit. You will still need the Wolfbox arm kit so you have the backing plate that screws onto the mirror. Once you have fitted the backing plate to the mirror, swap out the Wolfbox D-tab arm for arm #11. The ball head is the same size.
As noted earlier in this thread the screws that come in the Wolfbox arm kit are too long so the ball head is loose on the backing plate (disassembled pic for reference). It's the same problem with arm #11. Your choice is to either shorten the screws about 1.5mm (1/16"), or do as I did and make a packer to sit between the head and the backing plate. I used a piece of heavy card that will compress slightly as a vibration damper. Rubber sheet (e.g. inner tube) or silicone sheet would also work well. Again, this is a fault in the kit supplied by Wolfbox and nothing to do with the swapped arm.
Arm #11 is two-piece. Remove the #2 Phillips joining screw and attach the arm section to the windscreen screen. Attach the ball head and arm section to the mirror. Reassemble the two sections on the windscreen then install the screw from behind. This step is necessary because the arm has to rotate to engage the stud on the windscreen and the mirror is too long to do this as a complete assembly.
To tighten the screw use a stubby offset #2 Phillips, or a #2 bit and 1/4” ratchet wrench as I did (pic).
To remove the factory mirror wrap a leather riggers glove or similar heavy material around the arm to prevent damage, then grip it firmly with a set of multi-grips (slip-jaws, cobra pliers, etc.) and twist counter clockwise. The factory mirror arm is tight but take your time and grip firmly and it will come off. I put a few dabs of grease on the windscreen stud before fitting the new arm to make the job easier next time (hopefully not necessary..).
@Stu_Barnes If you communicate this arm info to Wolfbox they could package it in place of the D-tab arm as a MY23 Grenadier kit. They also need to supply a packer/gasket or shorter screws as noted.
@nishan
@Cheshire cat
Couple questions.
1 - Are you seeing any vibrations in the mirror?
2 - Do you see any reason this would not work on NA vehicles?
DaBull
Pretty sure it wont work for US as we have the forward facing camera right thereHi Clark Kent, Thanks for posting this. Nice work!
Couple questions.
1 - Are you seeing any vibrations in the mirror?
2 - Do you see any reason this would not work on NA vehicles?
DaBull
Hi @DaBull. Thank you.Hi Clark Kent, Thanks for posting this. Nice work!
Couple questions.
1 - Are you seeing any vibrations in the mirror?
2 - Do you see any reason this would not work on NA vehicles?
DaBull
First drive with the new arm today. There is some induced vibration in the mirror. I think it's due to the plastic backing plate supplied by Wolfbox being too thin for this application, and the G900 mirror is quite heavy. I would like to see Wolfbox offer a stiffer plate with rubber isolation for heavy duty 4WD applications. I have a spare Wolfbox OEM kit as part of my fitment trials so I can hack that to see how it might be improved.
I haven't tried the G900 over the factory mirror using the rubber bands. I suspect it might have slightly less vibration because the factory mirror would act as a stiffer arm.
As @AngusMacG noted the MY23 ROW uses a different mirror and arm because we don't currently have ADAS like all NA vehicles have. If the 67 Designs mount is not satisfactory then @Stu_Barnes noted earlier in this thread that Wolfbox were happy to produce a different mount.
Last edited:
I have not yet installed my Wolfbox, partially due to time constraints but also due to minor vibration I can see in the stock MY24 mirror arm. If I'm going to install it I want to make sure it is vibration-free.As @AngusMacG noted the MY23 ROW uses a different mirror and arm because we don't currently have ADAS like all NA vehicles have. If the 67 Designs mount is not satisfactory then @Stu_Barnes noted earlier in this thread that Wolfbox were happy to produce a different mount.
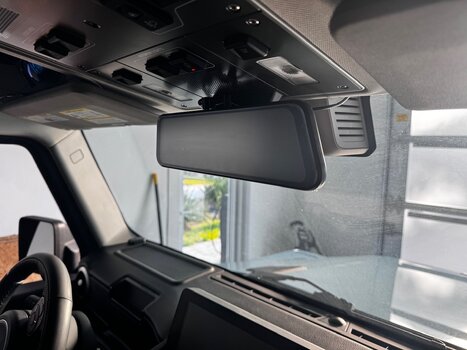
I have a stock mirror arm with ADAS. I used the wolfbox backing plate plus a ball mount shim from eBay and works perfect. No vibration. Sits high and close to the airbag indicator for maximum visibility.
Prior to the fixed mount I used the rubber straps and secured to the OEM mirror. That worked well too / no vibration.
Prior to the fixed mount I used the rubber straps and secured to the OEM mirror. That worked well too / no vibration.
Attachments
Last edited:
Does the film go on the window or the camera lens.Ultimately, I ended up using the two screws that came with the kit and pre-drilled small holes into the plastic trim and secured the camera mechanically. If I ever need to remove the camera (unlikely) I can prboably patch the hole with some grey toothpaste!BTW, I bought and installed the Wolfbox anti-glare film on my G900...only drove the truck once since then, but the reduction of reflections was very noticeable and a huge improvement. I didnt feel that the film degraded the clarity of the display much...or at least not nearly as bad as I feared. So far I give it a thumbs up.
Hi Asnes,I have a stock mirror arm with ADAS. I used the wolfbox backing plate plus a ball mount shim from eBay and works perfect. No vibration. Sits high and close to the airbag indicator for maximum visibility.
Prior to the fixed mount I used the rubber straps and secured to the OEM mirror. That worked well too / no vibration.
Which ball mount shim did you use on ebay?
DaBull
@Greni80 the film goes on the mirror display to reduce reflections in the glass.Does the film go on the window or the camera lens.
Nice one @Clark Kent Exciting progress !First drive with the new arm today. There is some induced vibration in the mirror. I think it's due to the plastic backing plate supplied by Wolfbox being too thin for this application, and the G900 mirror is quite heavy.
Thinking of getting one of these G900 unit’s and and had a few questions. When you say the plastic back plate is too thin do you mean the OEM Bracket is flimsy or the actual G900 build ? Also given you’ve a MY23 RHD do you think the same would be do-able on MY23 LHD ? Also is the 33 Feet Rear Camera Extension Cable needed to reach the rear view camera position? Oh and are the mentioned rubber bands coming in the main G900 kit ?
Sorry meant Amazon not eBay.Hi Asnes,
Which ball mount shim did you use on ebay?
DaBull
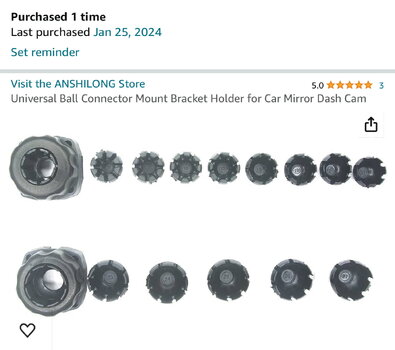
Ball-mount shims - 16mm is your friend!
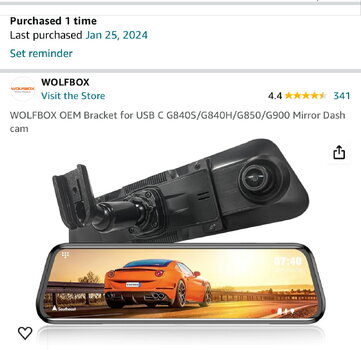
Wolfbox bracket:
This is all you need with an ADAS equipped vehicle. Works perfect.
Attachments
Yep, the backing plate is part of the OEM kit. The only issue I have with the mirror construction is that the power button rattles due to vibration. That's fixable.Nice one @Clark Kent Exciting progress !
Thinking of getting one of these G900 unit’s and and had a few questions. When you say the plastic back plate is too thin do you mean the OEM Bracket is flimsy or the actual G900 build ? Also given you’ve a MY23 RHD do you think the same would be do-able on MY23 LHD ? Also is the 33 Feet Rear Camera Extension Cable needed to reach the rear view camera position? Oh and are the mentioned rubber bands coming in the main G900 kit ?
If you have the same bare factory arm as MY23 RHD and don't have ADAS then this alternative arm should work for you also.
The rubber bands are part of the OEM kit.
I haven't fitted the rear camera yet but plenty have done this. We'll both need to search around a bit for that info.
The button sure does rattle! Wolfbox actually sent me a replacement unit, it rattled too!Yep, the backing plate is part of the OEM kit. The only issue I have with the mirror construction is that the power button rattles due to vibration. That's fixable.
If you have the same bare factory arm as MY23 RHD and don't have ADAS then this alternative arm should work for you also.
The rubber bands are part of the OEM kit.
I haven't fitted the rear camera yet but plenty have done this. We'll both need to search around a bit for that info.
I put a small piece of thick 3M tape on it, and that has worked perfectly
Similar threads
- Replies
- 12
- Views
- 457
- Replies
- 14
- Views
- 795
- Replies
- 3
- Views
- 687

