Decided to go back to the over mirror with straps
The Grenadier Forum
Register a free account today to become a member! Once signed in, you'll be able to contribute to the community by adding your own topics, posts, and connect with other members through your own private inbox! INEOS Agents, Dealers or Commercial vendors please contact admin@theineosforum.com for a commercial account.
You are using an out of date browser. It may not display this or other websites correctly.
You should upgrade or use an alternative browser.
You should upgrade or use an alternative browser.
WolfBox - As A New Vendor, Offering 20% Off Discount!
- Thread starter WolfBox
- Start date
-
- Tags
- backup camera discount wolfbox
No, it does not.Does Wolfbox have homelink built in?
Most hardwire installs seemed to be using the fuse taps...one for 'always-on' and another for 'switched power. I had a detailed write up on installing my G900 on this thread that'll hopefully help you.has anyone used the hardwire kit and does it require you to use the fuse taps or is there spaces for the fuses .?
Thanks Andy just found it much appreciated . will study before it arrives .Most hardwire installs seemed to be using the fuse taps...one for 'always-on' and another for 'switched power. I had a detailed write up on installing my G900 on this thread that'll hopefully help you.
Greetings- I’m trying to install a Wolfbox G840S. It comes with a male lighter socket to power the mirror. I wanted to power the mirror from auxiliary power in the driver footwell. I tested the mirror by plugging it into the lighter socket and it worked. I cut off the lighter head and found a red and black wire which I connected to the purple and black wires in the footwell. Aux power switch on and dash cam does not power up. Same result with car running. Voltmeter on the wires says I’ve got power. I tried running the ground wires to a bolt- still no go. Is there something in the lighter socket head that I need? Next step is buying the hardwire kit to go into a fuse which isn’t a big deal- I’m just wondering, kinda hoping, I’ve missed something easy. Again it’s a G840S model- if that matters. Appreciate any help.
The output or the lighter socket adapter is 5V and you powered it with 12V. Might have fried the Wolfbox??? Need to buy the wiring kit. Worked for me.Greetings- I’m trying to install a Wolfbox G840S. It comes with a male lighter socket to power the mirror. I wanted to power the mirror from auxiliary power in the driver footwell. I tested the mirror by plugging it into the lighter socket and it worked. I cut off the lighter head and found a red and black wire which I connected to the purple and black wires in the footwell. Aux power switch on and dash cam does not power up. Same result with car running. Voltmeter on the wires says I’ve got power. I tried running the ground wires to a bolt- still no go. Is there something in the lighter socket head that I need? Next step is buying the hardwire kit to go into a fuse which isn’t a big deal- I’m just wondering, kinda hoping, I’ve missed something easy. Again it’s a G840S model- if that matters. Appreciate any help.
Normally there is a fuse in the cigarette lighter adapter and as Lars noted above you went from 5V to 12V. Hopefully you habven’t damaged the Wolfbox.Greetings- I’m trying to install a Wolfbox G840S. It comes with a male lighter socket to power the mirror. I wanted to power the mirror from auxiliary power in the driver footwell. I tested the mirror by plugging it into the lighter socket and it worked. I cut off the lighter head and found a red and black wire which I connected to the purple and black wires in the footwell. Aux power switch on and dash cam does not power up. Same result with car running. Voltmeter on the wires says I’ve got power. I tried running the ground wires to a bolt- still no go. Is there something in the lighter socket head that I need? Next step is buying the hardwire kit to go into a fuse which isn’t a big deal- I’m just wondering, kinda hoping, I’ve missed something easy. Again it’s a G840S model- if that matters. Appreciate any help.
Greetings- I’m trying to install a Wolfbox G840S. It comes with a male lighter socket to power the mirror. I wanted to power the mirror from auxiliary power in the driver footwell. I tested the mirror by plugging it into the lighter socket and it worked. I cut off the lighter head and found a red and black wire which I connected to the purple and black wires in the footwell. Aux power switch on and dash cam does not power up. Same result with car running. Voltmeter on the wires says I’ve got power. I tried running the ground wires to a bolt- still no go. Is there something in the lighter socket head that I need? Next step is buying the hardwire kit to go into a fuse which isn’t a big deal- I’m just wondering, kinda hoping, I’ve missed something easy. Again it’s a G840S model- if that matters. Appreciate any help.
By cutting off the lighter head and wiring directly you have lost the voltage reduction from 12V to 5V. Suggest wiring it back to the original state and try the mirror to check if it is still working. The footwell wires can be wired to a lighter socket which you can then plug the head into it.
I had the same problem initially - very bizarre. So I wired into the fusebox near the steering column.Greetings- I’m trying to install a Wolfbox G840S. It comes with a male lighter socket to power the mirror. I wanted to power the mirror from auxiliary power in the driver footwell. I tested the mirror by plugging it into the lighter socket and it worked. I cut off the lighter head and found a red and black wire which I connected to the purple and black wires in the footwell. Aux power switch on and dash cam does not power up. Same result with car running. Voltmeter on the wires says I’ve got power. I tried running the ground wires to a bolt- still no go. Is there something in the lighter socket head that I need? Next step is buying the hardwire kit to go into a fuse which isn’t a big deal- I’m just wondering, kinda hoping, I’ve missed something easy. Again it’s a G840S model- if that matters. Appreciate any help.
See: https://jerryflint.co.uk/wolfbox-dash-cam-and-rear-view-mirror/
Fitted my 900 today followed Andy's instructions all working as advertised I didn't fit reverse wire as not required. This forum is a great help . The only thing that could help is some clips to hold the cables up on the windscreen headliner I'm going to find something somewhere to solve .
I just pushed the wires into the headliner.Fitted my 900 today followed Andy's instructions all working as advertised I didn't fit reverse wire as not required. This forum is a great help . The only thing that could help is some clips to hold the cables up on the windscreen headliner I'm going to find something somewhere to solve .
Glad to hear that my post was helpful. I did not use clips to hold the wires. I was able to tuck them in behind the headliner.Fitted my 900 today followed Andy's instructions all working as advertised I didn't fit reverse wire as not required. This forum is a great help . The only thing that could help is some clips to hold the cables up on the windscreen headliner I'm going to find something somewhere to solve .
Normally there is a fuse in the cigarette lighter adapter and as Lars noted above you went from 5V to 12V. Hopefully you habven’t damaged the Wolfbox.
By cutting off the lighter head and wiring directly you have lost the voltage reduction from 12V to 5V. Suggest wiring it back to the original state and try the mirror to check if it is still working. The footwell wires can be wired to a lighter socket which you can then plug the head into it.
Thanks for all the feedback. Definitely blew the fuse- mirror seems okay though (thankfully). I ordered the wiring kit. I’ll post an update to let everyone know how it turns out. Thanks again.I had the same problem initially - very bizarre. So I wired into the fusebox near the steering column.
See: https://jerryflint.co.uk/wolfbox-dash-cam-and-rear-view-mirror/
It was helpful here too.Glad to hear that my post was helpful. I did not use clips to hold the wires. I was able to tuck them in behind the headliner.
Same. I had the cigarette lighter wire hanging down from the roof behind the 1st row for a week or 2 before I found the time to learn the correct fuses to use and find the time to finish.It was helpful here too.Thanks! Took the rear wire the other way around the 70% door as it was an easier “fish” for me for whatever reason. Finding the 2-3 clear hours to do it right was the hardest part. And even then I did the camera install one day and the hard wire a week later.
The wire hanging really gave me motivation.
Wanted to write a quick write up on the install process for our NA spec Grenadier (MY2024)
After seeing various other's installation videos and results, I choose to install on the interior of the large rear door.
I will be using the 12V / USB Adapter that came with the 930 and upgraded to the "HD" camera (included extra 33ft extension cord **tbd )
PREFACE: Not Plastics nor other delivered parts were permanently harmed in the following. Same cannot be said for myself ;-/
Components:
1 - Wolfbox 930 (Mirror/Dashcam+rear+gps)
1 - "HD camera upgrade (+ 33ft extension)
1 - Wolfbox OEM mount for 930
1 - 15mm to 22mm Ball Joint Adapter (Search Ali express for DVR/Ipad/RearView Mount)
--additional bits :
Nylon zip ties
Adapter/rubber padding
Patience.
Tools needed:
Nylon trim removal tool(s) ** or if have handy, the mobile/cell phone screen repair tools**
1 T30, 1 T25, 1 T20 Torx
1 flat edge
Preparation of new mount/adapter:

The provided "adapter ball" joints allow the use of a 22mm mount of Wolfbox Bracket on the 15mm ball. If left unchanged, there is very little "adjustment" once installed as it is limited by the large "nub" (raised end) that fits into the hole.
If we compare to the OEM, the difference is quite noticeable.
Here are comparisons of each, nub removed completely, nub trimmed down to closely match OEM and the as delivered.

--Results:
--Out of Box

--Closely matching OEM
 --Removed
 --OEM Enough
I choose to stick with the little nubling (OEM-ish):

Removal of OEM Mirror:
--Back

Using the flat edge, pry the steel slip ring and work around until comes free

Upon removing the steel snap ring that holds the mirror on (and later attempting to fetch said ring somewhere "between the seats"), all that is needed is a good stiff pull, straight back.

You may or may not be able to make out in the photos, the wiring for USB(RED)/AV(BLUE)/GPS(GREEN) are "tucked" up along the headliner. The USB uses the 12V connector (RED) that I ran along the top, to the driver side (NA spec) to the A- Pillar , pushed the wire into the headliner.

 Here I removed the Driver side A pillar cover. It is a small (T20?) torx behind the small plastic "cap" (DO NOT LOSE!!, Those "little" bits are notoriously expensive ($90USD +) )--<add pictures of A Pillar here>
I ran the 12V/USB down, along the outside, so not as to interfere with Airbag deployment. Here a little bit of wiring is exposed, however I was able to use some nylon (plastic) trim tools to help push the wire in and behind the trim.

I ran this horizontally along the driver footwell, then under the plastic, then "popping out" just before the center console.
Here is the Wolfbox installed with the OEM enough mount (will get better pictures later)

After seeing various other's installation videos and results, I choose to install on the interior of the large rear door.
I will be using the 12V / USB Adapter that came with the 930 and upgraded to the "HD" camera (included extra 33ft extension cord **tbd )
PREFACE: Not Plastics nor other delivered parts were permanently harmed in the following. Same cannot be said for myself ;-/
Components:
1 - Wolfbox 930 (Mirror/Dashcam+rear+gps)
1 - "HD camera upgrade (+ 33ft extension)
1 - Wolfbox OEM mount for 930
1 - 15mm to 22mm Ball Joint Adapter (Search Ali express for DVR/Ipad/RearView Mount)
--additional bits :
Nylon zip ties
Adapter/rubber padding
Patience.
Tools needed:
Nylon trim removal tool(s) ** or if have handy, the mobile/cell phone screen repair tools**
1 T30, 1 T25, 1 T20 Torx
1 flat edge
Preparation of new mount/adapter:
The provided "adapter ball" joints allow the use of a 22mm mount of Wolfbox Bracket on the 15mm ball. If left unchanged, there is very little "adjustment" once installed as it is limited by the large "nub" (raised end) that fits into the hole.
If we compare to the OEM, the difference is quite noticeable.
Here are comparisons of each, nub removed completely, nub trimmed down to closely match OEM and the as delivered.
--Results:
--Out of Box
--Closely matching OEM
I choose to stick with the little nubling (OEM-ish):
Removal of OEM Mirror:
--Back
Using the flat edge, pry the steel slip ring and work around until comes free
Upon removing the steel snap ring that holds the mirror on (and later attempting to fetch said ring somewhere "between the seats"), all that is needed is a good stiff pull, straight back.
You may or may not be able to make out in the photos, the wiring for USB(RED)/AV(BLUE)/GPS(GREEN) are "tucked" up along the headliner. The USB uses the 12V connector (RED) that I ran along the top, to the driver side (NA spec) to the A- Pillar , pushed the wire into the headliner.
I ran the 12V/USB down, along the outside, so not as to interfere with Airbag deployment. Here a little bit of wiring is exposed, however I was able to use some nylon (plastic) trim tools to help push the wire in and behind the trim.
I ran this horizontally along the driver footwell, then under the plastic, then "popping out" just before the center console.
Here is the Wolfbox installed with the OEM enough mount (will get better pictures later)
Last edited:
In the previous post, I detailed how I removed the mirror, adding the new mount and adapter, then the 12V wiring for the USB/Power. Here I detail the Rear Cam.
--Part Duex : Backdoor Bugaloo
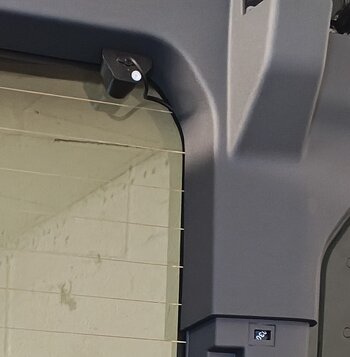
I moved my interest to the rear. Here I chose to mount the "HD" camera inside along the top. This was probably the easiest part of the entire process.
I removed the plastic cover and using the torx bit, remove the screw. I was then able to unfasten the rear plastic by using the nylon flat trim tool and inserting along the OUTER edge. Avoid using thing hard against the glass side, as the Rear Defroster wiring is here.


Using the flat tool under the outer edge of the trim, twist then pry and the plastic should give a resounding "pop". A firm yank should set it free.
With the bottom part removed, repeat the same for the upper, "using the nylon flat trim tool and inserting along the OUTER edge." This should give you all the room needed to run the wire from the camera down along the inside of the upper trim. Remove the torx from the rear storage box gives you access to the lower door section.

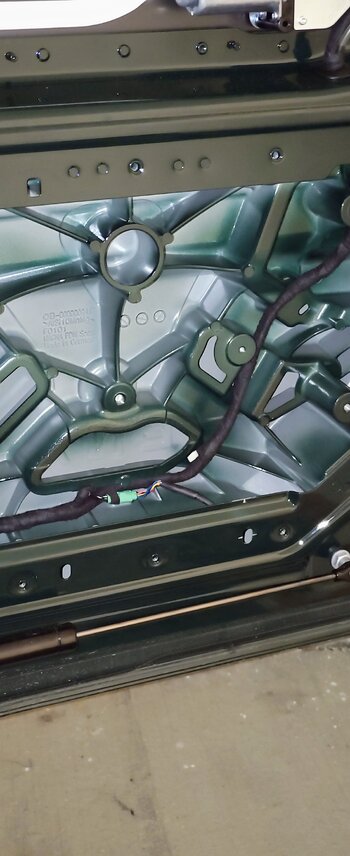
We can see here where the OEM Wiring harness comes in. The wires going "down" are to the built in rear camera (which suspiciously feels almost exactly the same as other rear camera plugs) then run a bit more and then UP. Here one set runs toward the rear wiper/washer. The other runs up to the rear door lock.

--And Here the AV wire from the cabin, enters the rear door using the hole provided. The wires then drop down and run along the bottom interior of the door.

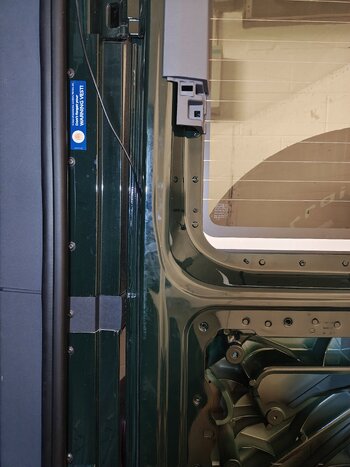
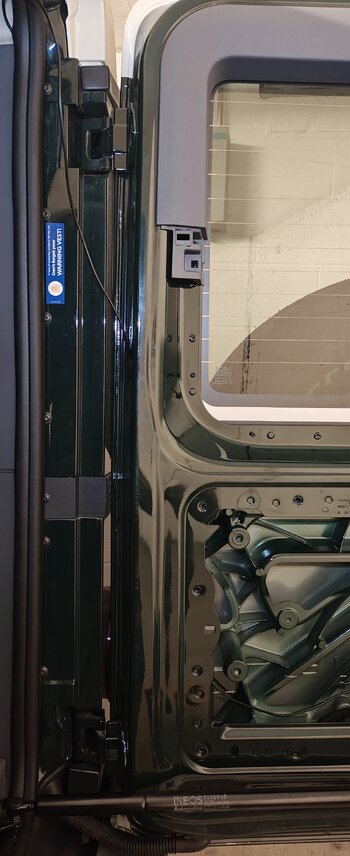
With the wiring feed into the rear door, I needed a way to run up where the camera connection is. To accomplish this, I lifted the sealed grommet for the power lock use the camera and then dropped the camera "tail" down, to where I could connect the AV wire.

Then pulled the cord up with the AV wire attached.

***IDEA : identify the signal wire for the read wiper, as it turns on automatically when you put in Reverse., would be easy way to get reverse functionality. Unsure if better done at washer/motor, or at loom (where built in reverse).
--
Once connected, I carefully pulled the AV wire up through the door, slipped passed the grommet (resealed with a bit of lube and persistence).

Here is a shot of the camera installed and the wiring feed through the rear door, then up to the camera.

--all bundled up:
<add finished shots of Rear, Liner path
--Part Duex : Backdoor Bugaloo
I moved my interest to the rear. Here I chose to mount the "HD" camera inside along the top. This was probably the easiest part of the entire process.
I removed the plastic cover and using the torx bit, remove the screw. I was then able to unfasten the rear plastic by using the nylon flat trim tool and inserting along the OUTER edge. Avoid using thing hard against the glass side, as the Rear Defroster wiring is here.
Using the flat tool under the outer edge of the trim, twist then pry and the plastic should give a resounding "pop". A firm yank should set it free.
With the bottom part removed, repeat the same for the upper, "using the nylon flat trim tool and inserting along the OUTER edge." This should give you all the room needed to run the wire from the camera down along the inside of the upper trim. Remove the torx from the rear storage box gives you access to the lower door section.
We can see here where the OEM Wiring harness comes in. The wires going "down" are to the built in rear camera (which suspiciously feels almost exactly the same as other rear camera plugs) then run a bit more and then UP. Here one set runs toward the rear wiper/washer. The other runs up to the rear door lock.
--And Here the AV wire from the cabin, enters the rear door using the hole provided. The wires then drop down and run along the bottom interior of the door.
With the wiring feed into the rear door, I needed a way to run up where the camera connection is. To accomplish this, I lifted the sealed grommet for the power lock use the camera and then dropped the camera "tail" down, to where I could connect the AV wire.
Then pulled the cord up with the AV wire attached.
***IDEA : identify the signal wire for the read wiper, as it turns on automatically when you put in Reverse., would be easy way to get reverse functionality. Unsure if better done at washer/motor, or at loom (where built in reverse).
--
Once connected, I carefully pulled the AV wire up through the door, slipped passed the grommet (resealed with a bit of lube and persistence).
Here is a shot of the camera installed and the wiring feed through the rear door, then up to the camera.
--all bundled up:
<add finished shots of Rear, Liner path
Attachments
Last edited:
Similar threads
- Replies
- 12
- Views
- 457
- Replies
- 14
- Views
- 795
- Replies
- 3
- Views
- 687


