The Grenadier Forum
Register Now for enhanced site access.
INEOS Agents, Dealers or Commercial vendors please contact admin@theineosforum.com for a commercial account.

Wolf Box

wolfbox_logo_e68cf9b7-062c-40e0-a6b8-6f94291edbd3.png.jpeg

As the leading brand in the automotive electronics market, WOLFBOX has earned its reputation with an unwavering commitment to quality and durability. We strive to deliver cutting-edge electronics with the latest trends and technology to enhance the driving experience and cater to the evolving needs of modern drivers.

At WOLFBOX, we understand that driving is more than just a means of transportation – it's an exploration, an adventure waiting to unfold. WOLFBOX is your trusted companion, encouraging you to venture beyond your comfort zone and discover the extraordinary.


Wolfbox have agreed to give forum members a discount on their products, the discount varies depending on region unfortunatelyf.

They didn't say if this was in addition to any other promotions but its worth a go.


For USA Customers ONLY 18% discount with the coupon code below.

Code

GRENADIERS-USA

WOLFBOX USA Site


For UK Customers and EU 20% discount with the coupon code below.

Code

GRENADIERS-UK

WOLFBOX UK Site


For AU and NZ Customers 20% discount with the coupon code below

Code

GRENADIERS-AU​


WOLFBOX AU Site


WOLFBOX G850 Rearview Mirror Backup Camera Dash Cam Smart Mirror​

wolfbox-g850-rearview-mirror-backup-camera-dash-cam-877069.jpg
The smart way to record your driving experience with a choice of G850 4K mirror rearview mirror backup camera.


Please note, the forum discount only applies to orders placed directly with WOLFBOX and not via 3rd parties.
The forum may earn a small commission from any sales generated by the links above or by using the coupon code.
 
Last edited:

Chadd7

Grenadier Owner
Local time
2:20 AM
Joined
May 17, 2023
Messages
577
Reaction score
789
Location
NJ, USA
In the previous post, I detailed how I removed the mirror, then the 12V wiring for the USB/Power.

--Part Duex : Backdoor Bugaloo

I moved my interest to the rear. Here I chose to mount the "HD" camera inside along the top. This was probably the easiest part of the entire process.


I removed the plastic cover and using the torx bit, remove the screw. I was then able to unfasten the rear plastic by using the nylon flat trim tool and inserting along the OUTER edge. Avoid using thing hard against the glass side, as the Rear Defroster wiring is here.
View attachment 7865107
View attachment 7865108
Using the flat tool under the outer edge of the trim, twist then pry and the plastic should give a resounding "pop". A firm yank should set it free.
With the bottom part removed, repeat the same for the upper, "using the nylon flat trim tool and inserting along the OUTER edge." This should give you all the room needed to run the wire from the camera down along the inside of the upper trim. Remove the torx from the rear storage box gives you access to the lower door section.
View attachment 7865182


We can see here where the OEM Wiring harness comes in. The wires going "down" are to the built in rear camera (which suspiciously feels almost exactly the same as other rear camera plugs) then run a bit more and then UP. Here one set runs toward the rear wiper/washer. The other runs up to the rear door lock.View attachment 7865109

--And Here the AV wire from the cabin, enters the rear door using the hole provided. The wires then drop down and run along the bottom interior of the door.
View attachment 7865183


With the wiring feed into the rear door, I needed a way to run up where the camera connection is. To accomplish this, I lifted the sealed grommet for the power lock use the camera and then dropped the camera "tail" down, to where I could connect the AV wire.
View attachment 7865111
Then pulled the cord up with the AV wire attached.
View attachment 7865112


***IDEA : identify the signal wire for the read wiper, as it turns on automatically when you put in Reverse., would be easy way to get reverse functionality. Unsure if better done at washer/motor, or at loom (where built in reverse).

--

Once connected, I carefully pulled the AV wire up through the door, slipped passed the grommet (resealed with a bit of lube and persistence).

View attachment 7865116

Here is a shot of the camera installed and the wiring feed through the rear door, then up to the camera.

View attachment 7865117
dang it. I need to redo mine. Should have read this first.
 

weeman

Grenadier Owner
Local time
4:20 PM
Joined
Jun 8, 2023
Messages
9
Reaction score
11
Location
Australia
Does anyone else find the framerate for the rear camera lacking on the G900? I believe its rated to 25fps, but it feels more like 15fps and the video feed is not smooth and almost induces motion sickness when looking for more than a second. Coming from the built in mirror camera on a New Defender it feels like a massive downgrade. Its still a large improvement and the picture quality is great, just wish the framerate was 60fps
 

IslandFalconer

Grenadier Owner
Local time
3:20 AM
Joined
Apr 24, 2024
Messages
172
Reaction score
303
Location
Prince Edward Island, Canada
Does anyone else find the framerate for the rear camera lacking on the G900? I believe its rated to 25fps, but it feels more like 15fps and the video feed is not smooth and almost induces motion sickness when looking for more than a second. Coming from the built in mirror camera on a New Defender it feels like a massive downgrade. Its still a large improvement and the picture quality is great, just wish the framerate was 60fps
I have the g900 and have no lag at all. Beautiful picture and no issue looking at it
 

globalgregors

Photo Contest Winner
Grenadier Owner
Lifetime Supporter
Local time
4:20 PM
Joined
May 15, 2022
Messages
1,469
Reaction score
3,782
Location
Sydney NSW, Australia
Update on my G900 that is worth reporting here…

So in previous news I lost the rear view feed and thought I had damaged the associated cable.

Since I was needing to order a replacement I figured I’d upgrade the rear camera at the same time.
Not easy to arrange logistics as we’re on the road but eventually teed things up and received the new camera and cable.

De-installed the existing rear camera and cable, and reinstalled the new… plugged it in… still no feed.

Turns out the head unit itself is fritz.

Troubleshot with Wolfbox support, updated firmware, changed power supply, all to no avail.

Good news is that Wolfbox immediately offered a replacement, and kindly sent it to our UK address.
Really fantastic support, couldn’t recommend Wolfbox highly enough if you’re considering a purchase.

6d20e245-0b57-40d9-b770-477496dbc6cc.jpeg
 

TheDocAUS

Grenadier Owner
Lifetime Supporter
Local time
4:20 PM
Joined
Mar 8, 2023
Messages
2,095
Reaction score
3,799
Location
Eromanga
Update on my G900 that is worth reporting here…

So in previous news I lost the rear view feed and thought I had damaged the associated cable.

Since I was needing to order a replacement I figured I’d upgrade the rear camera at the same time.
Not easy to arrange logistics as we’re on the road but eventually teed things up and received the new camera and cable.

De-installed the existing rear camera and cable, and reinstalled the new… plugged it in… still no feed.

Turns out the head unit itself is fritz.

Troubleshot with Wolfbox support, updated firmware, changed power supply, all to no avail.

Good news is that Wolfbox immediately offered a replacement, and kindly sent it to our UK address.
Really fantastic support, couldn’t recommend Wolfbox highly enough if you’re considering a purchase.

View attachment 7867064
Did you mean US address rather than UK?
 
Local time
2:20 AM
Joined
Apr 28, 2023
Messages
714
Reaction score
635
Location
Pittsburgh
the 9000 seems a bit laggy to me and I'm sure there are better options but it'll do.

I'll also note the obd2 port connector works just fine.
 

six1five

GG 319
Grenadier Owner
Lifetime Supporter
Local time
1:20 AM
Joined
Apr 19, 2022
Messages
122
Reaction score
258
Location
Nashville, TN
I have a stock mirror arm with ADAS. I used the wolfbox backing plate plus a ball mount shim from eBay and works perfect. No vibration. Sits high and close to the airbag indicator for maximum visibility.

Prior to the fixed mount I used the rubber straps and secured to the OEM mirror. That worked well too / no vibration.
Looks like Amazon is out of the shim kit. I did order the Wolfbox brack just incase. I'm gonna tackle mounting my G900 this week.
 

flynnsk

Grenadier Owner
Lifetime Supporter
Local time
1:20 AM
Joined
Jun 9, 2023
Messages
239
Reaction score
291
Location
Chicago
Looks like Amazon is out of the shim kit. I did order the Wolfbox brack just incase. I'm gonna tackle mounting my G900 this week.
AliExpress has them in many different forms. DVR/iPad/DashCam/Review adapter set. The size 15 (or 16) to 22mm should work. Highly recommend trimming or removing the "nub" on the rear to match as closely as possible the OEM, otherwise you get very minimal mirror adjustment.
 

Chadd7

Grenadier Owner
Local time
2:20 AM
Joined
May 17, 2023
Messages
577
Reaction score
789
Location
NJ, USA
Just want to say that I love the G900 and connecting to the INT2 switch was a great recommendation as I like to switch it off at night driving on residential roads.
 

six1five

GG 319
Grenadier Owner
Lifetime Supporter
Local time
1:20 AM
Joined
Apr 19, 2022
Messages
122
Reaction score
258
Location
Nashville, TN
@AndyT followed your write up and installed a G900 with the “upgraded rear camera”. Thanks for the easy guide!
 

Attachments

  • IMG_0849.jpeg
    IMG_0849.jpeg
    1.8 MB · Views: 39

flynnsk

Grenadier Owner
Lifetime Supporter
Local time
1:20 AM
Joined
Jun 9, 2023
Messages
239
Reaction score
291
Location
Chicago
Updated oringial posts to include additional pictures etc.
The only "issues" remaining for us (being vertically challenged), is with the mirror adjusted so, a good portion the front camera is blocked by the grey plastic ADAS "box" and not being able to set the mirror to boot to no screen (e.g. "off").
We have moved the adjustable front camera as far as it can go and still there. Not so much an issue when using as rear or dashcam. It's when using as split screen it is bothersome. For the mirror boot to screen, just requires a quick hit of the power button the turn off the screen.
--To add PictureHere
 

Chadd7

Grenadier Owner
Local time
2:20 AM
Joined
May 17, 2023
Messages
577
Reaction score
789
Location
NJ, USA
Updated oringial posts to include additional pictures etc.
The only "issues" remaining for us (being vertically challenged), is with the mirror adjusted so, a good portion the front camera is blocked by the grey plastic ADAS "box" and not being able to set the mirror to boot to no screen (e.g. "off").
We have moved the adjustable front camera as far as it can go and still there. Not so much an issue when using as rear or dashcam. It's when using as split screen it is bothersome. For the mirror boot to screen, just requires a quick hit of the power button the turn off the screen.
--To add PictureHere
If you wire to the INT2 switch, you can have the switch off until you want it on. Car will start up and boot to no screen
 
Local time
2:20 AM
Joined
Aug 5, 2024
Messages
35
Reaction score
43
Location
Miami Beach, FL, USA
I just installed a G930, for the rear camera I went through the top edge of the headrests along the door panels and weather stripping on the jams. I then went under a trim piece which has to get unscrewed and to the roof without making any holes. Figure I'd share since we all basically have the same make and model lol. I used the double sided tape to hold it down but I was worried that it would fly off in a car wash. For some odd reason this part popped up on amazon for a corvette

https://www.amazon.com/dp/B0CLNWVLS2?tag=globalgrena0b-20

I purchased it but it wouldn't fit the cars curves exactly, maybe someone else here would know a closer fit. I ended up trimming it and it works great and now I am not worried about the camera popping off and I didnt make on hole in my car for this entire instal. I know they sell license plate brackets but I wanted the camera on the roof as I get a much better viewing angle that way. Maybe someone can 3d print perfect fit covers! FYI I couldn't find any other better matching colors for this, but you really barely see it anyway. It actually looks like its OEM and matches the black strips on the roof unless you come really close and focus on it.


Thanks,

Adam


Screenshot 2024-08-21 at 3.12.55 PM.pngWhatsApp Image 2024-08-21 at 15.15.56 (1).jpegWhatsApp Image 2024-08-21 at 15.15.56 (2).jpegWhatsApp Image 2024-08-21 at 15.15.56.jpegWhatsApp Image 2024-08-21 at 15.15.56 (3).jpeg
 
Local time
2:20 AM
Joined
Aug 5, 2024
Messages
35
Reaction score
43
Location
Miami Beach, FL, USA
Wanted to write a quick write up on the install process for our NA spec Grenadier (MY2024)

After seeing various other's installation videos and results, I choose to install on the interior of the large rear door.
I will be using the 12V / USB Adapter that came with the 930 and upgraded to the "HD" camera (included extra 33ft extension cord **tbd )

PREFACE: Not Plastics nor other delivered parts were permanently harmed in the following. Same cannot be said for myself ;-/

Components:
1 - Wolfbox 930 (Mirror/Dashcam+rear+gps)
1 - "HD camera upgrade (+ 33ft extension)
1 - Wolfbox OEM mount for 930
1 - 15mm to 22mm Ball Joint Adapter (Search Ali express for DVR/Ipad/RearView Mount)

--additional bits :
Nylon zip ties
Adapter/rubber padding
Patience.

Tools needed:
Nylon trim removal tool(s) ** or if have handy, the mobile/cell phone screen repair tools**
1 T30, 1 T25, 1 T20 Torx
1 flat edge

Preparation of new mount/adapter:
View attachment 7867325

The provided "adapter ball" joints allow the use of a 22mm mount of Wolfbox Bracket on the 15mm ball. If left unchanged, there is very little "adjustment" once installed as it is limited by the large "nub" (raised end) that fits into the hole.
If we compare to the OEM, the difference is quite noticeable.
Here are comparisons of each, nub removed completely, nub trimmed down to closely match OEM and the as delivered.
View attachment 7867326
--Results:
--Out of Box

View attachment 7867327
--Closely matching OEM
View attachment 7867328--Removed
View attachment 7867329--OEM Enough
I choose to stick with the little nubling (OEM-ish):

View attachment 7867330


Removal of OEM Mirror:

--Back
View attachment 7865167


Using the flat edge, pry the steel slip ring and work around until comes free
View attachment 7865160
Upon removing the steel snap ring that holds the mirror on (and later attempting to fetch said ring somewhere "between the seats"), all that is needed is a good stiff pull, straight back.

View attachment 7865356

You may or may not be able to make out in the photos, the wiring for USB(RED)/AV(BLUE)/GPS(GREEN) are "tucked" up along the headliner. The USB uses the 12V connector (RED) that I ran along the top, to the driver side (NA spec) to the A- Pillar , pushed the wire into the headliner.

View attachment 7865357

View attachment 7865359Here I removed the Driver side A pillar cover. It is a small (T20?) torx behind the small plastic "cap" (DO NOT LOSE!!, Those "little" bits are notoriously expensive ($90USD +) )--<add pictures of A Pillar here>

I ran the 12V/USB down, along the outside, so not as to interfere with Airbag deployment. Here a little bit of wiring is exposed, however I was able to use some nylon (plastic) trim tools to help push the wire in and behind the trim.

View attachment 7865358

I ran this horizontally along the driver footwell, then under the plastic, then "popping out" just before the center console.

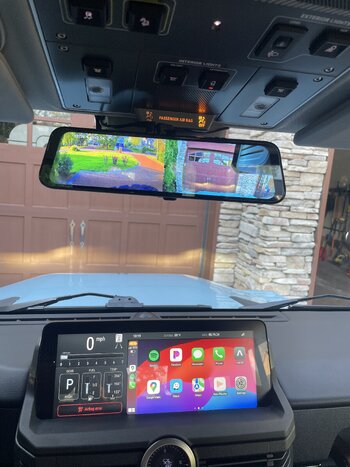
Here is the Wolfbox installed with the OEM enough mount (will get better pictures later)

View attachment 7867331


Is this the correct adapter?


Thanks,

Adam
 

FlyersFan76

Grenadier Owner
Lifetime Supporter
Local time
2:20 AM
Joined
Jan 7, 2023
Messages
380
Reaction score
450
Location
West Chester, Pennsylvania, USA
Updated oringial posts to include additional pictures etc.
The only "issues" remaining for us (being vertically challenged), is with the mirror adjusted so, a good portion the front camera is blocked by the grey plastic ADAS "box" and not being able to set the mirror to boot to no screen (e.g. "off").
We have moved the adjustable front camera as far as it can go and still there. Not so much an issue when using as rear or dashcam. It's when using as split screen it is bothersome. For the mirror boot to screen, just requires a quick hit of the power button the turn off the screen.
--To add PictureHere
The ADAS box does block a little and I have my mirror mounted as high and to the left as possible. I usually leave mine mirror showing both front and rear cameras. With the size of the mirror, I do not find that the ADAS box is that bad.

BTW, pay no attention to the exclamation point on the left side. That is actually duct tape showing the center line of my garage bay for something else. lol


20240821_004117794_iOS.jpg20240821_004141823_iOS.jpg20240821_004205597_iOS.jpg
 

grenadierguy

Grenadier Owner
Lifetime Supporter
Founding Guard
Local time
12:20 AM
Joined
Dec 18, 2021
Messages
303
Reaction score
289
Location
Colorado
I ran the cable via a rubber grommet inside the door and then inside the corrugated tube to the car body. It looks nice and clean and is worth the effort.
Any tips on how you did it? Thanks!
 
Local time
2:20 AM
Joined
Aug 5, 2024
Messages
35
Reaction score
43
Location
Miami Beach, FL, USA
Any tips on how you did it? Thanks!
I’ll take a picture later. I barely removed any trim. Most of it was just pushed in and I kept all the extra wire in the passenger side pillar don’t know the technical term for it (the one with the front passenger seat belt mounted to it). There was a lot of space in that one. I started from the front (mirror) then did the back and kept the extra in that pillar.
 
Back
Top Bottom