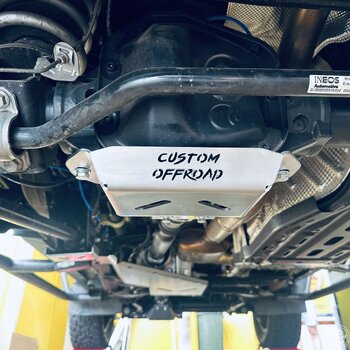
After installing the Custom Offroad Diff Protectors I drafted an install guide.

Read through all this Installation Guide before starting work. I suggest you install the front diff cover, then the rear diff cover.
INSTALLING THE FRONT DIFF PROTECTOR
Front diff cover, with protective plastic in place
Rear diff cover, with protective plastic in place
M12 bolts x 2. Specs are M12 x 1.5 (thread) x 30mm (bolt length). Use the 18mm socket/spanner. They are metric bolts and threads.
M10 bolts x 6. Specs are M10 x 1.5 (thread) x 25mm (bolt length). Use the 16mm socket/spanner. They are metric bolts and threads.
TOOLS NEEDED
Long nose pliers (to remove the plastic bungs on the Grenadier/QM)
18mm socket/spanner (M12 bolts)
16mm socket/spanner (M10 bolts)
Torque wrench
A mat to lay on, while under the car
Anti-galling agent (if you wish)
Metric tap and dye set (if needed)
BASH PLATES
@DenisM has also written up some installation tips for the Custom Offload Bash Plates here.

CUSTOM OFFROAD GRENADIER TRAILING ARM PROTECTORS
If you also bought the Custom Offroad Grenadier Trailing Arm Protectors you are supplied with four (4) bolts whose size is: M6 x 1 (thread) x 25mm (bolt length). 10mm socket/spanner for the M6 bolts. Tip: suggested torque setting for the M6 bolts is 10Nm.

Read through all this Installation Guide before starting work. I suggest you install the front diff cover, then the rear diff cover.
INSTALLING THE FRONT DIFF PROTECTOR
- Remove the plastic bungs from the pre-drilled holes on the FRONT diff on your Grenadier or Quartermaster. Tip: long nose pliers work well to remove the plastic bungs.
- Ensure all threads in the pre-drilled holes are clean. Tip: using a metric tap can clean away any debris. Warning: in Australia, the fine red dust can get past the plastic bung and deposit enough dust to clog up the thread. A bung can also fall out, allowing debris into the thread.
- Remove the protective plastic from the diff cover.
- Two M12 bolts and two M10 bolts are used to secure the FRONT diff cover. Tip: have within reach the FRONT diff cover, the needed bolts and your 16mm and 18mm sockets/spanners.
- Get under the car. Orientate the FRONT diff cover so the two M10 bolts holes close together face towards the back of the car, the two M12 bolt holes face the front of the car.
- While holding the diff cover in place, take a M12 bolt, washer and split washer and hand-tighten the bolt in place. Leave plenty of play. Next hand-tighten the second M12 bolt, again allowing play. Tip: it is good practice to use a suitable anti galling lubricant like Tel-Gel on all bolt threads. Tel-Gel stops corrosion, galling and seizing. It is non-toxic.
- Next hand-tighten the two M10 bolts in place. You need some play to ensure you get all four bolts inserted.
- Align the diff protector. Now ensure the FRONT diff protector is pushed towards the rear of the car as far as possible to ensure the stabiliser bar does not touch the protector.
- Fully tighten all four bolts. Tip: suggested torque setting for the M12 bolts is 77Nm and the M10 bolts is 44Nm.
- Remove the plastic bungs from the pre-drilled holes on the REAR diff on your Grenadier or Quartermaster. Tip: long nose pliers work well to remove the plastic bungs.
- Ensure all threads in the pre-drilled holes are clean.
- Remove the protective plastic from the diff cover.
- Four M10 bolts are used to secure the REAR diff cover. Tip: have within reach the REAR diff cover, the needed bolts and your 16mm socket.
- Get under the car. Orientate the REAR diff cover so the two M10 bolts holes close together face towards the front of the car.
- While holding the diff cover in place, take a M10 bolt, washer and split washer and hand-tighten the bolt in place. Leave plenty of play. Next hand-tighten the second M10 bolt, again allowing play. Tip: it is good practice to use a suitable anti galling lubricant on all bolt threads.
- Next hand-tighten the remaining two M10 bolts in place. You need some play to ensure you get all four bolts inserted.
- Once all bolts are hand-tightened and the diff cover aligned, fully tighten all bolts. Tip: suggested torque setting for the M10 bolts is 44Nm.
Front diff cover, with protective plastic in place
Rear diff cover, with protective plastic in place
M12 bolts x 2. Specs are M12 x 1.5 (thread) x 30mm (bolt length). Use the 18mm socket/spanner. They are metric bolts and threads.
M10 bolts x 6. Specs are M10 x 1.5 (thread) x 25mm (bolt length). Use the 16mm socket/spanner. They are metric bolts and threads.
TOOLS NEEDED
Long nose pliers (to remove the plastic bungs on the Grenadier/QM)
18mm socket/spanner (M12 bolts)
16mm socket/spanner (M10 bolts)
Torque wrench
A mat to lay on, while under the car
Anti-galling agent (if you wish)
Metric tap and dye set (if needed)
BASH PLATES
@DenisM has also written up some installation tips for the Custom Offload Bash Plates here.
CUSTOM OFFROAD GRENADIER TRAILING ARM PROTECTORS
If you also bought the Custom Offroad Grenadier Trailing Arm Protectors you are supplied with four (4) bolts whose size is: M6 x 1 (thread) x 25mm (bolt length). 10mm socket/spanner for the M6 bolts. Tip: suggested torque setting for the M6 bolts is 10Nm.
Last edited:


