The Grenadier Forum

Register a free account today to become a member! Once signed in, you'll be able to contribute to the community by adding your own topics, posts, and connect with other members through your own private inbox! INEOS Agents, Dealers or Commercial vendors please contact admin@theineosforum.com for a commercial account.

fixed air compressor

I like the location of the Owl bracket, its a clever use of that space. I’d rather run the trigger to INT1 and use that to tie to ignition. But then there will be the hole in the bracket where the switch should be which would look crappy, or just put the switch there without wiring it up. Maybe I can rig up a blank for that hole.
 
My solution:
Outlet and switch under the rear seats left and right (next weekends work):
IMG_3607.JPG
 
The ARB twin should be wired directly to the starter battery. This is because the alternator supplies currently directly to the starter battery and the engine should always be running when using the compressor. It can draw 80amps when under load which is very high current. If it is wired to the auxiliary battery then it is a longer current path as power from the alternator has to first go through the starter battery before reaching the auxiliary via the Ctek combiner. I don't know the position of the starter battery in right hand drive Grenadiers. It is behind the driver in left hand drive versions.

so you don't use the trialmaster's stock wiring that is on the top button panel?

I would like to install an ARB KCMA12 with a small tank and place them on the bisongear roof shelf soon.

I'm not very familiar with electricity so I would need detailed instructions on where and how to connect it.

thanks
 

Attachments

  • IMG_4769.jpg
    IMG_4769.jpg
    4.9 MB · Views: 16
  • Screenshot 2025-02-04 alle 16.50.27.png
    Screenshot 2025-02-04 alle 16.50.27.png
    1.1 MB · Views: 15
so you don't use the trialmaster's stock wiring that is on the top button panel?

I would like to install an ARB KCMA12 with a small tank and place them on the bisongear roof shelf soon.

I'm not very familiar with electricity so I would need detailed instructions on where and how to connect it.

thanks
So the power for the compressor aboslutely needs to come from the battery. Each ARB compressor draws 40 amps (so 80 amps for the dual compressor) and those switches are either 10 or 25 amps each. 80 amps is very high draw and you do want the engine running when airing up.

ARB compressors have trigger wires though that control whether the compressor is switched on or not. That can be wired to one of the overhead switches. I used INT1 for my under driver seat installation.
 
ARB compressors have trigger wires though that control whether the compressor is switched on or not. That can be wired to one of the overhead switches. I used INT1 for my under driver seat installation.

ok, let's see if I understood correctly:

with the CKMA12 compressor come two bundles of cables. the shorter one is used to activate the differential locks so it is not needed.

the longer wiring must be connected:

1) relay (supplied)
1 - relè.png


2) compressor power supply
2 - alimentazione compressore.png


3) pressure switch (supplied)
3 - pressostato.png


4) switch.
Do you connect the black and red cables to the original wiring on the passenger footwell instead of the ARB switch? Is this correct?
Connection: black => black and red => purple?
what cable section do you recommend in mmq for the connection?
In this way the compressor will be activated with the INT1 switch.
4a - switch.png

4b - switch.png

4bb - switch.png

4d - switch.png


5) battery. you connect to the starter battery.
are there two cables connected to the negative pole right?
what cable section do you recommend in mmq for the connection?
5 - battery.png

5b - battery.jpg


thanks


ps.
information taken from these two videos:
View: https://www.youtube.com/watch?v=S9yOAamRmJg

View: https://www.youtube.com/watch?v=A3qY4CrDonw
 
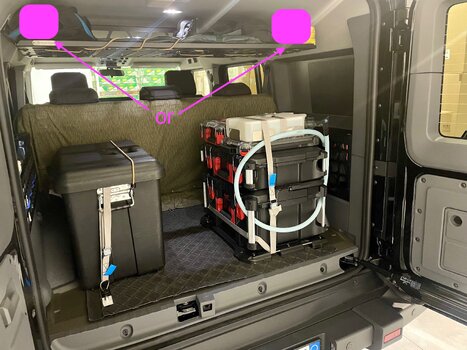
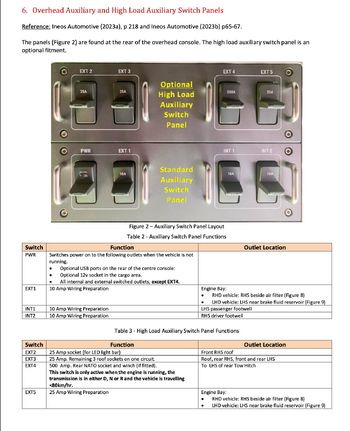
From the bundled ARB switch wiring loom, you only need the purple and black to connect to the INT1 outlet in the footwell.

As a caveat, I don't have the aux battery so I cant help you there with specifics. What I would do if I did was disconnect the aux battery from the starter first before doing anything else.

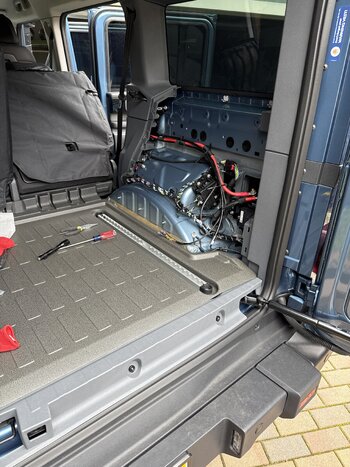
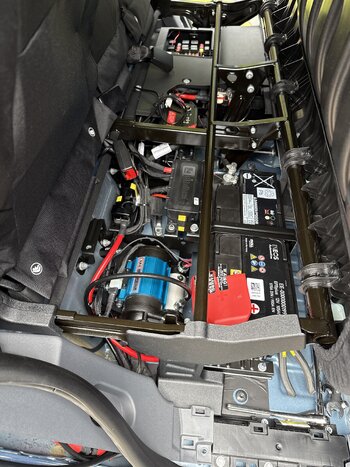
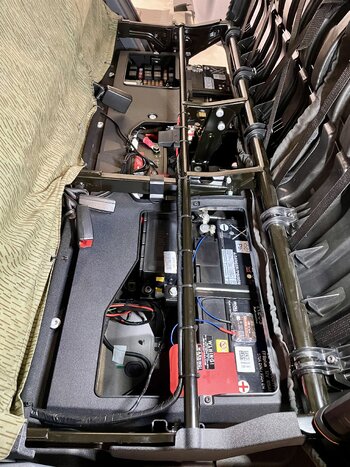
As for the power, the big red fused cable(s) should go straight to the starter battery positive terminal. The black negatives can go to any ground. There is a suitable ground under the floormat in the left rear passenger area, right behind the LHD driver seat and in front of the starter battery. Here is an install video from Owl outdoors which shows the wiring to the battery and ground:
View: https://youtu.be/sF_Fb0NIuzA


Important: Make sure you respect the process to safely disconnect the starter battery before disconnecting the negative. Open the doors and wait ~15 minutes until all the lights turn off to be sure the vehicle is fully in sleep mode, then disconnect the negative terminal.
 
Back
Top Bottom