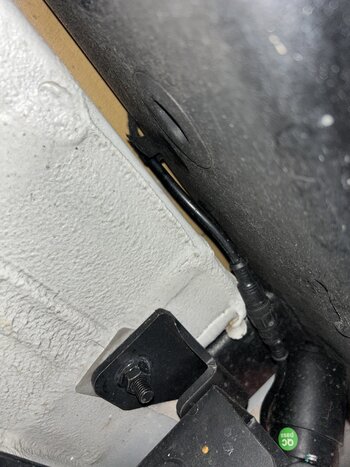
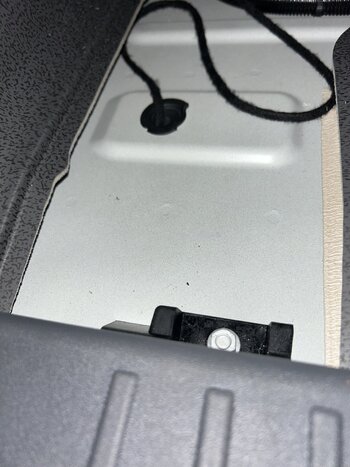
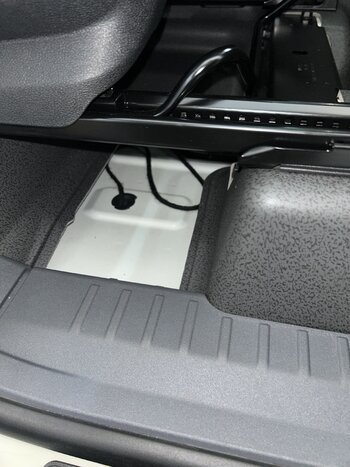
Great thanks for that, it was my plan so thanks for confirming this, I meant grommet not the drain hole sorry. I didn’t get the LED version, I bought the embossed GRENADIER version, they look fantastic. Does the LED look good?I didn't want to use the drain so I used a grommet in the rearseat floor closer to the door. The wires then come out closer to the motor and closer to the sill under for more protection. If you have the LED version install the steps with the cable to the rear (note: the endplate is removeable and there is more cable inside that can be pulled out for an exact length). I used the rearseat earth and power from under the rearseat so only the CANBUS cable had to go forward
The Grenadier Forum
Register a free account today to become a member! Once signed in, you'll be able to contribute to the community by adding your own topics, posts, and connect with other members through your own private inbox! INEOS Agents, Dealers or Commercial vendors please contact admin@theineosforum.com for a commercial account.
You are using an out of date browser. It may not display this or other websites correctly.
You should upgrade or use an alternative browser.
You should upgrade or use an alternative browser.
Australasia Electric Side Steps
- Thread starter Znarfgh
- Start date
-
- Tags
- side side steps steps
The video does show them using the rear seat drain hole but the grommet near the door is better. Yep the lights are great all programmable. My main plan for the LED was for ambient lighting at campsite but they are helpful (and fun). I will be at the BNE Xmas party if you want to see them on the 30th NovGreat thanks for that, it was my plan so thanks for confirming this, I meant grommet not the drain hole sorry. I didn’t get the LED version, I bought the embossed GRENADIER version, they look fantastic. Does the LED look good?
Yes I saw the Xmas party was on, just a busy time of the year but I am hoping to make it.The video does show them using the rear seat drain hole but the grommet near the door is better. Yep the lights are great all programmable. My main plan for the LED was for ambient lighting at campsite but they are helpful (and fun). I will be at the BNE Xmas party if you want to see them on the 30th Nov
Just would like to thank members for posting useful notes on their experiences installing the Summer Auto electric side steps, it really helped as the installation manual is pretty hopeless
Very impressed with the quality and dealings with Summer Auto in general.
I have the LED version and the only head scratch was when initially wired up the drivers door would drop the passenger step but the rear drivers door would drop the driver step thanks @Chook for the steer in your post, change the rudder in the app and swap the L to R wires at the white plugs and that sorted it.
The extra wire for the LED driver that is rolled up in the end cap (remove 2 Philips screws) to get the extra length needed to reach the middle motor bracket, again thanks @Chook
Lining up the step so it is parallel height and gap with the plastic seal cover took a couple of goes, so make sure you are happy before finally fitting the plastic trim.
This is a RHD install.
Very impressed with the quality and dealings with Summer Auto in general.
I have the LED version and the only head scratch was when initially wired up the drivers door would drop the passenger step but the rear drivers door would drop the driver step
The extra wire for the LED driver that is rolled up in the end cap (remove 2 Philips screws) to get the extra length needed to reach the middle motor bracket, again thanks @Chook
Lining up the step so it is parallel height and gap with the plastic seal cover took a couple of goes, so make sure you are happy before finally fitting the plastic trim.
This is a RHD install.
Last edited:
Thank you for your liking of our steps,if you have any questions can contact me,I will help you solve. Like many customers on this forum, I have provided installation help for most of them.Just would like to thank members for posting useful notes on their experiences installing the Summer Auto electric side steps, it really helped as the installation manual is pretty hopeless
Very impressed with the quality and dealings with Summer Auto in general.
I have the LED version and the only head scratch was when initially wired up the drivers door would drop the passenger step but the rear drivers door would drop the driver stepthanks @Chook for the steer in your post, change the rudder in the app and swap the L to R wires at the white plugs and that sorted it.
The extra wire for the LED driver that is rolled up in the end cap (remove 2 Philips screws) to get the extra length needed to reach the middle motor bracket, again thanks @Chook
Lining up the step so it is parallel height and gap with the plastic seal cover took a couple of goes, so make sure you are happy before finally fitting the plastic trim.
This is a RHD install.
View attachment 7882880
We not only provide excellent quality products, but also provide the best service.
So the people that said they can install it for me are too scared to do it because of the bottom trim cuts that are required for the install.
Should I just do this myself? I know I'll do the best job if I have all the right supplies but I figured a shop with a vehicle lift would make this child's play
Anyone have any fitters in DFW that do good work?
Should I just do this myself? I know I'll do the best job if I have all the right supplies but I figured a shop with a vehicle lift would make this child's play
Anyone have any fitters in DFW that do good work?
The install is really straight forward and easy to do...use a Dremel Tool for the cuts. Simply mark the spots with a sharpie marker and cut to fit. The cuts are pretty much hidden and the plastic trim piece pops/snaps right back in.So the people that said they can install it for me are too scared to do it because of the bottom trim cuts that are required for the install.
Should I just do this myself? I know I'll do the best job if I have all the right supplies but I figured a shop with a vehicle lift would make this child's play
Anyone have any fitters in DFW that do good work?
Yeah I started last night. Had to stop after an hour and a half but I got one side fitted. The only part that takes forever is putting holes in the rubber seals since I didnt have a decent knife at the house. Does anyone have a really good diagram on how they wired the motors? There's two connectors there and the guide is essentially useless.
The install is really straight forward and easy to do...use a Dremel Tool for the cuts. Simply mark the spots with a sharpie marker and cut to fit. The cuts are pretty much hidden and the plastic trim piece pops/snaps right back in.
I have the LED version. So you're saying to install the footplates with the plug at the end facing the rear of the vehicle? So you run everything through the middle row? Can you send a photo of where you plugged everything in under the rear seats? I'm doing the install today and I put the LED cable going forward.. but I can easily swap
I didn't want to use the drain so I used a grommet in the rearseat floor closer to the door. The wires then come out closer to the motor and closer to the sill under for more protection. If you have the LED version install the steps with the cable to the rear (note: the endplate is removeable and there is more cable inside that can be pulled out for an exact length). I used the rearseat earth and power from under the rearseat so only the CANBUS cable had to go forward
Not sure of I am answering your question, "wiring motors" but I ran the wires down the driver side door channels in the cab. I then cut across the rear of the driver side seat to the passenger side. Then fished the wires through the rubber grommet directly under the passenger seat. Lastly, wired it up to the motor. I used the rubber grommets under the seats on both the driver and passenger seats to get the wires to the motor, this preserves the drain plugs and still keeps a seal with the grommets.
Attachments
Okay I got everything installed. Now I have a fun error. The lights will turn on if I manually open and shut the footplates. But if I open the doors, the footplates come down but no lights
Check your app (and the lights the other side) I had to change a setting in the app and swap a connection inside to get the right sequenceOkay I got everything installed. Now I have a fun error. The lights will turn on if I manually open and shut the footplates. But if I open the doors, the footplates come down but no lights
Which setting did you have to change? I noticed that every time I leave the car for more than 30ish min, the system defaults to a fresh install.
I changed the password and when I got back in the car the password and settings had reverted back to new.
I changed the password and when I got back in the car the password and settings had reverted back to new.
Check your app (and the lights the other side) I had to change a setting in the app and swap a connection inside to get the right sequence
Found the solution.
While in the app, you set all the LED settings you like, color, etc. THEN you must hit the gear icon and go into "save changes". It doesn't automatically save the changes to the leds once you change them. You have to go into the sub menu and save them. You can get the gear icon to appear by tapping on the screen a few times and it will appear in the top right.
While in the app, you set all the LED settings you like, color, etc. THEN you must hit the gear icon and go into "save changes". It doesn't automatically save the changes to the leds once you change them. You have to go into the sub menu and save them. You can get the gear icon to appear by tapping on the screen a few times and it will appear in the top right.
Which setting did you have to change? I noticed that every time I leave the car for more than 30ish min, the system defaults to a fresh install.
I changed the password and when I got back in the car the password and settings had reverted back to new.
For mine I also had to change other settings (Rudder or Mirror I can't remember) and switch the L/R connector as opening the RHS door would drop the LHS stepFound the solution.
While in the app, you set all the LED settings you like, color, etc. THEN you must hit the gear icon and go into "save changes". It doesn't automatically save the changes to the leds once you change them. You have to go into the sub menu and save them. You can get the gear icon to appear by tapping on the screen a few times and it will appear in the top right.


