The Grenadier Forum
Register Now for enhanced site access.
INEOS Agents, Dealers or Commercial vendors please contact admin@theineosforum.com for a commercial account.

DIY halogen aux lights...no-cut

Korg

Grenadier Owner
Lifetime Supporter
Local time
1:13 AM
Joined
Dec 25, 2022
Messages
117
Reaction score
137
Location
Warrawee NSW, Australia
Hi all,

Some help from the community is requested - pretty please!

I have installed the Baja Off-Road Lights and they are awesome. Initially I have installed them using the 25Amp auxiliary power feed under the bonnet switched by EXT5. As I also wired them in using a relay switched by the power to the "old" OEM lights they come on with high beam so long as the aux light button is pressed along with EXT5. Upon reflection it would be better not to use EXT5 but to power the relay directly from a fused connection to power. As per the photos below I would like to use one of the +ve poles of the device in the attached photo but would like community advice prior to doing this. By the way the Baja lights are brilliant (literally) but beware that the labelling of "drivers side" and "passenger side" are incorrect for right hand drive markets and if followed will result in a car that looks cross-eyed!

The install took awhile (6 hours) with the removal and replacement of around 48 bolts including forgetting which bolts went where, having to remove the UHF ariel on the roo bar, dropping bolts into inaccessible places, removal of roo bar etc. etc. but the lights are worth the hassle.

The first photo is for context of the location under bonnet, the second is the device in question.
Under Bonnet.jpg
What is this.jpg

Of course I could refer to the online 3D manual and wiring diagram....if it existed.
 

MrMike

Lifetime Supporter
Local time
1:13 AM
Joined
Nov 25, 2022
Messages
1,667
Reaction score
2,515
Location
Australia
Hi all,

Some help from the community is requested - pretty please!

I have installed the Baja Off-Road Lights and they are awesome. Initially I have installed them using the 25Amp auxiliary power feed under the bonnet switched by EXT5. As I also wired them in using a relay switched by the power to the "old" OEM lights they come on with high beam so long as the aux light button is pressed along with EXT5. Upon reflection it would be better not to use EXT5 but to power the relay directly from a fused connection to power. As per the photos below I would like to use one of the +ve poles of the device in the attached photo but would like community advice prior to doing this. By the way the Baja lights are brilliant (literally) but beware that the labelling of "drivers side" and "passenger side" are incorrect for right hand drive markets and if followed will result in a car that looks cross-eyed!

The install took awhile (6 hours) with the removal and replacement of around 48 bolts including forgetting which bolts went where, having to remove the UHF ariel on the roo bar, dropping bolts into inaccessible places, removal of roo bar etc. etc. but the lights are worth the hassle.

The first photo is for context of the location under bonnet, the second is the device in question.
View attachment 7864375View attachment 7864376
Of course I could refer to the online 3D manual and wiring diagram....if it existed.
I have a feeling it's the winch fuse, from memory it has been mentioned previously
 

TinTin2023

Grenadier Owner
Lifetime Supporter
Local time
6:13 PM
Joined
Oct 20, 2023
Messages
21
Reaction score
28
Location
Hamburg, Deutschland
Hi all,

Some help from the community is requested - pretty please!

I have installed the Baja Off-Road Lights and they are awesome. Initially I have installed them using the 25Amp auxiliary power feed under the bonnet switched by EXT5. As I also wired them in using a relay switched by the power to the "old" OEM lights they come on with high beam so long as the aux light button is pressed along with EXT5. Upon reflection it would be better not to use EXT5 but to power the relay directly from a fused connection to power. As per the photos below I would like to use one of the +ve poles of the device in the attached photo but would like community advice prior to doing this. By the way the Baja lights are brilliant (literally) but beware that the labelling of "drivers side" and "passenger side" are incorrect for right hand drive markets and if followed will result in a car that looks cross-eyed!

The install took awhile (6 hours) with the removal and replacement of around 48 bolts including forgetting which bolts went where, having to remove the UHF ariel on the roo bar, dropping bolts into inaccessible places, removal of roo bar etc. etc. but the lights are worth the hassle.

The first photo is for context of the location under bonnet, the second is the device in question.
View attachment 7864375View attachment 7864376
Of course I could refer to the online 3D manual and wiring diagram....if it existed.
Hi Korg,


I just stumbled across your question and was wondering if anyone could give us some tips or point us to a similar thread as I'm about to do a similar setup with different lights.

I would need to find a place where I can connect two relays (12V 40Amp fuse) to the battery + and - as well to the grill light switch somewhere in the engine bay.

If you're wondering why two relays are used, it's because the manufacturer suggests two use 1 relay for two lights and I end up with 4.


Thanks and best regards
 

Korg

Grenadier Owner
Lifetime Supporter
Local time
1:13 AM
Joined
Dec 25, 2022
Messages
117
Reaction score
137
Location
Warrawee NSW, Australia
Hi TinTin,

Late reply - apologies.
I used 1 relay only - connected the power from the original spot light wiring at the front grill to activate the 25amp under the bonnet to power the replacement spot lights. Relay is positioned next to the 25amp feed under the bonnet.

Regards
 

TinTin2023

Grenadier Owner
Lifetime Supporter
Local time
6:13 PM
Joined
Oct 20, 2023
Messages
21
Reaction score
28
Location
Hamburg, Deutschland
Hi Korg,

Thanks for your reply. I decided in the meantime to have it done in my workshop and support them with DIY mounting brackets and drill guides for easy installation.
Electric is something im not familiar with so its better for me its done by the experts ;-)

But thank you very much for your efforts. Greetings to Australia
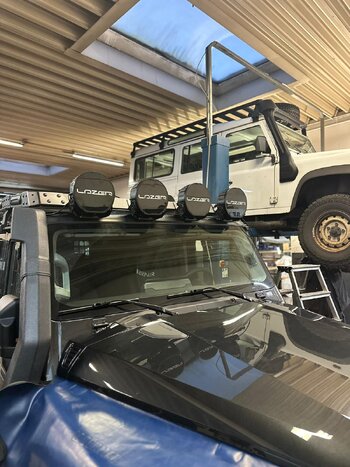
Here the result of 4x 9" Sentinel fresh out of the workshop. Mounting to the HGM Roofrack with custom made adapter brackets to lower the mountpoint. The Workshop will put the wires through the snorcle an connect them to the high beam and adds an interuption switch. So i have some options: normal high beam, high beem all Lamps (standard+grill+lazer), and also only the Lazerlamps seperately. As they are defined as working lights i cannot leagaly operate them in high beam mode. But this way i have all possibilitys. If you like to have some infos or need the drwing for this projekt let me know. Im happy to help. cheers!
 

Attachments

  • 74333609-bc28-49cc-b257-2bc6ebcb254a.jpeg
    74333609-bc28-49cc-b257-2bc6ebcb254a.jpeg
    329.5 KB · Views: 13
Back
Top Bottom