good steer, job done!
The Grenadier Forum
Register a free account today to become a member! Once signed in, you'll be able to contribute to the community by adding your own topics, posts, and connect with other members through your own private inbox! INEOS Agents, Dealers or Commercial vendors please use the contact us link at the bottom of the page.
-
Guest submit your best shot for a chance to win the December Photo Contest. Photo Contest Click Here
You are using an out of date browser. It may not display this or other websites correctly.
You should upgrade or use an alternative browser.
You should upgrade or use an alternative browser.
Auxiliary Lights in the Grill - High Power LED light upgrade without any cutting (now available on the Forum Store)
- Thread starter BenTN
- Start date
Katpa99pod, here is a link to the manufacturer website. Baja Design lights are considered the best available in the USA. The website has a pretty detailed ELS score to read how they rate their lights. Distance to 10 lux is 392ft.Hi Strib81,
Do you know any specs as can't find online....chasing output watts, distance for 1lux. Also are they quality led's??
Thanks, Terry

XL-R 80 LED Auxiliary Light Pod Pair - Universal - Baja Designs - Off-Road LED & Laser Lights | Automotive, Jeep, Truck, UTV, ADV, Dirtbike
Baja Designs offers high performance LED lights and light bars for off road trucks, UTVs, and ATVs. Baja Designs is The Scientists of Lighting, contact us today for more info!
Hope that helps.
Just purchased the brackets. Out of curiosity, what do you estimate the install time would be?
Allow yourself 2 hours for the mechanical install if you haven't ever had your grill loose. You will want to take a few pauses to ponder things as you go. I can do it in 30mins but I've done about 6 installs now while testing various lights/brackets. Don't rush though, you are more likely to break something.
The electrical/wiring install is more of a wildcard, depending on how you want to do it. Could be 15mins if you tap right into one of the overhead switch circuits. Or you could get creative and spend hours creating a relay trigger via the high-beam circuit.
Last edited:
When in doubt, put each set of screws in little ziploc bags and tape them to the sections they came from. You may want to mark the two long screws per side to note their positions in the bezels.
Thanks appreciate it. I actually think I am going to wire mine into the a separate switch panel i installed. thanks for your work and efforts in this. I think the lights look great.Allow yourself 2 hours for the mechanical install if you haven't ever had your grill loose. You will want to take a few pauses to ponder things as you go. I can do it in 30mins but I've done about 6 installs now while testing various lights/brackets. Don't rush though, you will likely break something.
The electrical/wiring install is more of a wildcard, depending on how you want to do it. Could be 15mins if you tap right into one of the overhead switch circuits. Or you could get creative and spend hours creating a relay trigger via the high-beam circuit.
Switchpro?Thanks appreciate it. I actually think I am going to wire mine into the a separate switch panel i installed. thanks for your work and efforts in this. I think the lights look great.
I actually had an extra 6 gang AuxBeam switch panel. I have used those in the past in my FJ and in a Conquerer Trailer I have.....they aways have worked well.Switchpro?
ThanksKatpa99pod, here is a link to the manufacturer website. Baja Design lights are considered the best available in the USA. The website has a pretty detailed ELS score to read how they rate their lights. Distance to 10 lux is 392ft.

XL-R 80 LED Auxiliary Light Pod Pair - Universal - Baja Designs - Off-Road LED & Laser Lights | Automotive, Jeep, Truck, UTV, ADV, Dirtbike
Baja Designs offers high performance LED lights and light bars for off road trucks, UTVs, and ATVs. Baja Designs is The Scientists of Lighting, contact us today for more info!www.bajadesigns.com
Hope that helps.
- Local time
- 2:18 PM
- Joined
- Jun 17, 2022
- Messages
- 6
sorry I am so late to this thread but did this progress to a bracket being made for the masses?
sorry I am so late to this thread but did this progress to a bracket being made for the masses?

GW Grenadier Accessories
Enhance the ownership experience of your INEOS Grenadier with these aftermarket parts brought to you by the INEOSforum.com and its own RatWorks.
grenadierworks.com
I wanted to add additional driving lights, trigger from overhead headbeam switch. Can you share bit more details about how did you get accees to overhaed trigger switch and power from engine bay.Having received the Exzeit lights and brackets ( thanks to Stu_Barnes) in the last few days, today was installation day. As I'm in the UK, the aux lights are activated via the overhead switch and power up on full beam. I decided that any install of replacement aux lights would need to replicate this. The Exzeits had to be ordered via Amazon US but were delivered for a very reasonable £89GBP all in. Compared to the stock aux lights they are great quality, well built, and come with clear and amber lens covers which are easily clipped into place. The Exzeits also come with a good quality wiring harness, with power fuse and the relay all wired up ready to go. This made the install relatively easy from a wiring point of view.
First step was tilting the grill forward as per the video instructions. It is important to remember where the various screws come from for reassembly so I took some pictures along the way in case of any brain fade. The stock lights are held in by the 3 prong rubber grommets. Unfortunately I managed to break some of the fixings on the stock lights pulling them out but as I wont be going back to stock its okay.
The Grenadier Works brackets and fitments are absolutely spot on and everyting assembles together perfectly.
So, to the wiring. Looking at the front of the vehicle, I just taped up the right hand original aux connector and tie wrapped it out of the way. As all my electrical connections were to remain on the left side, I snipped the stock left hand side aux light connector off and retained the blue and white wire as my signal wire to go to the relay. The Exzeit kit is supplied with an on/off switch to install in the cab, but as i will be using the overhead switch and full beam as the trigger I removed the connector and connected the remaining wires as follows:
View attachment 7865851
The lights are powered from the following locations on the left side of the engine bay. I didnt make any further alterations to the wiring harness and the relay is just bolted to the side using an existing bolt and a new nut. There's loads of excess cable, but I just tie wrapped it up and tucked it away. I might get round to tidying that up later.
View attachment 7865852
With everything working as it should, I bolted the grill back and thankfully didn't break or lose anything in the process.
View attachment 7865853
View attachment 7865854
View attachment 7865855
So in summary, I'm extremely happy with the brackets and lights. Given the very reasonable cost and the improvement over the stock lights, I would rate it as my best modification to date. Thanks again to all involved in the design and initial testing!
Thank you.
Last edited:
You did a really great job! They look awesome! Please let me know if you ever have any of those brackets for purchase.Like many others I was disappointed in the stock aux. lights in the grill of my Grenadier. I'm sure there were various regulations that limited what could legally be mounted there from the factory, but the light output is just pointless. I don't think I would ever use them, especially with the hassle of putting the car in offroad mode first (I'm in North America).
I decided to find a way to mount a modern high-power pair of LEDs in the stock location, without the need to do any cutting of the grill. I've seen a few kits out there but they all have hefty price tags and require cutting. I don't want to hack up the front end of my car if I don't have to.
Turns out the aux. lights installed at the factory are a PAR46 style lamp, which is a standard 5.75in diameter light housing size. The Grenadier lights are a 7.4Watt lamp, which is literally 10% the power of many modern LED pod lights. No wonder they are useless. There are a million aftermarket headlights available in this PAR46 size, and plenty of them are LED. However the Grenadier aux lights feature a unique triple mount boss in the rear that snaps into some grommets in the grill buckets (plastic dish behind the lamps). There does not seem to be any other light available that will mount in this same way.
I considered fashioning a bracket that would secure a modern PAR46 lamp in there, but ultimately decided that I didn't really want a redundant set of headlights on the car. I wanted something more powerful like a off-road pod light. The problem is that 5in (127mm) is a slightly unusual size for round pod lights.
After way too much time searching I found a good candidate in a 5in round pod light rated 80W per lamp with a combo (spot + flood) lens. These rugged lights include wiring, nice sealed connectors, and relay as part of the package, all for an unbelievable $80 on Amazon. Note that this pair of lights draws >13 amps, so the standard ceiling-mounted 10 amp upfitter switches will not work directly, requiring a relay in the circuit to switch the high current.
After some measuring and CAD work, I created the sheetmetal bracket design shown in the pics attached here. This bracket secures the light pods at their designed attachment/aiming points, and bolts directly into the holes that mounted the original aux lights in the Grenadier grill bucket. No cutting required. Best of all the original bezel fits around these lights and attaches right back into place. The final result looks like it could have come from the factory, in my opinion.
View attachment 7848899
In use these lights are bright AF. They provide the overwhelming light intensity I was looking for and switching them on from the ceiling-mounted 25 amp switch makes me feel like a helicopter pilot every time. They don't seem to generate a worrisome amount of heat.
The lights I used: Exzeit "LML-5064B"
I want to make a few more tweaks to the bracket design, then I will probably have a batch made. I plan to send a few sets out for people to try.
These lights are an amazing value, but honestly I was hoping to find a good light pod from a well-known quality brand like KC HiLites or Baja Designs or Diode Dynamics. Maybe someone can do some research and find one that fits the criteria:
- 5 inch (127mm) outside diameter or a little less
- 3 in (76mm) total depth or less would be nice
- mount bosses near rear of light (not protruding from bottom)
- 120 Watts or more power rating is ideal
I hope to find another light model (or two) to design brackets for. If people don't mind losing the round bezel around the lights then there are lots of options that will work. There are some downsides to that, though.
If there is sufficient interest we might talk Stu into running a batch of these mounts and offering kits to forum members through the forum store.
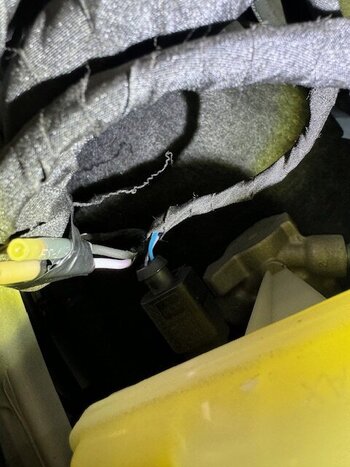
The harness end you want ( if you have the overhead aux swtich EXT 5 ) is located next to the brake fluid reservior, purple & black wires.I wanted to add additional driving lights, trigger from overhead headbeam switch. Can you share bit more details about how did you get accees to overhaed trigger switch and power from engine bay.
Thank you.
Thank you!You did a really great job! They look awesome! Please let me know if you ever have any of those brackets for purchase.
The brackets have been produced and are now available in the forum store.
Click on "Grenadier Works" in the upper RH corner of the forum page.
I wanted to add additional driving lights, trigger from overhead headbeam switch. Can you share bit more details about how did you get accees to overhaed trigger switch and power from engine bay.
Thank you.
Attachments
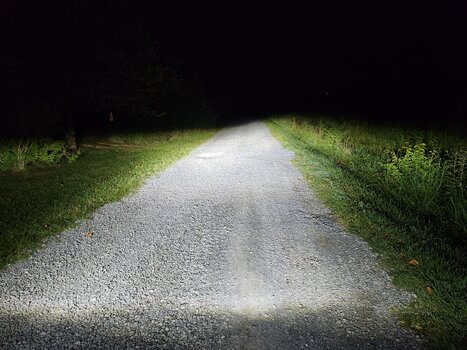
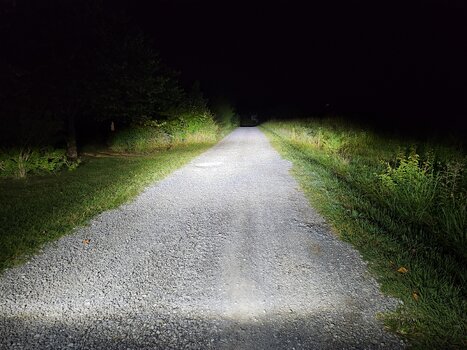
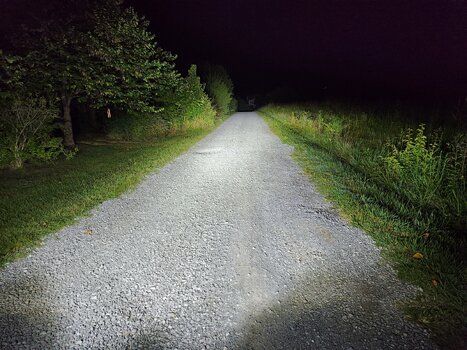
Has anyone got some night time photos for comparison factory to exzeit lights? I know the factory setup is not much better then hi beams
These aren't a great comparison, but it is what I have: Factory Low Beams vs Factory High Beams vs High Beams plus ExzeitHas anyone got some night time photos for comparison factory to exzeit lights? I know the factory setup is not much better then hi beams
Honestly this doesn't do it justice. The Exzeits are a wide flood pattern and they light up the trees overhead very nicely. The difference in total light right in front of you is pretty dramatic, but the broad coverage is the real advantage off road.
Factory Low Beams:

Factory High Beams (Left), High Beams plus Exzeit (Right):


That house in the center distance is about 1/4mi away.
Last edited:
EXT5 wire colors? Does anyone know?
Also, you can wire the lights directly to this lead...and the EXT5 switch triggers a relay to power this lead? Correct?
Just wanna check to make sure...thanks.
Also, you can wire the lights directly to this lead...and the EXT5 switch triggers a relay to power this lead? Correct?
Just wanna check to make sure...thanks.
Similar threads
- Replies
- 8
- Views
- 659
- Replies
- 6
- Views
- 372
- Replies
- 7
- Views
- 400
- Replies
- 10
- Views
- 1K
- Question
- Replies
- 18
- Views
- 989


