The Grenadier Forum
Register Now for enhanced site access.
INEOS Agents, Dealers or Commercial vendors please contact admin@theineosforum.com for a commercial account.

Auxiliary Lights in the Grill - High Power LED light upgrade without any cutting (now available on the Forum Store)

destination_tbd

Grenadier Owner
Local time
3:55 AM
Joined
Jun 16, 2024
Messages
4
Reaction score
27
Location
Melbourne VIC, Australia
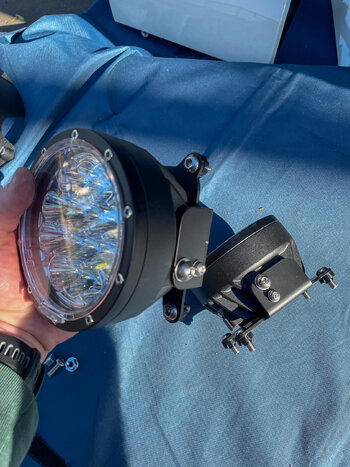
Having received the Exzeit lights and brackets ( thanks to Stu_Barnes) in the last few days, today was installation day. As I'm in the UK, the aux lights are activated via the overhead switch and power up on full beam. I decided that any install of replacement aux lights would need to replicate this. The Exzeits had to be ordered via Amazon US but were delivered for a very reasonable £89GBP all in. Compared to the stock aux lights they are great quality, well built, and come with clear and amber lens covers which are easily clipped into place. The Exzeits also come with a good quality wiring harness, with power fuse and the relay all wired up ready to go. This made the install relatively easy from a wiring point of view.
First step was tilting the grill forward as per the video instructions. It is important to remember where the various screws come from for reassembly so I took some pictures along the way in case of any brain fade. The stock lights are held in by the 3 prong rubber grommets. Unfortunately I managed to break some of the fixings on the stock lights pulling them out but as I wont be going back to stock its okay.
The Grenadier Works brackets and fitments are absolutely spot on and everything assembles together perfectly.
So, to the wiring. Looking at the front of the vehicle, I just taped up the right hand original aux connector and tie wrapped it out of the way. As all my electrical connections were to remain on the left side, I snipped the stock left hand side aux light connector off and retained the blue and white wire as my signal wire to go to the relay. The Exzeit kit is supplied with an on/off switch to install in the cab, but as i will be using the overhead switch and full beam as the trigger I removed the connector and connected the remaining wires as follows:

View attachment 7865851

The lights are powered from the following locations on the left side of the engine bay. I didnt make any further alterations to the wiring harness and the relay is just bolted to the side using an existing bolt and a new nut. There's loads of excess cable, but I just tie wrapped it up and tucked it away. I might get round to tidying that up later.

View attachment 7865852

With everything working as it should, I bolted the grill back and thankfully didn't break or lose anything in the process.
View attachment 7865853

View attachment 7865854

View attachment 7865855

So in summary, I'm extremely happy with the brackets and lights. Given the very reasonable cost and the improvement over the stock lights, I would rate it as my best modification to date. Thanks again to all involved in the design and initial testing!
Hi Riversides, thanks a lot for the detailed description and congrats of the success of your install. The Exzeit lights look awesome!

For the operation of your lights I do have one question - with powering them through the fused harness of the new lights to the 150A CB (in picture) - do they still operate in the traditional fashion of selecting the existing O/H switch + turning on your high beam, or do they simply turn on every time you use your high beam? To me, that potentially looks like a great way to reserve the 25A O/H switch for something else in the future - perhaps more lights ;)
 

Phred

Grenadier Owner
Lifetime Supporter
Local time
1:55 PM
Joined
Jul 2, 2024
Messages
62
Reaction score
69
Location
Doylestown, PA, USA
Hi Riversides, thanks a lot for the detailed description and congrats of the success of your install. The Exzeit lights look awesome!

For the operation of your lights I do have one question - with powering them through the fused harness of the new lights to the 150A CB (in picture) - do they still operate in the traditional fashion of selecting the existing O/H switch + turning on your high beam, or do they simply turn on every time you use your high beam? To me, that potentially looks like a great way to reserve the 25A O/H switch for something else in the future - perhaps more lights ;)
I see a few ways you could wire these:

1) The lights come with a supplied relay.
2) You could use the existing lights power to energize the relay and wire new lights power to battery terminal in engine compartment. This would preserve the high beam function and utilize the off-road switch in cabin. EXT1 & 5 both still available.
3) Not use the relay in light kit and wire directly to EXT5. Off-road switch abandoned.
4) Use light kit relay and use EXT1 switch to activate relay and wire lights power to battery terminal in engine compartment. This would save EXT5 for future use and bypass the high beam requirement. Off-road switch would be abandoned.
 

destination_tbd

Grenadier Owner
Local time
3:55 AM
Joined
Jun 16, 2024
Messages
4
Reaction score
27
Location
Melbourne VIC, Australia
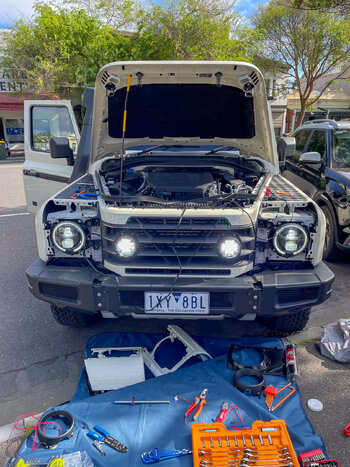
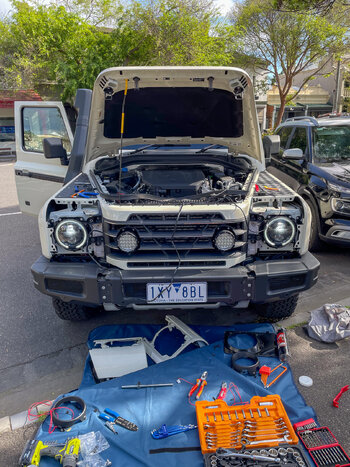
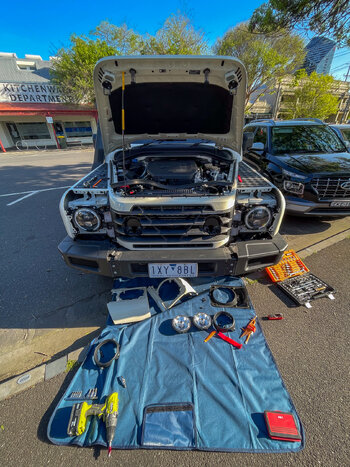
I allocated this morning to dive in and install the Exzeit spotlights using the Auxiliary light mount kit I purchased from the Grenadier Works store.

The installation itself was pretty straight forward and well documented in the instructions provided. I have the Roo Hoops on our IG and removed them completely for the process. I was able to do this alone and they weren't too heavy for one person to handle.

For the electrical, I followed a similar process as @Riversides (thanks for the detailed write up!) as I wanted to continue to be able to use the existing Auxiliary light switch in the O/H panel (in AU we don't have to select the Off-road switch for the Auxiliary lights to work) and also trigger the Auxiliary lights On/ Off together with the high beam driving lights as we do a lot of regional & country driving.

I did shorten the wiring harness that came with the Exzeit LED lights by approx. 1200mm before the final installation, and also used the individual blue wire from the existing righthand wiring harness as the trigger wire to the relay.

Total installation (including adjusting the wiring harness) took me approx. 4 hours.

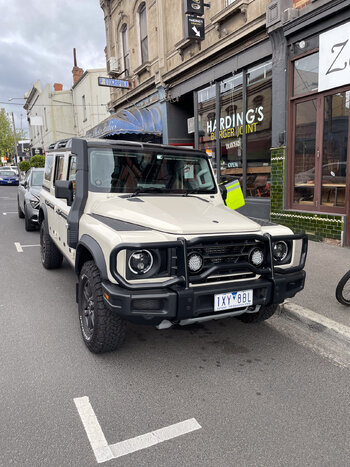
The lights themselves are a major upgrade to the OEM spotlights. Certainly well worth the effort/ investment - especially with being able to conserve the original look and design of the Grenadier.

Big thanks to @Stu_Barnes + @BenTN for making such a great product available for us all to enjoy! Everything fit seamlessly.
 

Attachments

  • IMG_4117.jpg
    IMG_4117.jpg
    1.5 MB · Views: 65
  • IMG_4121.jpg
    IMG_4121.jpg
    1.4 MB · Views: 61
  • IMG_4122.jpg
    IMG_4122.jpg
    1.3 MB · Views: 58
  • IMG_4123.jpg
    IMG_4123.jpg
    1.4 MB · Views: 61
  • IMG_4124.jpg
    IMG_4124.jpg
    1.2 MB · Views: 63
Last edited:

Phred

Grenadier Owner
Lifetime Supporter
Local time
1:55 PM
Joined
Jul 2, 2024
Messages
62
Reaction score
69
Location
Doylestown, PA, USA
I also did my install yesterday. I opted to use EXT5 and abandoned the “off-road light” switch. I now have full control of the lights regardless of headlights.

I also opted to remove the entire grille rather than leaning it forward. This allowed access to the last two bottom screws to release the grille and install the new lights on my bench.

Mine, too, was about 4 hours. I took my time and enjoyed working on the truck. The hardest part for me was adding connectors to the EXT5 pigtails. Not a lot of slack and very little room for crimpers in there.
 

BQAC

Grenadier Owner
Local time
10:55 AM
Joined
May 9, 2024
Messages
9
Reaction score
17
Location
Simi Valley, CA, USA
EXT5 wire colors? Does anyone know?

Also, you can wire the lights directly to this lead...and the EXT5 switch triggers a relay to power this lead? Correct?

Just wanna check to make sure...thanks.
EXT5 wire colors? Does anyone know?

Also, you can wire the lights directly to this lead...and the EXT5 switch triggers a relay to power this lead? Correct?

Just wanna check to make sure...thanks.
 

BQAC

Grenadier Owner
Local time
10:55 AM
Joined
May 9, 2024
Messages
9
Reaction score
17
Location
Simi Valley, CA, USA
Sorry for the delayed response. EXT 5 switch wires BLK & PURPLE wires are located by master cylinder. You can confirm by using a voltmeter or test light.
 

BenTN

Forum Moderator
Grenadier Owner
Lifetime Supporter
Local time
1:55 PM
Joined
May 17, 2023
Messages
125
Reaction score
827
Location
East TN, USA
Took me about 4 hours and I videotaped the disassembly part. Next one would be much easier. Also, I am old and I don't move around very quickly anymore! lol
@Stu_Barnes might be interested in that footage. We'd like to make some instructions specific to this kit instead of borrowing someone else's YouTube video...
 

Cheshire cat

Grenadier Owner
Lifetime Supporter
Local time
6:55 PM
Joined
May 30, 2022
Messages
1,876
Reaction score
4,506
Location
Cheshire, UK
Having received the Exzeit lights and brackets ( thanks to Stu_Barnes) in the last few days, today was installation day. As I'm in the UK, the aux lights are activated via the overhead switch and power up on full beam. I decided that any install of replacement aux lights would need to replicate this. The Exzeits had to be ordered via Amazon US but were delivered for a very reasonable £89GBP all in. Compared to the stock aux lights they are great quality, well built, and come with clear and amber lens covers which are easily clipped into place. The Exzeits also come with a good quality wiring harness, with power fuse and the relay all wired up ready to go. This made the install relatively easy from a wiring point of view.
First step was tilting the grill forward as per the video instructions. It is important to remember where the various screws come from for reassembly so I took some pictures along the way in case of any brain fade. The stock lights are held in by the 3 prong rubber grommets. Unfortunately I managed to break some of the fixings on the stock lights pulling them out but as I wont be going back to stock its okay.
The Grenadier Works brackets and fitments are absolutely spot on and everyting assembles together perfectly.
So, to the wiring. Looking at the front of the vehicle, I just taped up the right hand original aux connector and tie wrapped it out of the way. As all my electrical connections were to remain on the left side, I snipped the stock left hand side aux light connector off and retained the blue and white wire as my signal wire to go to the relay. The Exzeit kit is supplied with an on/off switch to install in the cab, but as i will be using the overhead switch and full beam as the trigger I removed the connector and connected the remaining wires as follows:

View attachment 7865851

The lights are powered from the following locations on the left side of the engine bay. I didnt make any further alterations to the wiring harness and the relay is just bolted to the side using an existing bolt and a new nut. There's loads of excess cable, but I just tie wrapped it up and tucked it away. I might get round to tidying that up later.

View attachment 7865852

With everything working as it should, I bolted the grill back and thankfully didn't break or lose anything in the process.
View attachment 7865853

View attachment 7865854

View attachment 7865855

So in summary, I'm extremely happy with the brackets and lights. Given the very reasonable cost and the improvement over the stock lights, I would rate it as my best modification to date. Thanks again to all involved in the design and initial testing!
Thanks for your excellent report. I have the surrounds and will order the lights themselves, from the US, today.
 

Drausch1976

Grenadier Owner
Local time
1:55 PM
Joined
Nov 28, 2022
Messages
187
Reaction score
197
Location
Connecticut
I've attached a few more pics below showing:
- the various LED lights I experimented with (mostly PAR46 and a few pods)
- some install details
- the tight fit inside the grill light bucket
- the intensity of these new auxiliary lights compared to the headlights (hi beams)

I plan to install the next proto tomorrow then order a batch of brackets to send out. Thanks to everyone who volunteered to test them. I will DM people probably next week to figure out who is serious. I will ask you to source the lights yourself (~$80) and commit to installing the kit within a week of receipt. Your thoughtful feedback on the install process and any possible improvements is requested.

If anyone finds a good pod light candidate from a high-end light manufacturer, please message me. It would be great for people to have some choices.

@Stu_Barnes I wonder if you are following this. I think a bracket kit would be a great product for forum members, as it seems like there is a demand out there for a cost-effective upgrade path. Power(ful aux lights) to the people!
100% in as a tester. I have already rerun my current lights to the 25A switch. Thx
 

Zenbox

Grenadier Owner
Local time
12:55 PM
Joined
Jul 21, 2024
Messages
11
Reaction score
13
Location
Minneapolis, MN, USA
Are there any concerns regarding the quality of the Exzeit lights? They are so much cheaper than the other alternatives such as KC HiLites or the Baja Designs being offered by Agile or Owl. I suppose one way to look at it is that you could replace the Exzeit lights many times and still be under the cost of the other alternatives. I am just curious if anyone has had experience with the Exzeit lights and how they have held up. My climate can be extreme, especially in the winter so I do not want to waste time if the product will not hold up. However, the cheap price of these lights sure has my attention. Any insights/thoughts are appreciated!
 

Cheshire cat

Grenadier Owner
Lifetime Supporter
Local time
6:55 PM
Joined
May 30, 2022
Messages
1,876
Reaction score
4,506
Location
Cheshire, UK
Are there any concerns regarding the quality of the Exzeit lights? They are so much cheaper than the other alternatives such as KC HiLites or the Baja Designs being offered by Agile or Owl. I suppose one way to look at it is that you could replace the Exzeit lights many times and still be under the cost of the other alternatives. I am just curious if anyone has had experience with the Exzeit lights and how they have held up. My climate can be extreme, especially in the winter so I do not want to waste time if the product will not hold up. However, the cheap price of these lights sure has my attention. Any insights/thoughts are appreciated!
The way I look at it, is similar to you. I could replace these several times over the alternatives. That said, if they start to degrade and show signs of not lasting very well, they will be off my vehicle in no time and an alternative sourced.
In the meantime, once fitted, I will keep them protected with liberal applications of ACF 50.
 

Cheshire cat

Grenadier Owner
Lifetime Supporter
Local time
6:55 PM
Joined
May 30, 2022
Messages
1,876
Reaction score
4,506
Location
Cheshire, UK
I have never heard of ACF 50. Just did some research and looks like good stuff. Just ordered some. Thank you for that tip Cheshire Cat!
Use if on my motorcycle. In the motorcycle world (As well as the aircraft industry), this stuff is very highly rated.
 

TXJOHN

Grenadier Owner
Lifetime Supporter
Local time
12:55 PM
Joined
Apr 2, 2023
Messages
20
Reaction score
12
Location
SATexas
I also did my install yesterday. I opted to use EXT5 and abandoned the “off-road light” switch. I now have full control of the lights regardless of headlights.

I also opted to remove the entire grille rather than leaning it forward. This allowed access to the last two bottom screws to release the grille and install the new lights on my bench.

Mine, too, was about 4 hours. I took my time and enjoyed working on the truck. The hardest part for me was adding connectors to the EXT5 pigtails. Not a lot of slack and very little room for crimpers in there.
Could you have used the EXT1 pigtails and saved the EXT5 for another application? Or do the lights require a 25 amp circuit? tsk
 

Tom109

Grenadier Owner
Local time
1:55 PM
Joined
Jun 3, 2023
Messages
1,469
Reaction score
2,023
Location
New Jersey, USA
For the electrical, I followed a similar process as @Riversides (thanks for the detailed write up!) as I wanted to continue to be able to use the existing Auxiliary light switch in the O/H panel (in AU we don't have to select the Off-road switch for the Auxiliary lights to work) and also trigger the Auxiliary lights On/ Off together with the high beam driving lights as we do a lot of regional & country driving.
Has anyone identified the wiring difference (and connection locations) between Australian and North American auxiliary light wiring? I would like them as the Australian vehicles are set up.
 

Phred

Grenadier Owner
Lifetime Supporter
Local time
1:55 PM
Joined
Jul 2, 2024
Messages
62
Reaction score
69
Location
Doylestown, PA, USA
Could you have used the EXT1 pigtails and saved the EXT5 for another application? Or do the lights require a 25 amp circuit? tsk
The lights do come with a relay. So you could use EXT1 to activate the relay and wire the lights power supply to the positive terminal in the engine compartment. This would save EXT5 and bypass the high beam/off-road ckt. EXT1 would turn lights on/off.

Light draw is 13-14amps (160/12).
 
Back
Top Bottom