The Grenadier Forum
You are using an out of date browser. It may not display this or other websites correctly.
You should upgrade or use an alternative browser.
You should upgrade or use an alternative browser.
Has anyone successfully removed the Centre console panel?
- Thread starter MattG
- Start date
-
- Tags
- center console panel
- Local time
- 9:51 AM
- Joined
- Sep 10, 2023
- Messages
- 494
- Reaction score
- 671
- Location
- Santa Barbara, California, USA
So, when you unscrewed the vertical control panel, were you able to pull it forward? I'm thinking not, since no pics of that. I need confirmation that there is a big PCB back there, making those two corner areas unavailable to custom installs.The fourth picture of Matt was for me a "wow" moment. I already tried to remove the "climate control panel" in the past by removing the visible screws of the panel, to no avail. Because I wanted to use the "empty button" position (I don't have seat warming) to place a wired USB charging point for my phone.
Therefore I went immediately to my car to see if I could remove it now. I didn't remove it completely because I only had access to two upper screws of the four screws, but anyway here my findings.
"First remove the upper console decorative strip" it says. To remove this strip, you should first unclip the two small decorative strip pieces left and right of the dashboard. In my Left Hand Drive car, the left part is longer than the right part.
View attachment 7838750
View attachment 7838751
Then remove the two screws of the "upper console decorative strip", one left, one right, with a TX20 screwdriver:
View attachment 7838752
Next unclip the "upper console decorative strip":
View attachment 7838753
Then, two of the four TX20 screws of the "climate control board" become visible, and I removed them (see the red dots on the Ineos screenshot of Matt).
I did not continue, but is is clear that this is the way to remove the panel: When I also remove the lower screws, the board will flip out I guess.
View attachment 7838754
- Local time
- 6:51 PM
- Joined
- Sep 10, 2022
- Messages
- 2,633
- Reaction score
- 9,406
- Location
- Sint-Martens-Latem, Belgium
No, because I should have dismounted some lower trims, and unscrew two other bolts in the bottom. Didn't do it yet. Some day ... not urgent.So, when you unscrewed the vertical control panel, were you able to pull it forward? I'm thinking not, since no pics of that. I need confirmation that there is a big PCB back there, making those two corner areas unavailable to custom installs.
Yes Jean ( same make use of empty panels) was intending to place my UHF microphone mount there with a round rj45 socket mounted next to volume control. Looks like it's not as they say easy to work on.
Like mounting the UHF antenna through flat fender panel (20mm hole) then cable through firewall. However first need to cut out high density form in thar space from inside engine bay.). Then to drill a 24mm hole next vol control to insert rj45 socket round mount. ( can then insert microphone curly chord end - rj45 plug into socket). Be a next job. Remove mike when not required. Geoff
Like mounting the UHF antenna through flat fender panel (20mm hole) then cable through firewall. However first need to cut out high density form in thar space from inside engine bay.). Then to drill a 24mm hole next vol control to insert rj45 socket round mount. ( can then insert microphone curly chord end - rj45 plug into socket). Be a next job. Remove mike when not required. Geoff
- Local time
- 3:51 AM
- Joined
- Jan 26, 2022
- Messages
- 2,200
- Reaction score
- 4,384
- Location
- Brisbane, Queensland Australia
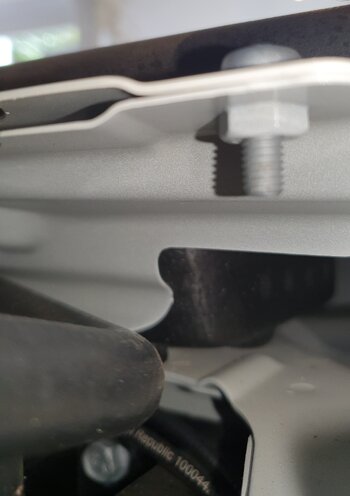
FWIW: Depending where through the fender panel you wish to drill, closer to the front there's space for said hole, well clear of the high density foam..see photoYes Jean ( same make use of empty panels) was intending to place my UHF microphone mount there with a round rj45 socket mounted next to volume control. Looks like it's not as they say easy to work on.
Like mounting the UHF antenna through flat fender panel (20mm hole) then cable through firewall. However first need to cut out high density form in thar space from inside engine bay.). Then to drill a 24mm hole next vol control to insert rj45 socket round mount. ( can then insert microphone curly chord end - rj45 plug into socket). Be a next job. Remove mike when not required. Geoff
Jean. May I kindly ask you for some advise. Do you know how to dismantle the grey dashboard section underneath the steering wheel (not the black steering column). I’ve dismantled the lower section (2 screws). Don’t know how to dismantle the mid section and the grey dashboard end caps. I have an annoying loose screw rolling around. My dealer surprisingly can’t find anything without dismantling so I thought I would give it a try. Many thanks.No, because I should have dismounted some lower trims, and unscrew two other bolts in the bottom. Didn't do it yet. Some day ... not urgent.
- Local time
- 12:51 PM
- Joined
- Jan 7, 2023
- Messages
- 440
- Reaction score
- 502
- Location
- West Chester, Pennsylvania, USA
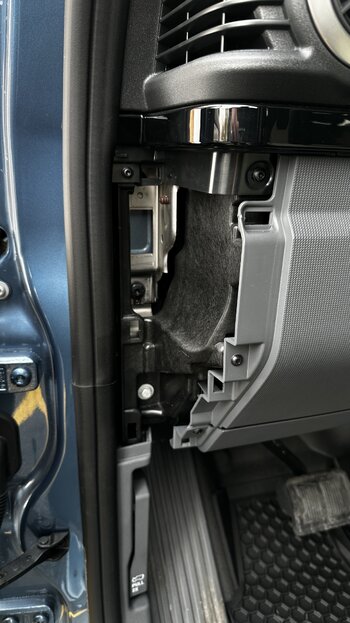
This piece? That pops out and there is an additional screen for the lower section. How did you take the lower section off without taking the side off?Jean. May I kindly ask you for some advise. Do you know how to dismantle the grey dashboard section underneath the steering wheel (not the black steering column). I’ve dismantled the lower section (2 screws). Don’t know how to dismantle the mid section and the grey dashboard end caps. I have an annoying loose screw rolling around. My dealer surprisingly can’t find anything without dismantling so I thought I would give it a try. Many thanks.
- Local time
- 6:51 PM
- Joined
- Sep 10, 2022
- Messages
- 2,633
- Reaction score
- 9,406
- Location
- Sint-Martens-Latem, Belgium
If you mean the panel from the first picture in this thread:Jean. May I kindly ask you for some advise. Do you know how to dismantle the grey dashboard section underneath the steering wheel (not the black steering column). I’ve dismantled the lower section (2 screws). Don’t know how to dismantle the mid section and the grey dashboard end caps. I have an annoying loose screw rolling around. My dealer surprisingly can’t find anything without dismantling so I thought I would give it a try. Many thanks.
footwell illumination
When I removed part of the trim covers under the dashboard some weeks ago, I noticed some kind of “electric” device (see right side of the trim). Of course, I was curious. Clearly a small light to illuminate your toes ;) . Googling, it seems this company (TLC Redditch) makes lighting...
I don't remember if you need to remove another one before this one to be able to take it out.
[EDITED] See also the picture of @FlyersFan76, this makes it clear that you indeed have to remove that side panel too!
The higher up panel was already dismounted by other people, and documented. I didn't till now.
Last edited:
- Local time
- 4:21 AM
- Joined
- Jun 7, 2023
- Messages
- 104
- Reaction score
- 215
- Location
- Adelaide, South Australia
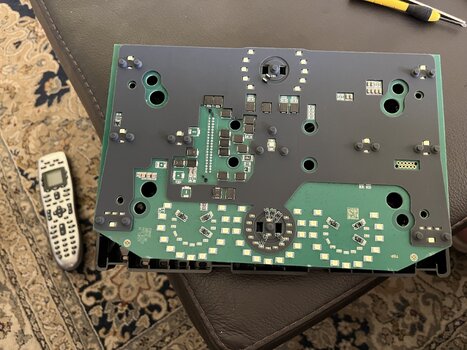
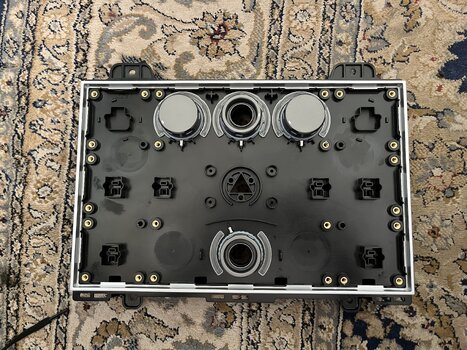
The photos I posted on Jan 5 show details of the large PCB that occupies the entire space behind the centre climate/control panel. Sure, you can drill a hole in the fascia of that panel, but there is no way to drill a hole through the PCB (that I could see) in any of the unused spaces on the control panel that wouldn’t damage or potentially destroy the PCB in doing so.So, when you unscrewed the vertical control panel, were you able to pull it forward? I'm thinking not, since no pics of that. I need confirmation that there is a big PCB back there, making those two corner areas unavailable to custom installs.
Attachments
Last edited:
- Local time
- 6:51 PM
- Joined
- Sep 10, 2022
- Messages
- 2,633
- Reaction score
- 9,406
- Location
- Sint-Martens-Latem, Belgium
Well, that is a quite interesting picture and will save me time, by avoiding to dismount it myself.The photos I posted on Jan 5 show details of the large PCB that occupies the entire space behind the centre climate/control panel. Sure, you can drill a hole in the fascia of that panel, but there is no way to drill a hole through the PCB (that I could see) in any of the unused spaces on the control panel that wouldn’t damage or potentially destroy the PCB in doing so.
Thanks a lot for that!
[EDITED] I didn't notice these pictures on January 5!
Last edited:
Thank you. Great information as usual.If you mean the panel from the first picture in this thread:
then there are at least two screws, and the rest are clips.footwell illumination
When I removed part of the trim covers under the dashboard some weeks ago, I noticed some kind of “electric” device (see right side of the trim). Of course, I was curious. Clearly a small light to illuminate your toes ;) . Googling, it seems this company (TLC Redditch) makes lighting...www.theineosforum.com
I don't remember if you need to remove another one before this one to be able to take it out.
[EDITED] See also the picture of @FlyersFan76, this makes it clear that you indeed have to remove that side panel too!
The higher up panel was already dismounted by other people, and documented. I didn't till now.
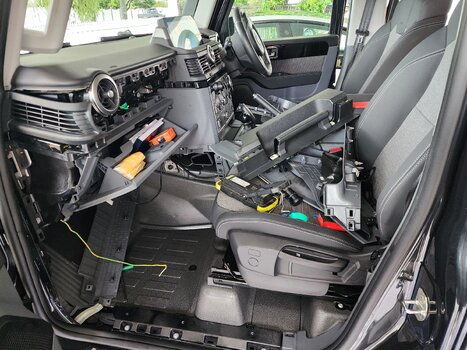
@MattG - Did you decide where to mount the RJ45 (microphone port)? I too wanted to stick it in the dash but the pcb has ruled that out. Thank you for the photos and saving me all that time.So, because I wanted to mount my TowPro elite controller knob in the empty top right-hand space of the centre console panel, (and my GME UHF microphone port in the top left), I finally managed to remove the centre console panel today (after I received some very helpful information from my local dealership). The dealership sent me several pages from their workshop manual which gave me step-by-step instructions on how to remove and reinstall it. It was quite a big job. Alas, the behind the plastic facade of the centre console, there is a large printed circuit board occupying the entire space, with no ability to insert any accessory without damaging (destroying) the PCB. Hence, I have now located the TowPro controller knob in between the two gear levers. This required a little bit of dremel-action to create a small cavity for the controller to fit into. It’s not my preferred position, but it is very easy to get to and looks fairly neat too.
It's unlikely I'll ever tow anything so where you located the TwoPro controller knob looks like a good place for the RJ45 connector. I'm just left wondering if the microphone cable might get in the way.
Has anyone else installed a RJ45 socket? If so, where?
- Local time
- 3:51 AM
- Joined
- Feb 13, 2023
- Messages
- 138
- Reaction score
- 259
- Location
- Townsville Australia
@MattG - Did you decide where to mount the RJ45 (microphone port)? I too wanted to stick it in the dash but the pcb has ruled that out. Thank you for the photos and saving me all that time.
It's unlikely I'll ever tow anything so where you located the TwoPro controller knob looks like a good place for the RJ45 connector. I'm just left wondering if the microphone cable might get in the way.
Has anyone else installed a RJ45 socket? If so, where?
The post is on here somewhere. Ninetubes has a short YouTube video on how to pull apart the passenger side dash area. You'll have to zoom in the photo but the rj45 plug is tucked away beside the jesus handle pointed at the floor. Nice and out of the way. I still haven't mounted the microphone hanging point. It's mostly disconnected and left in glove box. I want to put a usb c/a on the other side closer to the door in similar position.@MattG - Did you decide where to mount the RJ45 (microphone port)? I too wanted to stick it in the dash but the pcb has ruled that out. Thank you for the photos and saving me all that time.
It's unlikely I'll ever tow anything so where you located the TwoPro controller knob looks like a good place for the RJ45 connector. I'm just left wondering if the microphone cable might get in the way.
Has anyone else installed a RJ45 socket? If so, where?
This is where I got the idea
Post in thread 'Relocate usb c from storage box' https://www.theineosforum.com/threads/relocate-usb-c-from-storage-box.12413988/post-1333241901
Attachments
- Local time
- 4:21 AM
- Joined
- Jun 7, 2023
- Messages
- 104
- Reaction score
- 215
- Location
- Adelaide, South Australia
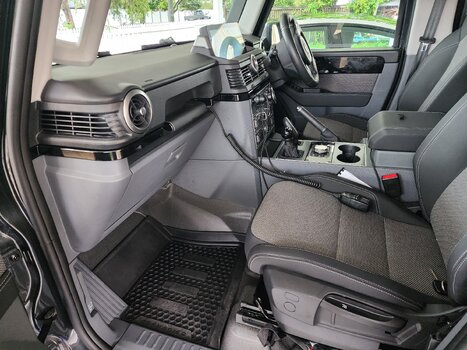
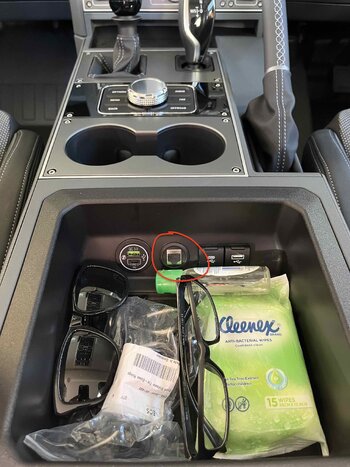
I mounted an RJ45 microphone socket in the front part of the centre tray (between the two front seats), next to the USB charging points. I also removed the 12V Cigarette-lighter socket in favour of an additional USB Charging (to the left of the UHF Socket in the attached photo). This way, the UHF socket is completely out of the way when not in use.@MattG - Did you decide where to mount the RJ45 (microphone port)? I too wanted to stick it in the dash but the pcb has ruled that out. Thank you for the photos and saving me all that time.
It's unlikely I'll ever tow anything so where you located the TwoPro controller knob looks like a good place for the RJ45 connector. I'm just left wondering if the microphone cable might get in the way.
Has anyone else installed a RJ45 socket? If so, where?
Attachments
That is an excellent idea! I wasn't too keen on having the RJ45 socket visible. It gives the game away that you have a UHF radio and probably have it stored somewhere inside. I'll be following your example and putting the RJ45 socket in exactly the same place and I'll replace the cigarette-lighter socket with USB as well. Thank you for the tip.I mounted an RJ45 microphone socket in the front part of the centre tray (between the two front seats), next to the USB charging points. I also removed the 12V Cigarette-lighter socket in favour of an additional USB Charging (to the left of the UHF Socket in the attached photo). This way, the UHF socket is completely out of the way when not in use.
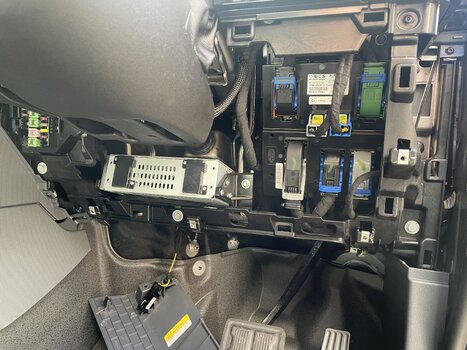
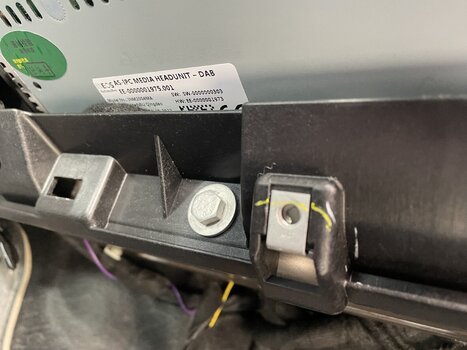
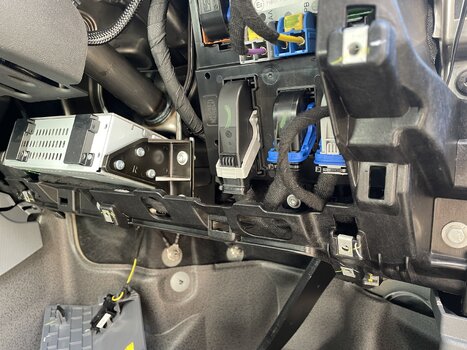
I’ve pulled away the drivers side lower dash to investigate a loose screw rolling around. Also whilst I’m there, I nipped up the screws. I found the headunit and interesting to find it’s made in China.
To access this part, first remove the rubber doorseal slightly surrounding the dash area. Then pull off the dash end caps towards you. They’re are clipped on. Once this is removed, all the screws are accessible.
To access this part, first remove the rubber doorseal slightly surrounding the dash area. Then pull off the dash end caps towards you. They’re are clipped on. Once this is removed, all the screws are accessible.
Attachments
I tried this method because I like the idea of having the passenger reach for the brake controller as well. I could not get the vertical space needed - the housing for the controller plus the cat-5 cable ( even the supplied 90 degree elbow) was too long that the control knob would be too elevated. To the point where the housing would be sticking out. You said you took a dremel and created a cavity, I thought you meant in the baseplate. But did you go down somewhere? I have the Redarc liberty, but I believe the housing is the same. I have a LHD, but I compensated for that and put my hole where yours would be swapped.So, because I wanted to mount my TowPro elite controller knob in the empty top right-hand space of the centre console panel, (and my GME UHF microphone port in the top left), I finally managed to remove the centre console panel today (after I received some very helpful information from my local dealership). The dealership sent me several pages from their workshop manual which gave me step-by-step instructions on how to remove and reinstall it. It was quite a big job. Alas, the behind the plastic facade of the centre console, there is a large printed circuit board occupying the entire space, with no ability to insert any accessory without damaging (destroying) the PCB. Hence, I have now located the TowPro controller knob in between the two gear levers. This required a little bit of dremel-action to create a small cavity for the controller to fit into. It’s not my preferred position, but it is very easy to get to and looks fairly neat too.
However you did it, I am impressed!!
- Local time
- 4:21 AM
- Joined
- Jun 7, 2023
- Messages
- 104
- Reaction score
- 215
- Location
- Adelaide, South Australia
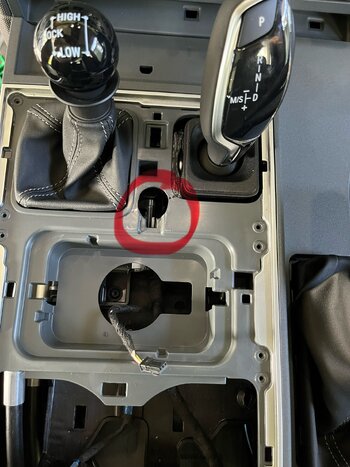
I used the Dremel to make a hole just in front of the trim clip that holds down the gear selector trim (circled in red). I was careful not to enlarge the area around the trim clip too much, such that the clip could still engage in the hole. I did massage the plastic Immediately below the hole I created for the TowPro elite control knob for it to sit comfortably, but I didnt need to remove all that much material.I tried this method because I like the idea of having the passenger reach for the brake controller as well. I could not get the vertical space needed - the housing for the controller plus the cat-5 cable ( even the supplied 90 degree elbow) was too long that the control knob would be too elevated. To the point where the housing would be sticking out. You said you took a dremel and created a cavity, I thought you meant in the baseplate. But did you go down somewhere? I have the Redarc liberty, but I believe the housing is the same. I have a LHD, but I compensated for that and put my hole where yours would be swapped.
However you did it, I am impressed!dremel for was to enlarge the area immediately in front of the clip that holds the
Attachments
Well, that was a lot of work to just get this one piece of plastic out of the way to get to the bottom two hidden screws.So, because I wanted to mount my TowPro elite controller knob in the empty top right-hand space of the centre console panel, (and my GME UHF microphone port in the top left), I finally managed to remove the centre console panel today (after I received some very helpful information from my local dealership). The dealership sent me several pages from their workshop manual which gave me step-by-step instructions on how to remove and reinstall it. It was quite a big job. Alas, the behind the plastic facade of the centre console, there is a large printed circuit board occupying the entire space, with no ability to insert any accessory without damaging (destroying) the PCB. Hence, I have now located the TowPro controller knob in between the two gear levers. This required a little bit of dremel-action to create a small cavity for the controller to fit into. It’s not my preferred position, but it is very easy to get to and looks fairly neat too.
- Local time
- 4:21 AM
- Joined
- Jun 7, 2023
- Messages
- 104
- Reaction score
- 215
- Location
- Adelaide, South Australia
Yep, but if I hadn’t done that I’d never know what lay beneath all of that trim!Well, that was a lot of work to just get this one piece of plastic out of the way to get to the bottom two hidden screws.
Similar threads
- Replies
- 17
- Views
- 880
- Replies
- 1
- Views
- 384
- Replies
- 2
- Views
- 393
- Replies
- 26
- Views
- 3K
- Replies
- 338
- Views
- 23K

