I know - brilliant - that’s why I mentioned the Agile Off-road “beginners eject button “ - they know what works with the Grenadier and you don’t even have to think about it - all guaranteed to fitThanks for the references. TheDoc's post makes me feel like I want to grad school.
The Grenadier Forum
Register a free account today to become a member! Once signed in, you'll be able to contribute to the community by adding your own topics, posts, and connect with other members through your own private inbox! INEOS Agents, Dealers or Commercial vendors please contact admin@theineosforum.com for a commercial account.
You are using an out of date browser. It may not display this or other websites correctly.
You should upgrade or use an alternative browser.
You should upgrade or use an alternative browser.
Would you be willing to mount it to the grab rail, rather than on the rack, itself? If so, here’s an adjustable option - same as the one Baja Designs recommended to me, but with more adjustment optionsNot the grab rail per se, but wondering if there are suggestions for a mount to grab in underneath a slotted rack. Will be ordering the Leitner rack, but prefer my forward side light to be able to swivel 45 degrees. Their mount prevents that. Most likely be using S2’s.
Small Base Adjustable Light Mount – Axia Alloys
Appreciate the link! Definitely an option… I was trying to keep the grab rails free since the rack is right there… would also use the same type mount for rear lights as well
What about this approach? If you use this mount from Rhino Rack, then you can pivot the S2 to any angle - and the bracket on the S2 allows you to swivel up/down.Appreciate the link! Definitely an option… I was trying to keep the grab rails free since the rack is right there… would also use the same type mount for rear lights as well
#RWLB - Work Light Bracket |
The Work Light Bracket is used to mount various lights and aerials to your Rhino-Rack Vortex and Heavy Duty bars.
I’m not positive the Rhino Rack mounting hardware works with the T slot on the Leitner rack, so you could buy slot mounts from Leitner if it doesn’t. Combined, that ought to work.

TRUCK BED RACK REPLACEMENT PARTS
Overlanding sometimes requires truck rack replacement parts, and an array of them are available from LEITNER. Leitner rack parts restores those that are lost or missing in action.
Sorry just saw this - maybe this would work?Appreciate the link! Definitely an option… I was trying to keep the grab rails free since the rack is right there… would also use the same type mount for rear lights as well

LIGHT BRACKET - Universal for ACS Bed Rack
PART # 00-LBA-01-1073 Shine some light on the situation! Active Cargo System light brackets are engineered to mount a large variety of LED, HID and halogen lights onto any ACS truck bed rack. Installs within minutes to put light where you need it most. Specifications: Active Cargo System Truck...
That could be the ticket! Thank you so much for the search - though admittedly I should have found it with the amount of time I’ve spent on their site! 
Just buy the Kit from Agile Offroad and get straight to work.Thanks for the references. TheDoc's post makes me feel like I want to grad school.
- Local time
- 10:20 PM
- Joined
- Sep 25, 2021
- Messages
- 395
Has anyone tried these tube mounts for KC Hilites? I am considering a light to be mounted on a rung of the OEM rear ladder and this mount would seem to fit (as well as the similar size roof grab bar)? (I apologize for the duplicate image.)
Bill, that might work. I can't tell if it is rubber or just poorly finished metal. Not very attractive. Still too big and bulky for my current taste. Only needs to be 1/2 or 3/4" wide. Check out what I posted here previously.
"Super Strong Glass Injected Nylon Composite"Bill, that might work. I can't tell if it is rubber or just poorly finished metal. Not very attractive. Still too big and bulky for my current taste. Only needs to be 1/2 or 3/4" wide. Check out what I posted here previously.
I bought this Micro V2 light and Vice 22mm-30mm clamps direct from Stedi, AUD$95 delivered which I thought was quite reasonable. They come with a DTP plug molded onto a short wire, if you cut open the plug and save as much wire as possible its just enough to fit a DTP2 plug to and make it fit without extending. The clamps don't come with mounting bolts and the bolts included with the lights are too short so you need to source some M6 bolts approx 16mm long with narrow heads to mount them. I like the technical look of the setup and it has a nice spread for a small light. It would also be a perfect fit for mounting on the rear ladder from the top rung (would need to extend the wire).The mounts in the Abenteuer kit are from Stedi as well and look nice and solid, think I have found my lights:
https://www.stedi.com.au/vice-bull-bar-tube-clamps-mc.html
They do look great! Bonus - they may fit beneath the side plates of the full Rhino roof rack.I bought this Micro V2 light and Vice 22mm-30mm clamps direct from Stedi, AUD$95 delivered which I thought was quite reasonable. They come with a DTP plug molded onto a short wire, if you cut open the plug and save as much wire as possible its just enough to fit a DTP2 plug to and make it fit without extending. The clamps don't come with mounting bolts and the bolts included with the lights are too short so you need to source some M6 bolts approx 16mm long with narrow heads to mount them. I like the technical look of the setup and it has a nice spread for a small light. It would also be a perfect fit for mounting on the rear ladder from the top rung (would need to extend the wire).
View attachment 7864533View attachment 7864534View attachment 7864535
I really like these, although £50 just for the brackets seems a little steep (or I'm just being cheap), but either way, after I spend another few hours wasting time looking at worse options, I'll probably buy themI bought this Micro V2 light and Vice 22mm-30mm clamps direct from Stedi, AUD$95 delivered which I thought was quite reasonable. They come with a DTP plug molded onto a short wire, if you cut open the plug and save as much wire as possible its just enough to fit a DTP2 plug to and make it fit without extending. The clamps don't come with mounting bolts and the bolts included with the lights are too short so you need to source some M6 bolts approx 16mm long with narrow heads to mount them. I like the technical look of the setup and it has a nice spread for a small light. It would also be a perfect fit for mounting on the rear ladder from the top rung (would need to extend the wire).
View attachment 7864533View attachment 7864534View attachment 7864535
- Local time
- 10:20 PM
- Joined
- Sep 25, 2021
- Messages
- 395
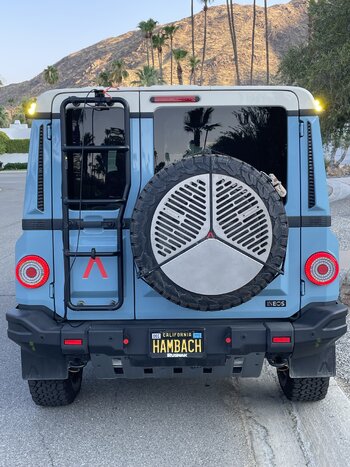
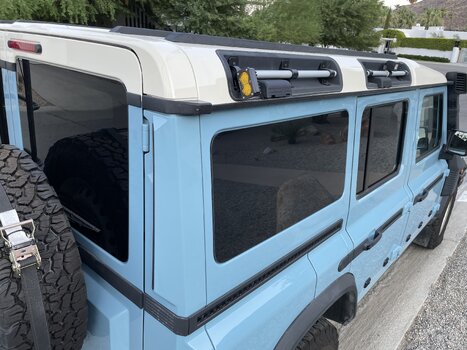
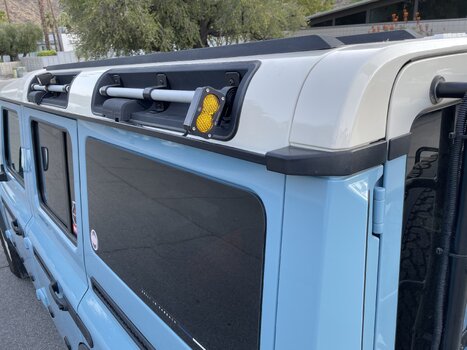
I have added a pair of Baja Designs S2 Sport lights with Amber Work/Scene lenses to the rear end of the grab bars on the roof. They are attached to the rails with the Brcovan Light Bar Mounts that Jeffery in Santa Barbara recommends and controlled by the EXT 3 Switch. I hope they will prove useful as:
1. ‘chase lights’ on dusty trails
2. supplement to OEM reverse light and,
3. area light when setting up camp
1. ‘chase lights’ on dusty trails
2. supplement to OEM reverse light and,
3. area light when setting up camp
Attachments
Pauli
Grenadier Owner
nice license plate 
Thanks to some guidance in this thread I have completed a very satisfactory, sleek, and stealthy work light installation to the front side roof grab bars and the rear of my Grenadier.
The three work lights used are the Stedi Micro V2 7.8" LED flood lights. I picked mine up here from Napa.
Here's how I connected everything:
1. I am powering all three lights through the right front roof power connection. No issue, since one light draws 1.3A at 12v (specs). This starts by adding a DTP female connector to one of the female DT pigtails that comes with one of the Stedi lights. This will be connected to the DTP roof power outlet, and then to a three way split DT cable. I purchased these from Amazon and used one in this install. You'll also need to pick up a set of DT connectors to complete the cable runs from the three-way split cable to your work lights.
2. For the two lights mounted to the front roof grab bars, I used these NiLight Bar Clamps. I chose these because I figured I could use them to mount the work lights in such a way that they do not extend past the roof gutter. Also - I searched long and hard, but never could find the Stedi 1" (22-30mm) clamps shown in this post above by @Shopkeep in the U.S. (in the end, I think the NiLights are the superior solution, because they are a smaller form factor). A complication arises with the NiLight clamps, however, since they are sized for M10 bolts and the Stedi light bracket is sized for M8 bolts. So, I picked up some 10mm M10 to M8 sleeve adapters and some 20mm M8 bolts and used M8 lock nuts. Using this combo allowed for the slim profile install I had hoped to achieve:


I used the slimmest rubber insert in the clamps, and, as you might imagine, actually attaching the clamps to the bar is a fiddly exercise, since you are up on a ladder and rotating the clamps down to get a bite on the bolts with an allen wrench and squeezing them together to get the bolt started, etc. So, take a deep breath and be patient during this stage. It can be done and is worth the effort, because the install does indeed keep the light within the perimeter of the roof gutters:


3. For the rear light, I found the ideal place to mount it at the rear of my RTT (Alu-Cab Gen 3R). I noticed the two holes near the edge of the center structural bars:

After some r&d, I figured out that 12x3/4" Sheet Metal Screws would fit the hole perfectly. So, I bought an Aluminum bar from Lowe's, measured it out, cut it with a jigsaw, marked, and drilled holes for the tent bars and for the Stedi light mount, primed and painted the bar matte black with Rust-Oleum rattle cans, and mounted the light with the screws and with strips of 3M VHB double side tape for insurance:


4. Now to the cables. The split DT cable is 20AWG, so I stuck with that for my runs. I found this cable easy to work with. I know I did not always want to have all three lights on at once, and that meant I needed to figure out how to add some waterproof inline switches. I went with these. Now, they did not qualify as "waterproof" for my use case out of the box, since the holes at the ends were too large for the cable I selected, but, after some more fast and furious r&d, I found this perfect fit silicone tubing to use as a shroud insert around my cable. Next step was putting them together, and note, I was able to use the two other DT pigtails from the Stedi worklights during this process.
Snug fit with silicone tubing section added (spinning the silicone tube helps seat it along the way):


Wiring everything up:


Also, to further enhance the waterproof-ness of the switches, I added some Permatex Sealant along the edges of the switch before connecting it:


5. The next step was to figure out where I wanted to mount the switches and measure out the remaining lengths of cable I needed to run, add the appropriate DT connectors, and route for neatness. I found a great place to mount the switches for the side grab rails - and that was right on top of the plastic roof rail with some 3M VHB tape, and I mounted the rear switch to the right structural load bar using VHB tape.
End result
Left Side:


Right Side:


Rear:

The switches work great and I'm more than happy with the throw of the lights. Boom! Let's set up camp.


The three work lights used are the Stedi Micro V2 7.8" LED flood lights. I picked mine up here from Napa.
Here's how I connected everything:
1. I am powering all three lights through the right front roof power connection. No issue, since one light draws 1.3A at 12v (specs). This starts by adding a DTP female connector to one of the female DT pigtails that comes with one of the Stedi lights. This will be connected to the DTP roof power outlet, and then to a three way split DT cable. I purchased these from Amazon and used one in this install. You'll also need to pick up a set of DT connectors to complete the cable runs from the three-way split cable to your work lights.
2. For the two lights mounted to the front roof grab bars, I used these NiLight Bar Clamps. I chose these because I figured I could use them to mount the work lights in such a way that they do not extend past the roof gutter. Also - I searched long and hard, but never could find the Stedi 1" (22-30mm) clamps shown in this post above by @Shopkeep in the U.S. (in the end, I think the NiLights are the superior solution, because they are a smaller form factor). A complication arises with the NiLight clamps, however, since they are sized for M10 bolts and the Stedi light bracket is sized for M8 bolts. So, I picked up some 10mm M10 to M8 sleeve adapters and some 20mm M8 bolts and used M8 lock nuts. Using this combo allowed for the slim profile install I had hoped to achieve:
I used the slimmest rubber insert in the clamps, and, as you might imagine, actually attaching the clamps to the bar is a fiddly exercise, since you are up on a ladder and rotating the clamps down to get a bite on the bolts with an allen wrench and squeezing them together to get the bolt started, etc. So, take a deep breath and be patient during this stage. It can be done and is worth the effort, because the install does indeed keep the light within the perimeter of the roof gutters:
3. For the rear light, I found the ideal place to mount it at the rear of my RTT (Alu-Cab Gen 3R). I noticed the two holes near the edge of the center structural bars:
After some r&d, I figured out that 12x3/4" Sheet Metal Screws would fit the hole perfectly. So, I bought an Aluminum bar from Lowe's, measured it out, cut it with a jigsaw, marked, and drilled holes for the tent bars and for the Stedi light mount, primed and painted the bar matte black with Rust-Oleum rattle cans, and mounted the light with the screws and with strips of 3M VHB double side tape for insurance:
4. Now to the cables. The split DT cable is 20AWG, so I stuck with that for my runs. I found this cable easy to work with. I know I did not always want to have all three lights on at once, and that meant I needed to figure out how to add some waterproof inline switches. I went with these. Now, they did not qualify as "waterproof" for my use case out of the box, since the holes at the ends were too large for the cable I selected, but, after some more fast and furious r&d, I found this perfect fit silicone tubing to use as a shroud insert around my cable. Next step was putting them together, and note, I was able to use the two other DT pigtails from the Stedi worklights during this process.
Snug fit with silicone tubing section added (spinning the silicone tube helps seat it along the way):
Wiring everything up:
Also, to further enhance the waterproof-ness of the switches, I added some Permatex Sealant along the edges of the switch before connecting it:
5. The next step was to figure out where I wanted to mount the switches and measure out the remaining lengths of cable I needed to run, add the appropriate DT connectors, and route for neatness. I found a great place to mount the switches for the side grab rails - and that was right on top of the plastic roof rail with some 3M VHB tape, and I mounted the rear switch to the right structural load bar using VHB tape.
End result
Left Side:
Right Side:
Rear:
The switches work great and I'm more than happy with the throw of the lights. Boom! Let's set up camp.
Last edited:
My pleasure - just trying to give back what I can where I can in appreciation for all the excellent information and guidance I have received from this site that has helped me along the way.
Great share. I like the switches, I'm going to copy that idea.
Similar threads
- Replies
- 7
- Views
- 452
- Replies
- 7
- Views
- 509


