etc.
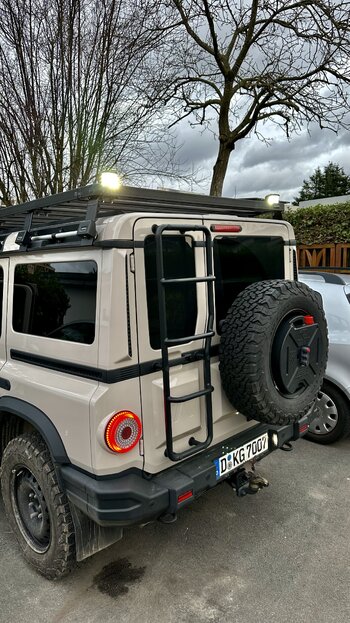
etc.On a side note, there were many propper 4x4s in attendance. 5 Grenadiers, many old defenders, many new JLR products and this RAM TRX which is a rare site here in the UK!
Register a free account today to become a member! Once signed in, you'll be able to contribute to the community by adding your own topics, posts, and connect with other members through your own private inbox! INEOS Agents, Dealers or Commercial vendors please contact admin@theineosforum.com for a commercial account.
etc.Very handy work. Everything looks fantastic and looks stock.Been a busy couple of weeks since taking delivery of my Scottish White diesel Grenadier. Have installed a few accessories so far - GME UHF radio (under the glovebox with remote connection via a “telephone” style connector in the centre console tray), STEDI dual row light bar (wired into the overhead Auxiliary High beam light circuit), REDARC TowPro elite electric brake controller, 12v power outlets into the passenger side rear cargo area (1x Anderson outlet, 2x MagCode outlets for fridge power and 1x USB B and C power outlet), I removed the Nato plug on the towbar and replaced this with an Anderson plug for trailer power and an Anderson plug for Solar input (mounted under the trailer Anderson plug onto a hand-made, custom mounting bracket) and I replaced the 13 pin Euro trailer socket for a 7 pin flat trailer socket (also mounted onto a hand-made custom bracket). All tested and working as expected (Thankfully)!! 4 roof-top lights (to be wired into overhead roof switches) yet to be installed.
I decided to make some simple roof storage in the rear…
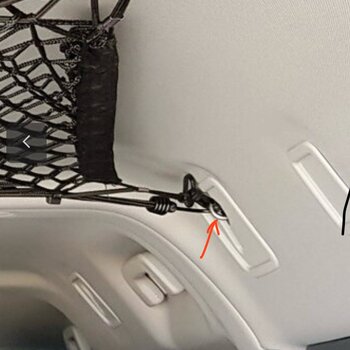
Well, he explains this in his post and look at the third picture: he removed the original screws and replaced them with the "rings". I did the same shortly after wards, I mean replacing the screws with steel rings, but never posted my modification as it was copying @Highwayman. I used the rings to extend a rope and dry my washed clothes while driving after camping.I love this @Highwayman
Just been looking at ceiling nets myself. Your mod looks spot on.
Can I ask, what are these steel rings in the hangers? I was expecting to have to bungee hook into them directly so your photo intrigued me.
Ah, thank you Jean.Well, he explains this in his post and look at the third picture: he removed the original screws and replaced them with the "rings". I did the same shortly after wards, I mean replacing the screws with steel rings, but never posted my modification as it was copying @Highwayman. I used the rings to extend a rope and dry my washed clothes while driving after camping.
Only today I did put my freshly arrived Chinese net, like @Highwayman.
Here you have a picture of the original screw and the steel ring.
View attachment 7837641

Someone superglued theirs and someone else installed a rubber washer inside the case. On my phone so search is a pain. But poke around and you’ll find them.PANIC BUTTON ON KEY
Am about to use a butane GAS flame to 'melt' the key PANIC button on the Grenadier keys !!! Am so bloody over it!
This happens almost hourly at all hours, day or night. My family, my neighbours even strangers standing nearby in a carpark all comment.
Cannot even place the keys in my pocket (without the horn going off day or night), cant just grab the keys in the dark, just getting into the car while holding the keys, inserting the key to start, etc. etc.
Totolly crazy, is there is no other way to diable it?

Yes, Photos Please. Thanks for your detailed description. DaBullThese mods I purchased nothing.
Once I got I home did a full undercarriage inspection. After a little over an hour of scouring everything I would give it a score of 99%. Here are the 3 changes/mods I made. I would note that if you plan on only driving your Gren on the street or don't plan on keep it over 10 yrs just leave as is.
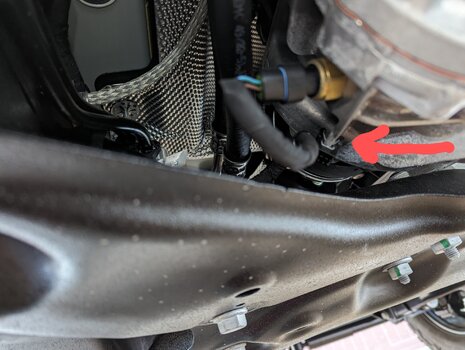
1. I notice that the transfer temp sensor wire harness was at the same height as the transmission cross member. The installer placed the loom holding loop down. I assume because it makes it easier to cut the tie. Simple fix, especially because everything is brand new. Flip the metal plastic so the retaining loop is oriented up. Place new tie. Now the loom is tucked over the cross member. Chance of getting ripped off is much less. Note, make sure you still have a 1 inch space from the inside of the sharp part of the frame rail.
2. A similar clip is used for the ground strap to the starter motor on the catalytic converter heat shield. The way mine was installed the ground wire was touching the right side engine mount bolt . I removed that harness clip holder completely. Kept the clip a spare. Made my own ground strap holder using that same engine mount bolt it was previously touching. Now the ground wire is routed more that a inch further from the catalytic converter from how I received it, Win! Tweaked that heatshield a touch more to keep the motor mount insulated more.
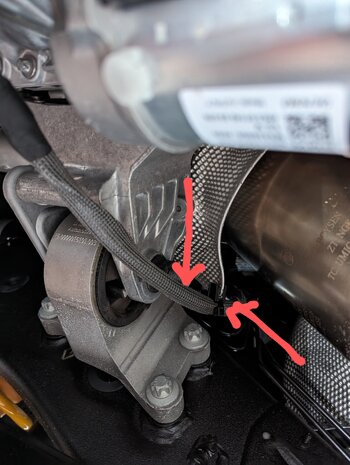
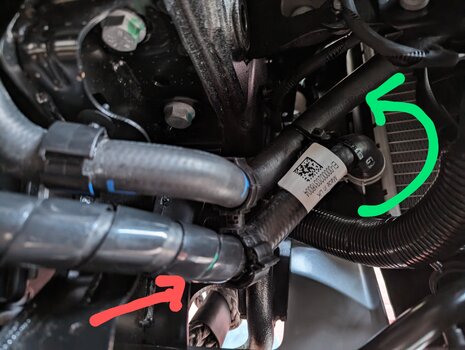
3. Coolant hose going to the heat exchanger in the right side front bumper. The lower hose is much more free to move then the upper hose. So much so that the lower hose can rub on 2 places. The sway bar, not sharp. And the frame, sharp. My fix was to clock the hose clamp and hose on the nipple counter clockwise 35 degrees. This naturally sets the lower hose 2 inches away from the sharp parts of the chassis. I then wrapped the hose with hydraulic line PTFE chaffing guard, just in case. Supported the upper and lower hose together.
If y'all want pics I can upload later. BTW this has not impeded my love affair of my Trialmaster. I maintain 6 vehicles in my fleet. The newest is a 2000. I have worked on vehicles that stay on ranches and am an old desert rat, prerunners, dirt bikes etc. I made my mods over the past 30 yrs of whoopsies. Also the harness protection on the Ineos is the most robust I have scene from a vehicle manufacturer. For me it is a better to not put the loom protection to the test
Cheers and have a Happy New Year.
The thread is here:PANIC BUTTON ON KEY
Am about to use a butane GAS flame to 'melt' the key PANIC button on the Grenadier keys !!! Am so bloody over it!
This happens almost hourly at all hours, day or night. My family, my neighbours even strangers standing nearby in a carpark all comment.
Cannot even place the keys in my pocket (without the horn going off day or night), cant just grab the keys in the dark, just getting into the car while holding the keys, inserting the key to start, etc. etc.
Totolly crazy, is there is no other way to diable it?

") ) are the most important ones to know how to dismount the key. Be careful to keep the key itself (see picture 10) in its position. I removed it in one of my two keys, and the spring mechanism jumped out, and it took me some time to figure out how to place it back.
) are the most important ones to know how to dismount the key. Be careful to keep the key itself (see picture 10) in its position. I removed it in one of my two keys, and the spring mechanism jumped out, and it took me some time to figure out how to place it back.These mods I purchased nothing.
Once I got I home did a full undercarriage inspection. After a little over an hour of scouring everything I would give it a score of 99%. Here are the 3 changes/mods I made. I would note that if you plan on only driving your Gren on the street or don't plan on keep it over 10 yrs just leave as is.
1. I notice that the transfer temp sensor wire harness was at the same height as the transmission cross member. The installer placed the loom holding loop down. I assume because it makes it easier to cut the tie. Simple fix, especially because everything is brand new. Flip the metal plastic so the retaining loop is oriented up. Place new tie. Now the loom is tucked over the cross member. Chance of getting ripped off is much less. Note, make sure you still have a 1 inch space from the inside of the sharp part of the frame rail.
2. A similar clip is used for the ground strap to the starter motor on the catalytic converter heat shield. The way mine was installed the ground wire was touching the right side engine mount bolt . I removed that harness clip holder completely. Kept the clip a spare. Made my own ground strap holder using that same engine mount bolt it was previously touching. Now the ground wire is routed more that a inch further from the catalytic converter from how I received it, Win! Tweaked that heatshield a touch more to keep the motor mount insulated more.
3. Coolant hose going to the heat exchanger in the right side front bumper. The lower hose is much more free to move then the upper hose. So much so that the lower hose can rub on 2 places. The sway bar, not sharp. And the frame, sharp. My fix was to clock the hose clamp and hose on the nipple counter clockwise 35 degrees. This naturally sets the lower hose 2 inches away from the sharp parts of the chassis. I then wrapped the hose with hydraulic line PTFE chaffing guard, just in case. Supported the upper and lower hose together.
If y'all want pics I can upload later. BTW this has not impeded my love affair of my Trialmaster. I maintain 6 vehicles in my fleet. The newest is a 2000. I have worked on vehicles that stay on ranches and am an old desert rat, prerunners, dirt bikes etc. I made my mods over the past 30 yrs of whoopsies. Also the harness protection on the Ineos is the most robust I have scene from a vehicle manufacturer. For me it is a better to not put the loom protection to the test
Cheers and have a Happy New Year
 For my more remote travels having a spare starter will give me peace of mind.
")
Yes, I also prefer hand washing. Yesterday, I washed the mud from the wheel arches and the bodywork from the last few weeks. Yes, with MM the dirt is not so noticeable. That was one reason for me to choose the colour. But you can still see the chunks of earth.Washed and cleaned our Grenadier for the first time...by hand! Magic Mushroom does not show much dirt at all! I noticed in the handbook the sequence for shifting the Grenadier into neutral before going through a car wash...but I think I'll stick with handwashing. Our Grenadier deserves it!

Hi @HighwaymanToday I decided to fit an ARB compressor (single) into the space by the auxiliary battery and connect it to the Ineos fitted wiring points in that same place.
If I was doing it again, I may take the rear seat out. I didn’t, and managed to work around the plastic panels under the seat, but it was fiddly and awkward. Probably took longer.
First I made up a bracket to hold the compressor. Two small pieces of 30mm box and a small piece of 3mm plate (I had these bits in the shed - they are certainly strong enough). I used the box to fit over the four existing 8mm studs in the floorpan and then fixed the plate to the box using rivnuts. I inserted some strips of soundproofing between the box and the floorpan, and then between the box and the plate. This has really damped out any vibration from the pump.
View attachment 7817903
View attachment 7817904
I connected the wiring loom using solder and heatshrink. I had intended to use Deutsch DTP connectors, but the cable was too thick. Do this before you put the pump in place as there is no room when it’s in position.
I decided to have the switch and the air outlet in the rear. There’s plenty of space behind the right hand rear panel to run the loom and the air hose.
The one compromise I made was to drill a hole in the plastic panel under the seat to get the air hose and loom out. If you took the seat out, you could avoid this. I decided to compromise, because once the rear seat squab is in place, you have to bend down and look really close to see the hose.
View attachment 7817907
View attachment 7817908
View attachment 7817906
View attachment 7817905
View attachment 7817909
Overall I’m pleased with the outcome.
As I was in there with the rear panel off, I thought it would be rude not to fit a couple of extra 12v sockets. I managed to run a cable all the way to the front footwell without much problem. The sad thing is, I then couldn’t find the outlet wires on the right hand side. I’ve checked other helpful threads from @Jean Mercier and @rovie, but mine are not easy to spot.
That was a bit frustrating!