The Grenadier Forum

Register a free account today to become a member! Once signed in, you'll be able to contribute to the community by adding your own topics, posts, and connect with other members through your own private inbox! INEOS Agents, Dealers or Commercial vendors please contact admin@theineosforum.com for a commercial account.

Some more dismounting (centre console/kick plates)

PoziTap You can see them on YouTube. Really good experience with them so far. The pierce the wire with just a pin prick. If removed, the wire insulation tends to close in on itself again.
Brilliant I’ll get some to keep in the electrical box. And I’ll get the same usb socket as a very neat solutio. Thanks 👍🏼
 
Last edited:
As reported earlier today, I went to my dealer. We looked to see where the water was coming from the centre console, but only suspected it was condensation.
However, I am now getting to the detail of it. I have dismantled some panels. But that is, as we say in Germany, a rat's tail. If you want to remove one fairing, you have to remove the next one first. But you can't remove it until you unscrew another one, and so on. The beginning has been made. Now I'll stop. That's enough for today.
It's same but also different when working on a really old car Rovie - like 1960's MB.

When something needs fixing - usually not so complex panels etc. to remove but when removed - 5 other issues now need fixing!

In English we say going down a "rabbit hole".

When I say to my wife I am going out to the garage for an hour to fix something, she responds with...."see you tomorrow then"!!
Hello @grenadierboy thank you for the expression rabbit hole. I've learned something new again. Yes, that's true, I always find something to screw on my old vehicles. On the one hand it's fun, but on the other hand it takes up valuable time.
 
Has anyone managed to get the dash switch panel (AC etc) out yet? I've to the top out and for the life of me can't release the bottom
 
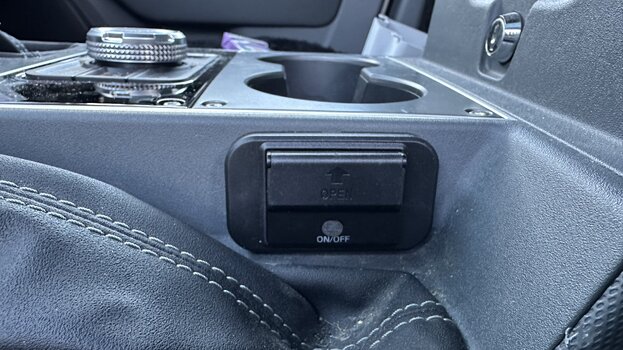
All done. Comes on with ignition or with PWR on roof panel. Wires not long enough to route in the way I would have preferred. Gynaecology skills very useful as a bit of a tight space to work in.
Hi- as mentioned before I like that idea. So I got now the USB socket I ordered and the Pozytabs. One question: did you simply drilled a hole from the hand brake lever to the inside? Just want to make sure that there are no wires etc…. 😉
 
Hi- as mentioned before I like that idea. So I got now the USB socket I ordered and the Pozytabs. One question: did you simply drilled a hole from the hand brake lever to the inside? Just want to make sure that there are no wires etc…. 😉
Hi Hunter
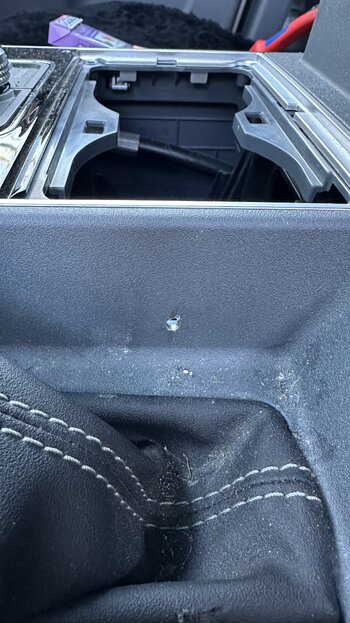
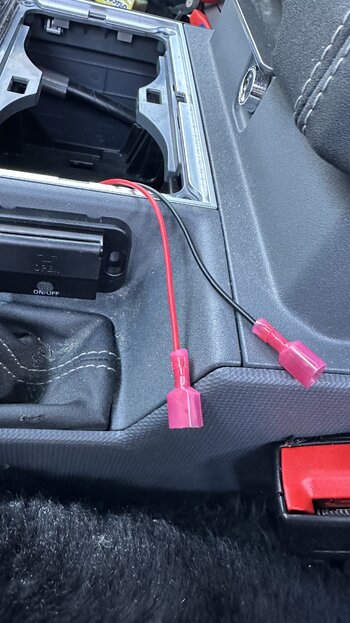
That’s correct. My usb socket has no depth to it so just needed two small holes for the self tappers that secure it, and a centre hole for the wires. I posi tapped into the cigarette socket wiring and not the adjacent USB socket wiring.
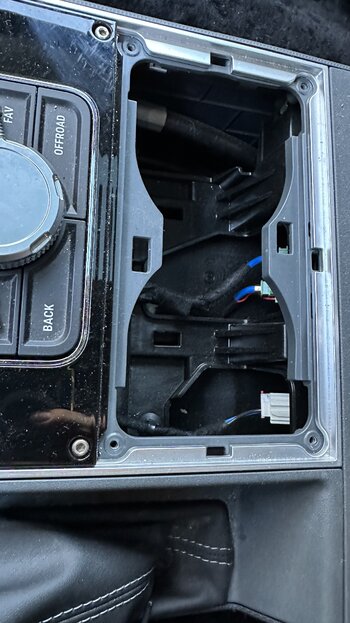
I of course had to remove the cup holder for access to wiring. Once screws are removed, it was quite tough to pull out. I think I put tape along the edge of the trim and used a plastic trim tool to assist with the removal.
I have found it a very handy, practical and out of the way place for a USB socket. Hope you find the same.
Hi Cheshire - it‘s on my agenda for next week. I will let you know as soon as it is done. Again, thanks for the additional explanation. 👍🏻👍🏻
I believe it is a very good place for that USB. Hope my hands are small enough to fit into that „space“ 😂😂
 
Hi Cheshire - it‘s on my agenda for next week. I will let you know as soon as it is done. Again, thanks for the additional explanation. 👍🏻👍🏻
I believe it is a very good place for that USB. Hope my hands are small enough to fit into that „space“ 😂😂
Now that bit is a challenge. Not very much access, that's for sure. :)
 
Now that bit is a challenge. Not very much access, that's for sure. :)
Hi Cheahire cat,

I couldn‘t wait untill next week so I copied your excellent idea today.
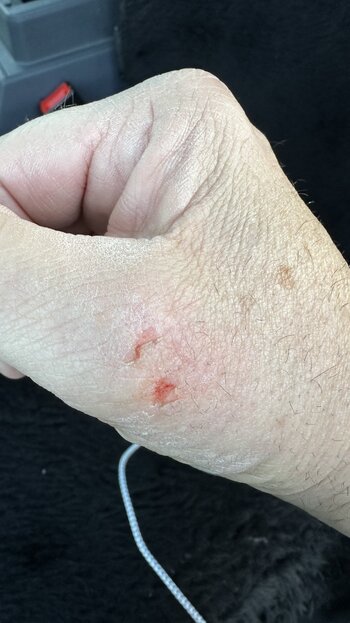
First of all you are right: it is a bit of a challange to get the hand in that area. The fact that all plastic parts inside — once the cup-holder is build-out — are sharp like a razor blade doesn‘t help…..as you can see in the first picture 😂😂😂

However, the spot for the USB socket is brilliant from my point of view. It looks like that it belongs there 👍🏻!

IMG_2864.jpeg
 

Attachments

  • IMG_2867.jpeg
    IMG_2867.jpeg
    1.7 MB · Views: 125
  • IMG_2861.jpeg
    IMG_2861.jpeg
    1.8 MB · Views: 126
  • IMG_2862.jpeg
    IMG_2862.jpeg
    2.4 MB · Views: 120
  • IMG_2863.jpeg
    IMG_2863.jpeg
    2.2 MB · Views: 123
  • IMG_2866.jpeg
    IMG_2866.jpeg
    2.2 MB · Views: 123
Hi Cheahire cat,

I couldn‘t wait untill next week so I copied your excellent idea today.
First of all you are right: it is a bit of a challange to get the hand in that area. The fact that all plastic parts inside — once the cup-holder is build-out — are sharp like a razor blade doesn‘t help…..as you can see in the first picture 😂😂😂

However, the spot for the USB socket is brilliant from my point of view. It looks like that it belongs there 👍🏻!

View attachment 7840451
Brilliant. Well done. Glad it worked out so well.
 
By the way from Ineos Website:

We’ve also developed an interactive parts catalogue to make it easy for you to identify exactly what parts you need, and to place an order for them.​

And on the German Site only:

3D-Anleitungen und -Reparaturhandbücher​

Wir wissen, dass Du vielleicht selbst Arbeiten am Fahrzeug durchführen möchtest. Deshalb haben wir den Grenadier bewusst so gestaltet und konstruiert, dass Arbeiten innen wie außen leicht auszuführen sind. Um Dir unter die Arme zu greifen, stellen wir Online-Reparaturhandbücher bereit. Und für Unterstützung durch das Technikteam im INEOS HQ reicht ein Anruf oder ein Klick.​
Natürlich kommt ein Fahrzeug des 21. Jahrhunderts nicht ohne Elektronik aus, um die sich besser unsere erfahrenen Techniker kümmern. Doch mit dem Betriebshandbuch und den Online-Anleitungen kannst Du einfache mechanische Wartungsarbeiten ohne Weiteres selbst ausführen. Zudem werden im interaktiven, animierten 3D-Online-Reparaturhandbuch alle Bauteile einzeln aufgeschlüsselt.
Translation with Google Translator:
3D guides and repair manuals​
We know that you may want to carry out work on the vehicle yourself. That's why we deliberately designed and constructed the Grenadier in such a way that work inside and outside can be carried out easily. To help you, we provide online repair manuals. And support from the technical team at INEOS HQ is just a phone call or a click away.​
Of course, a 21st century vehicle cannot do without electronics, which are better taken care of by our experienced technicians. But with the owner's manual and online instructions, you can easily perform simple mechanical maintenance yourself. In addition, all components are broken down individually in the interactive, animated 3D online repair manual.

Where they are?? - This could help enormously!
Some times earlier someone from Ineos say´s "comming soon" (readed this in our forum), please define "soon" !!
Is there any news to this?!
 
I do not dismount only out of curiosity, I dismount things when I want to fix something (but my car has a warranty), or when I want to modify something.
Bad luck, between yesterday and today, many hours spend, I burned an electric(onic)al component (not from the Grenadier) and a fuse (from the Grenadier), because a wire became loose on my component, and made a short circuit. Anyway, the space where I wanted to place it was too tight.
And I also wanted to dismount the front panel, the one with the airco, audio, and seat heating knobs and so on, and I didn't find how.

Anyway, some pictures to share, almost everything with screws and clipping parts.

View attachment 7820840View attachment 7820841View attachment 7820842View attachment 7820843View attachment 7820844View attachment 7820846View attachment 7820845

Am I really depressed because I didn't succeed? No, nothing I couldn't live without, not like Australians or other people who want a CB radio on board, in Europe we almost don't need this.
Only playing around with some non critical ideas.
(I didn't finish mounting everything back, by the way).
Hey so it looks like the piano black piece surrounding the iDrive infotainment controls can be individually removed?

I want to wrap it in vinyl. Looking to remove it to make it easier to wrap
 
Back
Top Bottom