should be GRA-7000-005910 for the rails and GRA-0000-003690 for the hardware. mine came to $178.00 + tax.That makes me wish I had ordered mine with the tool belt. Any guess what the part number is to add it now?
Register a free account today to become a member! Once signed in, you'll be able to contribute to the community by adding your own topics, posts, and connect with other members through your own private inbox! INEOS Agents, Dealers or Commercial vendors please contact admin@theineosforum.com for a commercial account.
should be GRA-7000-005910 for the rails and GRA-0000-003690 for the hardware. mine came to $178.00 + tax.That makes me wish I had ordered mine with the tool belt. Any guess what the part number is to add it now?
should be GRA-7000-005910 for the rails and GRA-0000-003690 for the hardware. mine came to $178.00 + tax.


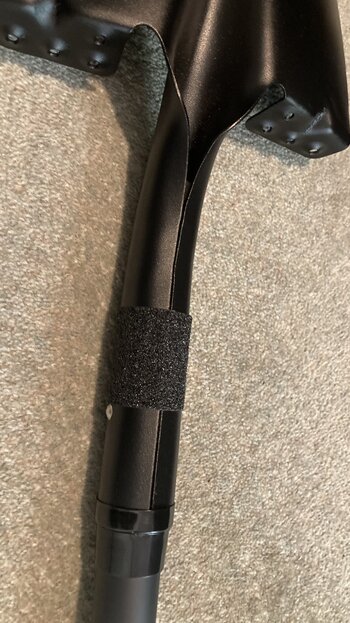
Thanks to all the advice here, I have mounted a shovel onto the utility belt.
I used a pair of https://www.z1motorsports.com/misce...l-quickfist-riser-by-z1-off-road-p-44901.html
Attached to the utility belt using https://www.aliexpress.com/item/1005006954198737.html
I chose the M6 bolts, so I didn't have to drill out the risers.
The shovel I used was a https://www.roofracksgalore.com.au/spade-black-1065mm-handle-blue-grip
Next step is to apply some type of grip tape to the handle (where the QuickFists grab it) to prevent the shovel from rotating and touching the bodywork.
View attachment 7873501View attachment 7873502View attachment 7873503View attachment 7873504View attachment 7873505
Assuming it doesn’t get scrubbed off by the branch or whatever is scraping along the side in the process. Hanging shit off the side isn’t my bag but, if I were to do it the blade end would slide into a firmly mounted pocket.I'm a fan. A bit of rubber edge guard on the shovel blade should be enough to protect the paint even if it rotates in it's mount.
I still don't want it bouncing off the truck sheet mental. If something can flop around, it's not really fastened. I think if one wanted the shovel on the side, one of those panels would be much more solid and safe.If you add rubber onto the shovel blade, it is called pinchweld.
Looks like a good solution. Have been pondering options and this, together with thedocaus suggestion of pinchweld looks like an attractive optionThanks to all the advice here, I have mounted a shovel onto the utility belt.
I used a pair of https://www.z1motorsports.com/misce...l-quickfist-riser-by-z1-off-road-p-44901.html
Attached to the utility belt using https://www.aliexpress.com/item/1005006954198737.html
I chose the M6 bolts, so I didn't have to drill out the risers.
The shovel I used was a https://www.roofracksgalore.com.au/spade-black-1065mm-handle-blue-grip
Next step is to apply some type of grip tape to the handle (where the QuickFists grab it) to prevent the shovel from rotating and touching the bodywork.
View attachment 7873501View attachment 7873502View attachment 7873503View attachment 7873504View attachment 7873505


OUCH! I never want to encounter YOUR Grenadier EVER!I’ve been following this thread as was debating changing my roof top shovel mount in these pics to a side mount as I really like the side mount better and it’s easier & faster to access it. First pic was at a weird angle as was checking to see if it would fit into the garage and with some work it actually did!! You may have to zoom in on the second pic to see the shovel on top. When I tried to zoom in and take a closer pic and download to this site I get an error code that image too big. If anyone could help me on that I would appreciate it as I’ve tried adjusting the settings on my phone but no matter what I do when I zoom in on things I can’t download those pics. So if anyone image is not too big when you have the whole vehicle then how can it be too big with only parts of the vehicle? I’m not a tech guy so I’m sure there is a simple solution or reason just above my pay grade as they say. Btw, yes I can access the roof top shovel now using the side “Buzz” step, but I also keep a small stool in the rear cargo area just in case…..
Graphics definitely NOT cheap, but was done with PPF first then the black map wrap on top. Then to finish all off a ceramic coat is being applied this week to finish it off. Couldn’t do it all at once had to let things adhere get dry etc. after that she should be ok to get hit with some small branches and debris off road. I am not doing any rock crawling but will be fly fishing and camping in it. Local tint/wrap/graphic shop I know the owner and been going there for years. I HAVE to customize almost every vehicle I get. Not gonna load up pics on here as have a ton but most of my rides get the custom treatment. Btw, I’m fine with people who leave theirs completely stock. I’m TRYING to do that with my 2nd Grenadier, we shall see how long that lasts……OUCH! I never want to encounter YOUR Grenadier EVER!
BY the way where did you get your Graphics done? They look AMAZING! Cost?


I thought I posted both sides, sorry. Yes the map starts on driver’s side and ends on pass side. Basically a larger layout of the same map on the hood. You may have to zoom in on the black map section to see the terrain and details:Did you make some sort of map from the passenger to the driver side? I think you had to make that yourself!