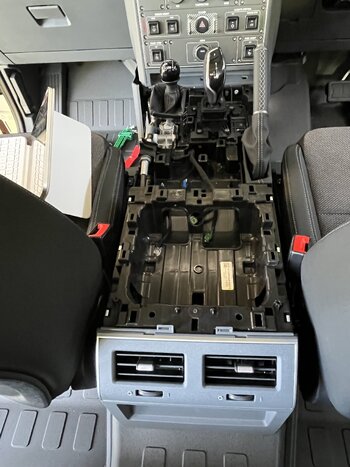
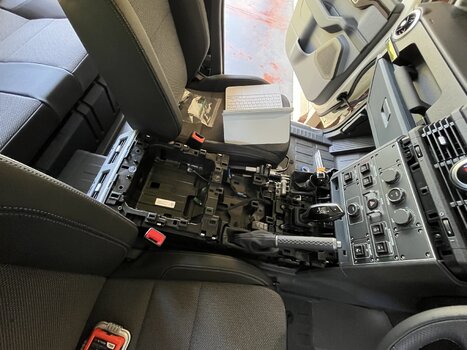
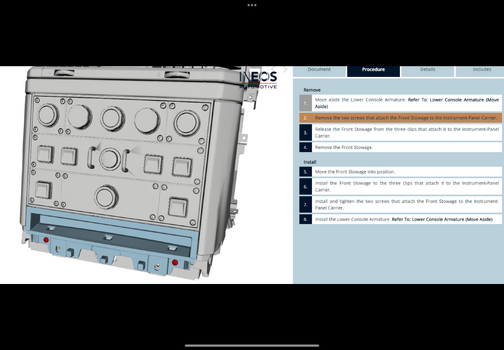
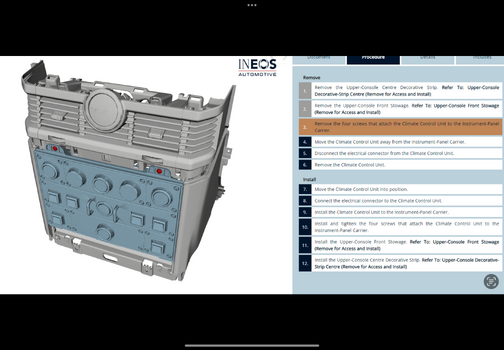
Yes clips, if you go to posts #18 and #20 of @rovie you see the explanation.And how did you get out the cup holder? It still sits tight when the four little screws are taken out. Is it fixed with additional clips?
The Grenadier Forum
Register a free account today to become a member! Once signed in, you'll be able to contribute to the community by adding your own topics, posts, and connect with other members through your own private inbox! INEOS Agents, Dealers or Commercial vendors please contact admin@theineosforum.com for a commercial account.
You are using an out of date browser. It may not display this or other websites correctly.
You should upgrade or use an alternative browser.
You should upgrade or use an alternative browser.
Has anyone successfully removed the Centre console panel?
- Thread starter MattG
- Start date
-
- Tags
- center console panel
There use to be a local person to LA that did burl wood for the FJ60's.Burr walnut in the Bentley, that will do nicely thank you.
Sammy Davis Jr lost his eye due to the steering wheel on his 1949 cad that had a center that looked like a missile. Given that it is in the center, that it isn't in the immediate area of airbags and that we now where seat belts....I remember the days when all kinds of folks were walking around in society with facial scars from car accidents. Use your imagination. Those concerns largely disappeared with safety glass, shoulder belts, and air bags.
Nowadays it's your stainless coffee mug and cell phone that's going to be through your teeth in a collision.
View attachment 7836893
I'd be ok with plastic (maybe somebody smarter than I (Which is 90% of you) has the ability to create plans for a 3D printer.
I find the location of the key in the Grenadier curious, the RHD foot wedge means its located at perfect kneecap height and could become firmly and painfully wedged in there in a heavy collision. Always liked the Saab centre console solution.Historically, metal/wood dashes became plastic for safety reasons , and cost saving was a nice side effect.
Without safety belts ( I recall , just, those days) you did not want to contact that metal in a stoppage!
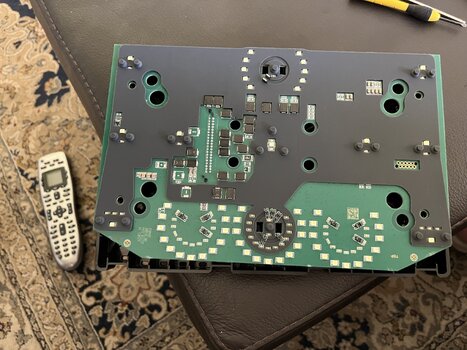
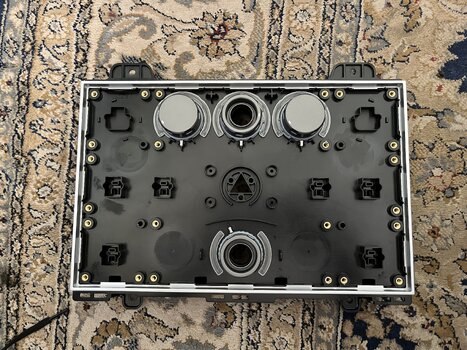
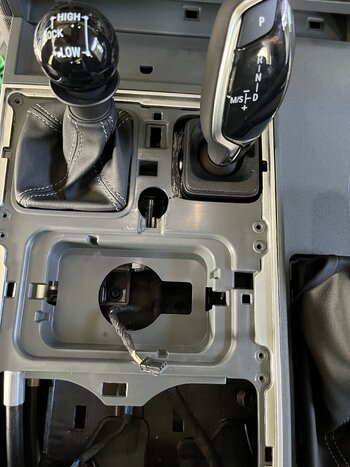
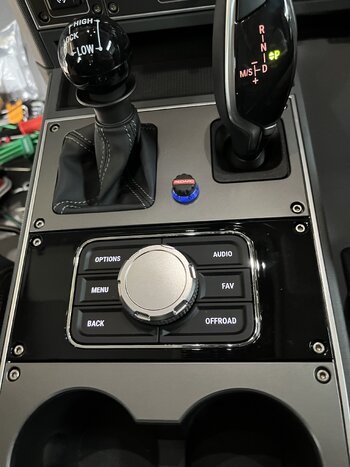
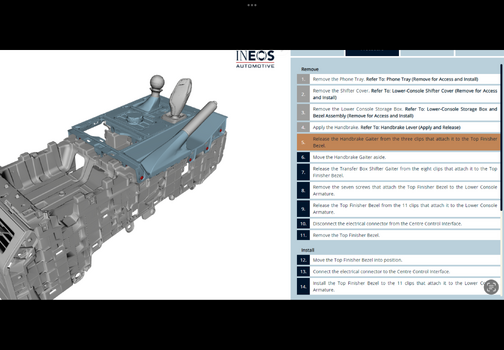
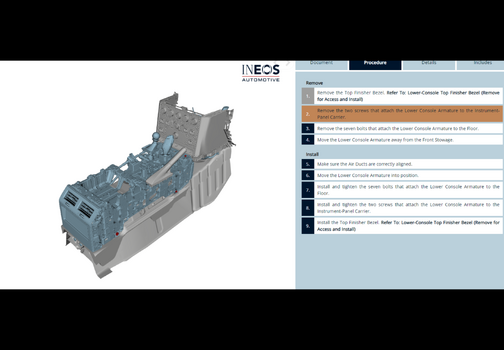
So, because I wanted to mount my TowPro elite controller knob in the empty top right-hand space of the centre console panel, (and my GME UHF microphone port in the top left), I finally managed to remove the centre console panel today (after I received some very helpful information from my local dealership). The dealership sent me several pages from their workshop manual which gave me step-by-step instructions on how to remove and reinstall it. It was quite a big job. Alas, the behind the plastic facade of the centre console, there is a large printed circuit board occupying the entire space, with no ability to insert any accessory without damaging (destroying) the PCB. Hence, I have now located the TowPro controller knob in between the two gear levers. This required a little bit of dremel-action to create a small cavity for the controller to fit into. It’s not my preferred position, but it is very easy to get to and looks fairly neat too.
Attachments
Thanks @Matt G. for sharing this info! A very neat install -well done!So, because I wanted to mount my TowPro elite controller knob in the empty top right-hand space of the centre console panel, (and my GME UHF microphone port in the top left), I finally managed to remove the centre console panel today (after I received some very helpful information from my local dealership). The dealership sent me several pages from their workshop manual which gave me step-by-step instructions on how to remove and reinstall it. It was quite a big job. Alas, the behind the plastic facade of the centre console, there is a large printed circuit board occupying the entire space, with no ability to insert any accessory without damaging (destroying) the PCB. Hence, I have now located the TowPro controller knob in between the two gear levers. This required a little bit of dremel-action to create a small cavity for the controller to fit into. It’s not my preferred position, but it is very easy to get to and looks fairly neat too.
I now know what "not" to touch and will seek other options should the need arise.
Very interesting snippet also re. the "existential" question re. "a" workshop manual
Last edited:
Ha, I agree on this. I always assumed that the chunky center console was because of need; they have dedicated wiring for each control. That's not the case. I'm a little surprised no one else is complaining about the integrated circuit board here. One thing that appealed to me on this vehicle was that it avoided the "look" of anything and instead was authentic WYSIWYG.This is something that really bothers me. It’s like Ford putting fake plastic that looks like metal on their trucks to fake being tough. It’s tacky. I really hope they come out with a modular panel for real.
Quick question...in removing these panels is there any waterproofing evident? I don't see any gaskets or seals protecting the circuit boards from water.
I remember watching one of those 'Inside The Factory' kind of shows about Bentley a couple of years ago. The wood and leather segments actually made me think for a minute "I'm surprised they're not MORE expensive"!Burr walnut in the Bentley, that will do nicely thank you.
I thought that maybe an aftermarket or 3d print could build individual sections but with a single board behind the panel it will be difficult.
Well those pictures certainly answered my questions. On my commute this morning I thought about moving the cup holders up and the buttons back.So, because I wanted to mount my TowPro elite controller knob in the empty top right-hand space of the centre console panel, (and my GME UHF microphone port in the top left), I finally managed to remove the centre console panel today (after I received some very helpful information from my local dealership). The dealership sent me several pages from their workshop manual which gave me step-by-step instructions on how to remove and reinstall it. It was quite a big job. Alas, the behind the plastic facade of the centre console, there is a large printed circuit board occupying the entire space, with no ability to insert any accessory without damaging (destroying) the PCB. Hence, I have now located the TowPro controller knob in between the two gear levers. This required a little bit of dremel-action to create a small cavity for the controller to fit into. It’s not my preferred position, but it is very easy to get to and looks fairly neat too.
No waterproofing that I could see, other than the usual rubber conductive membrane between the buttons and the PCBHa, I agree on this. I always assumed that the chunky center console was because of need; they have dedicated wiring for each control. That's not the case. I'm a little surprised no one else is complaining about the integrated circuit board here. One thing that appealed to me on this vehicle was that it avoided the "look" of anything and instead was authentic WYSIWYG.
Quick question...in removing these panels is there any waterproofing evident? I don't see any gaskets or seals protecting the circuit boards from water.
This is what I was given:
Attachments
Thank you!
So the 3d step by step service manual exists. It’s just a matter of when INEOS will make it available to us owners.
So the 3d step by step service manual exists. It’s just a matter of when INEOS will make it available to us owners.
This would really be helpful if we get these guide for our cars, as promised by INEOS. I would even pay an annual fee for it! But I guess the dealers have placed their veto against this brilliant idea of INEOS. As long as they can prevent INEOS of sharing this with us, the more the dealers can keep us as livestock to milk and fund their business. (And the more frustrated we get)This is what I was given:
Considering the unscrupulousness with which you are dismantling our Grenadiers, I understand why INEOS is hesitant to make the manual workshop public...Thank you!
So the 3d step by step service manual exists. It’s just a matter of when INEOS will make it available to us owners.
It is not "our Grenadier", it is mineConsidering the unscrupulousness with which you are dismantling our Grenadiers, I understand why INEOS is hesitant to make the manual workshop public...
Despite the laudable idea that the Grenadier would be a "simpler" vehicle, with a commensurately reduced requirement for specialised service tools in the field, it is nevertheless a complex beast. The engines and transmissions are quite sophisticated. I don't believe that the dealers are necessarily anti the prospect of competent DIY owners undertaking minor servicing -filters, oil changes etc. Let's face it very few of us have the time and capabilities of "LR Time's Christian and Vera" but with our own GrenadierThis would really be helpful if we get these guide for our cars, as promised by INEOS. I would even pay an annual fee for it! But I guess the dealers have placed their veto against this brilliant idea of INEOS. As long as they can prevent INEOS of sharing this with us, the more the dealers can keep us as livestock to milk and fund their business. (And the more frustrated we get)
Making detailed data available to one and all reduces the 'barriers to entry' to independents outside the established Ineos dealer/Bosch agent arrangements.... In that respect I can appreciate the concerns. I note that early in the piece, while anticipating owners would undertake routine fluids and filters servicing, there was a specific caveat that Ineos expected the vehicle be seen once a year by an authorised dealer/service agent.
That PCB behind the console looks pretty well designed and made to me. l guess all vehicles are like this now, it's likely much more labour intensive to hand wire all the switches in production. And also likely cheaper to produce a one for all PCB and just leave out the switches that aren't specified on that particular vehicle.
The fourth picture of Matt was for me a "wow" moment. I already tried to remove the "climate control panel" in the past by removing the visible screws of the panel, to no avail. Because I wanted to use the "empty button" position (I don't have seat warming) to place a wired USB charging point for my phone.This is what I was given:
Therefore I went immediately to my car to see if I could remove it now. I didn't remove it completely because I only had access to two upper screws of the four screws, but anyway here my findings.
"First remove the upper console decorative strip" it says. To remove this strip, you should first unclip the two small decorative strip pieces left and right of the dashboard. In my Left Hand Drive car, the left part is longer than the right part.
Then remove the two screws of the "upper console decorative strip", one left, one right, with a TX20 screwdriver:
Next unclip the "upper console decorative strip":
Then, two of the four TX20 screws of the "climate control board" become visible, and I removed them (see the red dots on the Ineos screenshot of Matt).
I did not continue, but is is clear that this is the way to remove the panel: When I also remove the lower screws, the board will flip out I guess.
Similar threads
- Replies
- 17
- Views
- 995
- Replies
- 1
- Views
- 694
- Replies
- 27
- Views
- 2K

