The Grenadier Forum
Register Now for enhanced site access.
INEOS Agents, Dealers or Commercial vendors please contact admin@theineosforum.com for a commercial account.

Show us your mods.

Shaky

Grenadier Owner
Forum Donor
Local time
3:40 AM
Joined
Apr 28, 2022
Messages
1,494
Reaction score
3,138
The box is self-made to maintain a flat surface with the rear seat folded down. On the right side there is space for 2 x 2 liter water bottles for the dogs, rain gear or similar fits under the lid.
I built it myself because, in my opinion, the ones on the market are too expensive and I was happy to take on the challenge of finding a solution that exactly meets my requirements. The whole thing weighs a little under 32kg.
As you can see by the different colors, it was a step by step project. There will definitely be changes...
View attachment 7848768

Shame you are in Germany as I would like to have had a good look at that. I am about to start a rear shelf like yours but without the draws. I want to put guns under it without have to break them down, so I won’t be able to have draws.

The right hand side material interests me as it looks like plastic or something I can’t make my mind up.

If you can supply some information on the materials used I would be abliged, including the shelf covering.

Cheers Shaky 👍
 

MShepherd

Grenadier Owner
Local time
9:40 AM
Joined
Jan 7, 2023
Messages
30
Reaction score
72
Location
Germany
Shame you are in Germany as I would like to have had a good look at that. I am about to start a rear shelf like yours but without the draws. I want to put guns under it without have to break them down, so I won’t be able to have draws.

The right hand side material interests me as it looks like plastic or something I can’t make my mind up.

If you can supply some information on the materials used I would be abliged, including the shelf covering.

Cheers Shaky 👍
Hello Shaky,
I used 10 and 12 mm plywood and covered it with faux leather. The cover plate also has a 3 mm foam rubber.
Ordered heavy-duty pull-outs online and a few aluminum profiles from the hardware store (to cover the cutting and assembly of the faux leather). No big deal ...
Maybe the length of one large drawer is enough for you. But without the intermediate strut, 12 mm plywood becomes too unstable. An AK47 would fit I think ;)
Michael
 

Shaky

Grenadier Owner
Forum Donor
Local time
3:40 AM
Joined
Apr 28, 2022
Messages
1,494
Reaction score
3,138
Hello Shaky,
I used 10 and 12 mm plywood and covered it with faux leather. The cover plate also has a 3 mm foam rubber.
Ordered heavy-duty pull-outs online and a few aluminum profiles from the hardware store (to cover the cutting and assembly of the faux leather). No big deal ...
Maybe the length of one large drawer is enough for you. But without the intermediate strut, 12 mm plywood becomes too unstable. An AK47 would fit I think ;)
Michael

It’s a Barrett 50 Cal.

Thanks for the materials list, I re-examined your photo and concluded it was a faux leather. I really like the look and makes it appear very professional 👍
 

MShepherd

Grenadier Owner
Local time
9:40 AM
Joined
Jan 7, 2023
Messages
30
Reaction score
72
Location
Germany
It’s a Barrett 50 Cal.

Thanks for the materials list, I re-examined your photo and concluded it was a faux leather. I really like the look and makes it appear very professional 👍
many thanks Shaky! it's more to hide the unprofessionalism :p
 

Asnes

Grenadier Owner
Lifetime Supporter
Local time
3:40 AM
Joined
Dec 10, 2022
Messages
352
Reaction score
639
Location
Windermere, FL, USA
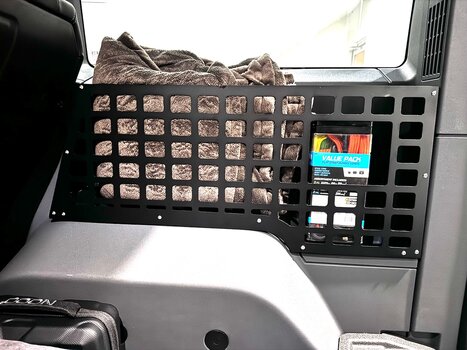
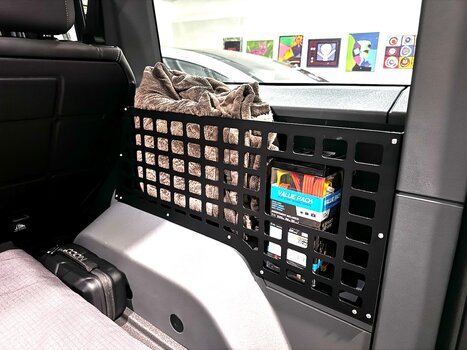
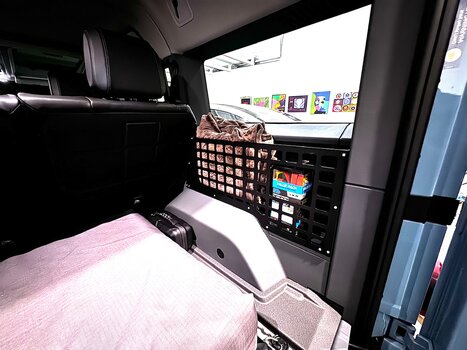
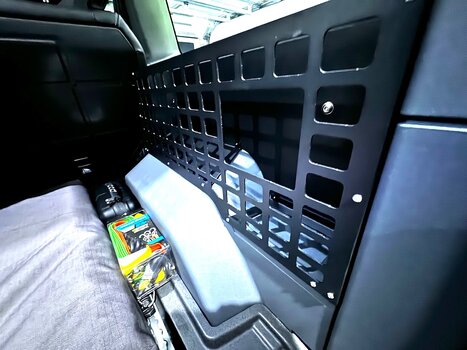
Installed an aluminum storage bin over the wheel well. Picked it up on Amazon but available on eBay as well. It was pricey at $300 shipped but I’m very pleased with the quality and fit. Less stuff flying around the rear now… can still lash things down using the MOLLE panel design, it would seem.

Came fully assembled. 5 minute install - you simply replace the tie downs with supplied hardware. Done.

My bison gear shelf that mounts to the roof arrives Friday…….
 

Attachments

  • IMG_1141.jpeg
    IMG_1141.jpeg
    440.5 KB · Views: 374
  • IMG_1144.jpeg
    IMG_1144.jpeg
    432.3 KB · Views: 327
  • IMG_1143.jpeg
    IMG_1143.jpeg
    437.9 KB · Views: 279
  • IMG_1142.jpeg
    IMG_1142.jpeg
    421.7 KB · Views: 350
Last edited:

Tom D

Grenadier Owner
Lifetime Supporter
Local time
8:40 AM
Joined
Jun 3, 2022
Messages
989
Reaction score
2,737
Location
Berwickshire
Installed an aluminum storage bin over the wheel well. Picked it up on Amazon but available on eBay as well. It was pricey at $300 shipped but I’m very pleased with the quality and fit. Less stuff flying around the rear now… can still lash things down using the MOLLE panel design, it would seem.

Came fully assembled. 5 minute install - you simply replace the tie downs with supplied hardware. Done.

My bison gear shelf that mounts to the roof arrives Friday…….
Is that a grenadier specific product? looks a very good fit!
 

Skiprat

Grenadier Owner
Lifetime Supporter
Local time
3:40 AM
Joined
May 20, 2022
Messages
31
Reaction score
93
Location
Herts UK
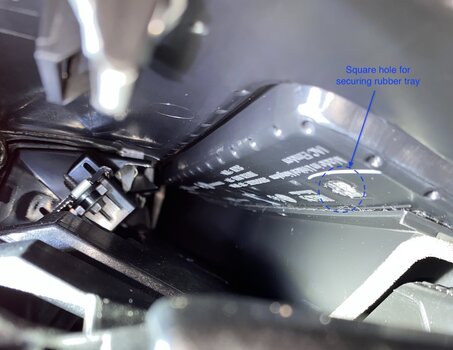
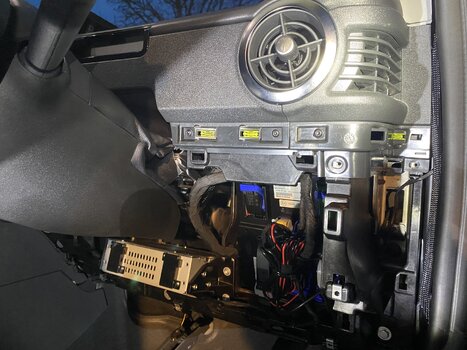
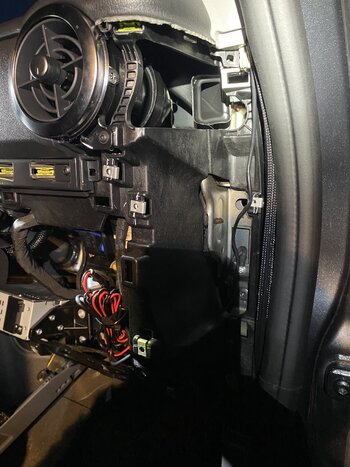
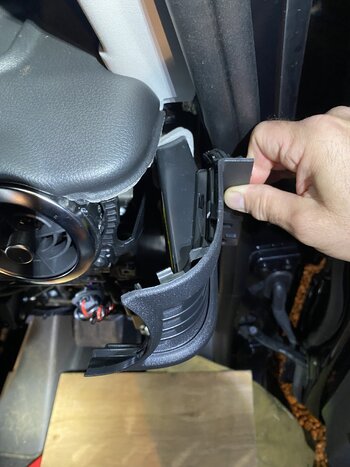
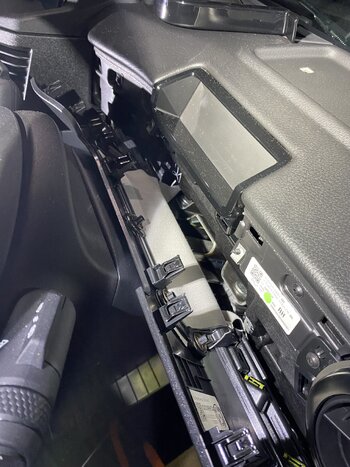
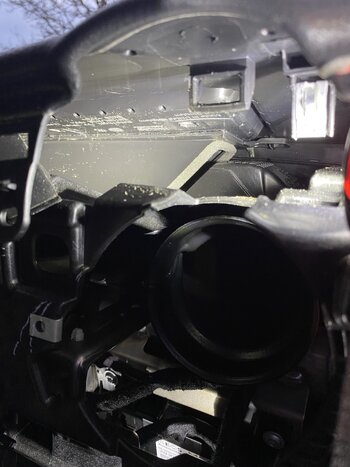
I decided to take the plunge and get a look at the underside of the Dashboard top. I was looking to mount a Garmin Camper 895 to the shallow tray area in front of the steering wheel/annunciator panel and at about the same time @chrsbe posted the pictures of the nice 3D insert that he'd produced. I too was wondering what it was like immediately underneath and I've managed to get in there this evening. It is constructed from plastic, but a spreader plate underneath would go some way to preventing the load above from pulling through or cracking the plastic.
I was thinking M5 or M6 Rivnuts into an aluminium plate or a plastic 3D printed plate in the existing positions that are used by the rubber 'barbs' of the shallow tray. That plate could be secured in position on the underside using double sided foam tape.
 

Attachments

  • Grenadier dash underside.jpg
    Grenadier dash underside.jpg
    140.2 KB · Views: 350
  • Grenadier Under Dash Plate.pdf
    126.8 KB · Views: 66

Skiprat

Grenadier Owner
Lifetime Supporter
Local time
3:40 AM
Joined
May 20, 2022
Messages
31
Reaction score
93
Location
Herts UK
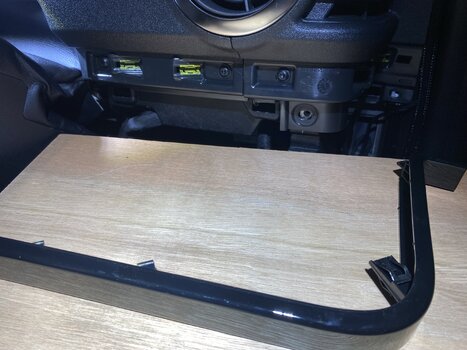
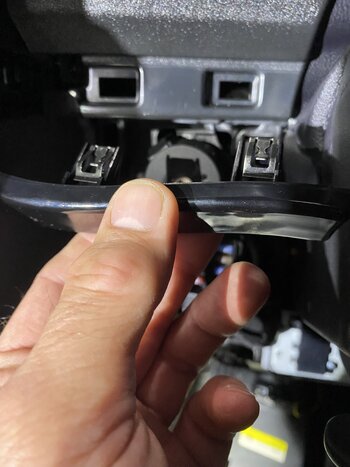
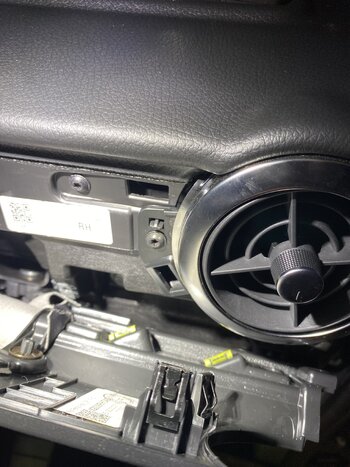
The process to get to the underside is as follows:
Tools: Torx drivers T20 & T30, & plastic trim removing tools.
1) Remove the Lower & Mid panels that sit above your shins when driving - T20 screws & rectangular spring clips.
2) Remove the 2 delicate shiny trim strips from either side of the steering column - *Note that outboard of the steering column the clips are set at an angle of 45 degrees (see the yellow clips in the dash from the picture)
3) Remove the T20 screws behind those trim strips, and from the front of the dash end panel located below the 6 o'clock position of the air vent. Remove the end panel (spring clips)
4) Pull out the panel that sits above the steering column and below the annunciator panel (it's still attached to the leatherette cover on top of the column)
5) Remove the T20 screws that hold the air vent in (9 o'clock & 5 o'clock positions) - Note these screws are a little longer than the others.
6) Pull the air vent out
7) Remove the 'A' pillar cover (T30 screw + spring clips) and remove the T20 screw holding the end of the dash down.
8) The end of the dash can be prised up under tension now, it appears to be held down by spring clips at least in part - this should give you access to the underside of the rubber tray.
 

Attachments

  • IMG_0651.jpeg
    IMG_0651.jpeg
    3.1 MB · Views: 327
  • IMG_0654.jpeg
    IMG_0654.jpeg
    2.5 MB · Views: 287
  • IMG_0655.jpeg
    IMG_0655.jpeg
    1.9 MB · Views: 248
  • IMG_0659.jpeg
    IMG_0659.jpeg
    1.6 MB · Views: 240
  • IMG_0657.jpeg
    IMG_0657.jpeg
    1.6 MB · Views: 234
  • IMG_0660.jpeg
    IMG_0660.jpeg
    2 MB · Views: 243
  • IMG_0663.jpeg
    IMG_0663.jpeg
    1.7 MB · Views: 248
  • IMG_0664.jpeg
    IMG_0664.jpeg
    1.8 MB · Views: 285

Skiprat

Grenadier Owner
Lifetime Supporter
Local time
3:40 AM
Joined
May 20, 2022
Messages
31
Reaction score
93
Location
Herts UK
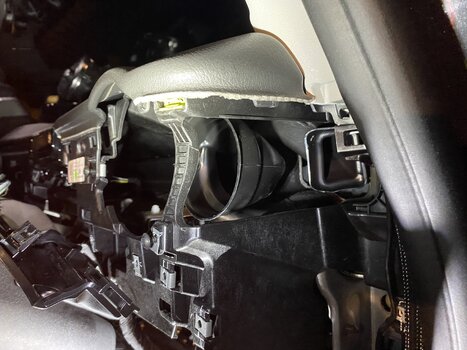
Regarding the exploratory fun I had under the dash a couple of posts ago, I realized that the depression in the dash top is not available in its entirety for a spreader plate underneath. There is a heating duct that runs across under the forward part of the tray. From the measurements I have taken it would leave enough for a 44mm approx. wide spreader plate. Note the heating duct starts to curve in at the inboard end of the area in question, so a slight chamfer of the edge that sits against the heating duct should keep it sitting correctly. I managed to cut a piece of hardboard 290mm x 44mm with that chamfer and it sat nicely on the underside.
As for the clearance underneath I reckon that there's 45mm clearance below the front edge of the spreader and 30mm along the rear.
The attached diagram shows a view looking from above (RHD) and a cutaway side view showing the position of the heating duct and the clearance underneath.
I’ve also attached a photo that hopefully shows the heating duct
 

Attachments

  • Grenadier Dash Top Diagram.pdf
    97.4 KB · Views: 72
  • IMG_0682.jpeg
    IMG_0682.jpeg
    1.7 MB · Views: 268

DaBull

Grenadier Owner
Lifetime Supporter
Local time
12:40 AM
Joined
Dec 28, 2022
Messages
1,410
Reaction score
2,695
Location
California
Hi Lollo050968, Very nice drawer system build and photos too!
What mm of plywood are you using?
What it the total height from the bottom of the bottom piece of plywood to the top of the top platform?
DaBull
 

Lollo050968

Grenadier Owner
Lifetime Supporter
Local time
9:40 AM
Joined
Oct 12, 2022
Messages
605
Reaction score
1,447
Location
Germany
@DaBull Thanks! Ground 12mm, vertical 15mm, Top 18mm, drawer bottom 9mm, Airline 10mm sinked and glued with installation glue, and additional fix with screws 4x12mm, space for the Eurobox height 240mm. 7mm space under the bottom of the drawer. Total height around 300mm
 

chrsbe

Grenadier Owner
Local time
9:40 AM
Joined
Apr 2, 2023
Messages
323
Reaction score
569
Location
Sternwartestraße, Wien, Österreich

Lollo050968

Grenadier Owner
Lifetime Supporter
Local time
9:40 AM
Joined
Oct 12, 2022
Messages
605
Reaction score
1,447
Location
Germany
Nice and simple setup. I like it a lot! Great work.
What brand of drawer slides have you used? I made the mistake of buying ones that were too cheap.
Teleskopschienen24.de, 800mm for 60kg
 

NoAge Hunter

Grenadier Owner
Lifetime Supporter
Local time
9:40 AM
Joined
Mar 3, 2023
Messages
228
Reaction score
614
Location
Kaarst, Deutschland
The box is self-made to maintain a flat surface with the rear seat folded down. On the right side there is space for 2 x 2 liter water bottles for the dogs, rain gear or similar fits under the lid.
I built it myself because, in my opinion, the ones on the market are too expensive and I was happy to take on the challenge of finding a solution that exactly meets my requirements. The whole thing weighs a little under 32kg.
As you can see by the different colors, it was a step by step project. There will definitely be changes...
View attachment 7848768
That really looks great! Also the combination with the flat tire housing….. perfekt!
Hie did you fix the rails for the drawer if I may ask. Oh, and how much weight do you believe you can put on top?
I really like that…… would you share a bit of how you built it?
Michael
 

NoAge Hunter

Grenadier Owner
Lifetime Supporter
Local time
9:40 AM
Joined
Mar 3, 2023
Messages
228
Reaction score
614
Location
Kaarst, Deutschland
Back
Top Bottom