
I just installed the G990 pro and thought I would post incase it helped someone. Prior to install, I researched all the threads and watched all install videos I could find. I was still unclear on the exact procedure to fish the wire through the rear door boot (specifically the door side of the boot - this is the hard part). In two of the "pro" install videos, the hardest part of the install was skipped and it seemed like the installer actually made a hole in the door side of the boot after the weather seal portion.
Well, after thinking it over I finally came up with the exact procedure to do this WITHOUT damaging the boot in 30 mins or less.
What I used:
Cat 5e cable I had laying around (cut off the ends)
Klien tools 51100 foam lubricant
Gorilla tape
1) Remove both ends of the rubber boot. Remove lower door panel.
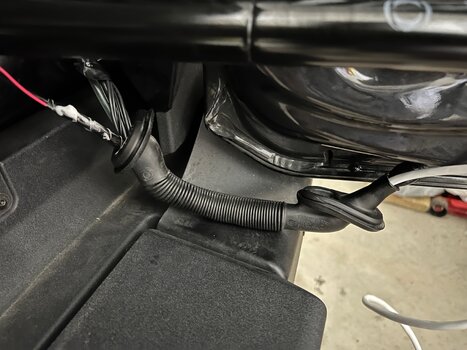
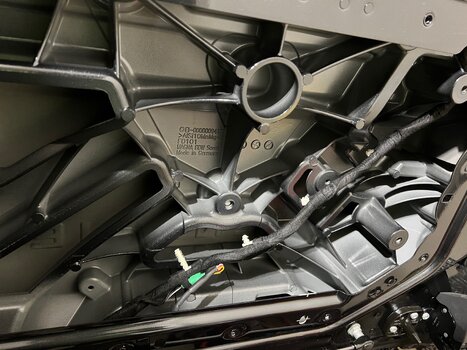
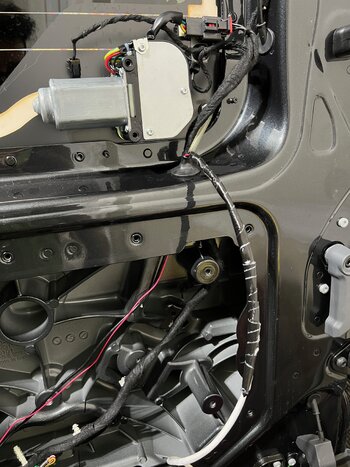
2) Remove all white clips securing the factory wire harness from the for frame. This will allow you to pull the wire harness out of the door side boot hole so you can expose the electrical tape. Remove electrical tape that secures harness to rubber boot (door side).
3) Get comfortable with rolling the rubber back from the harness.
4) Roll rubber back, place the foam lubricant tube and roll rubber over the tube. Discharge lube. Push the lube tube further and discharge again (do this a few times). Also insert lubricant tube on the other side of the boot and discharge. The goal is to get everything nice and slippery.
5) Take the cat5e cable (with trimmed ends) and insert on the door side of the boot (using the same procedure used to insert lubricant tube).
6) Once cable is in the boot slowly keep sliding it in until you can find it on the other side of the boot.
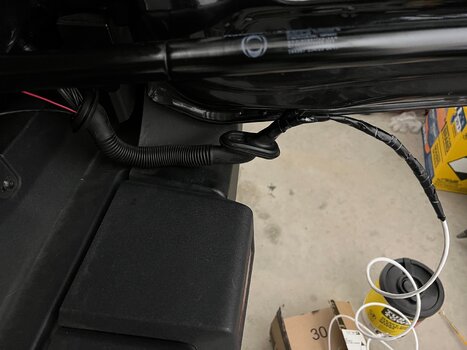
7) Pull cable until at least 5 inches of cable are exposed on the other side.
8) Clean the lube of the cable throughly, duck tape at least 5 inches of cable and 5 inches of the camera cable (with a continuous piece of duck tape).
9) Take your time and fish the camera cable through the boot (I am talking like 1mm per second)
10) Do not remove the duck tape after you fish the cable through, there will be another rubber grommet that your can fish through using the same procedure.
Well, after thinking it over I finally came up with the exact procedure to do this WITHOUT damaging the boot in 30 mins or less.
What I used:
Cat 5e cable I had laying around (cut off the ends)
Klien tools 51100 foam lubricant
Gorilla tape
1) Remove both ends of the rubber boot. Remove lower door panel.
2) Remove all white clips securing the factory wire harness from the for frame. This will allow you to pull the wire harness out of the door side boot hole so you can expose the electrical tape. Remove electrical tape that secures harness to rubber boot (door side).
3) Get comfortable with rolling the rubber back from the harness.
4) Roll rubber back, place the foam lubricant tube and roll rubber over the tube. Discharge lube. Push the lube tube further and discharge again (do this a few times). Also insert lubricant tube on the other side of the boot and discharge. The goal is to get everything nice and slippery.
5) Take the cat5e cable (with trimmed ends) and insert on the door side of the boot (using the same procedure used to insert lubricant tube).
6) Once cable is in the boot slowly keep sliding it in until you can find it on the other side of the boot.
7) Pull cable until at least 5 inches of cable are exposed on the other side.
8) Clean the lube of the cable throughly, duck tape at least 5 inches of cable and 5 inches of the camera cable (with a continuous piece of duck tape).
9) Take your time and fish the camera cable through the boot (I am talking like 1mm per second)
10) Do not remove the duck tape after you fish the cable through, there will be another rubber grommet that your can fish through using the same procedure.
Attachments
Last edited:


