The Grenadier Forum
Register Now for enhanced site access.
INEOS Agents, Dealers or Commercial vendors please contact admin@theineosforum.com for a commercial account.

Solar Panel Installation and Setup

K1LL3M

Grenadier Owner
Local time
4:15 AM
Joined
May 21, 2023
Messages
159
Reaction score
371
Location
AUSTRALIA
Not sure if it is helpful for you, but there is a point at the end of the gutter that allows you to route a cable into the vent cover, under the rubber at the rear and then into the vehicle. There is an opens directly into the trim panels along the side at the bottom. No need to remove roof lining

I dont have an exact picture angle available but if you check it out you should be able to make sense of it. tThis is where I ran the roof mounted aerial cable, down the roof rack leg and into vehicle..
 

Attachments

  • Screenshot_20240131_131037_Gallery.jpg
    Screenshot_20240131_131037_Gallery.jpg
    1 MB · Views: 178
  • 20230923_193741.jpg
    20230923_193741.jpg
    1.8 MB · Views: 185

Miltz

Grenadier Owner
Local time
3:45 AM
Joined
May 11, 2023
Messages
133
Reaction score
174
Location
Australia
Not sure if it is helpful for you, but there is a point at the end of the gutter that allows you to route a cable into the vent cover, under the rubber at the rear and then into the vehicle. There is an opens directly into the trim panels along the side at the bottom. No need to remove roof lining

I dont have an exact picture angle available but if you check it out you should be able to make sense of it. tThis is where I ran the roof mounted aerial cable, down the roof rack leg and into vehicle..
Interesting, just had a look at my vehicle and it looks like the corner trim of the gutter comes off with a single bolt, has groves in it that would take the cable and there is an opening into the body above the rear door hinge that I could get into and run down into the boot via what I guess you'd call the D-pillar.

I notice you've gone down the right side of the car, do you know if it's similar inside the boot on the left (obviously there's a jack in there)? I was going to use the left for coming in via the roof outlet via the C-pillar but his option may be better for weather proofing (not opening the existing power outlet grommet too much trying to feed an extra cable through) however this does require a longer cable run and I'm trying to keep these as short as possible for best efficiency. If I go this route it may be best to go in via the right as you've done, I believe there is a power supply on the left intended for an inverter which I'll probably end up installing at some point.

Cheers,
Paul
 

K1LL3M

Grenadier Owner
Local time
4:15 AM
Joined
May 21, 2023
Messages
159
Reaction score
371
Location
AUSTRALIA
Inside the boot is similar, but I'm not sure if the cable run is the same as I haven't run that side. I do plan to run my solar on that side to keep it away from my aerial cabling. I would not worry about solar efficiency over that short distance.
 

Miltz

Grenadier Owner
Local time
3:45 AM
Joined
May 11, 2023
Messages
133
Reaction score
174
Location
Australia
Inside the boot is similar, but I'm not sure if the cable run is the same as I haven't run that side. I do plan to run my solar on that side to keep it away from my aerial cabling. I would not worry about solar efficiency over that short distance.
Good move keeping the solar away from the aerial cables with potential interference! I'm looking at radio options, will probably go from the front bar (aerial, have considered roof mounts) via the LHS of the engine bay/guard and into the cabin from there (there's a YouTube video showing this cable run) to use one of the additional power outlets behind the kick panel. I don't have heated seats so may use the RHS spot on the dash panel for the connection to the handset.
 

Tazzieman

Grenadier Owner
Lifetime Supporter
Founding Guard
Local time
4:15 AM
Joined
Sep 30, 2021
Messages
6,818
Reaction score
13,495
Location
Tasmania
I don't have heated seats so may use the RHS spot on the dash panel for the connection to the handset.
I've just mounted a magnetic base on the trim just to the right of that spot. If the 3M double sided tape holds up I see no reason to change it.
 

K1LL3M

Grenadier Owner
Local time
4:15 AM
Joined
May 21, 2023
Messages
159
Reaction score
371
Location
AUSTRALIA
Good move keeping the solar away from the aerial cables with potential interference! I'm looking at radio options, will probably go from the front bar (aerial, have considered roof mounts) via the LHS of the engine bay/guard and into the cabin from there (there's a YouTube video showing this cable run) to use one of the additional power outlets behind the kick panel. I don't have heated seats so may use the RHS spot on the dash panel for the connection to the handset.

I had my last uhf aerial mounted on the bar and after driving the Grenadier for a few weeks before installing my uhf, I liked not having it out front. The higher roof mount also offers the advantage better reception/transmit coverage.

Interesting test video by ol' mate Ronny if interested
View: https://youtu.be/HCgSFvQYY08?si=6yM0THTUY5bNlnUD
 

Miltz

Grenadier Owner
Local time
3:45 AM
Joined
May 11, 2023
Messages
133
Reaction score
174
Location
Australia
I had my last uhf aerial mounted on the bar and after driving the Grenadier for a few weeks before installing my uhf, I liked not having it out front. The higher roof mount also offers the advantage better reception/transmit coverage.

Interesting test video by ol' mate Ronny if interested
View: https://youtu.be/HCgSFvQYY08?si=6yM0THTUY5bNlnUD
I have seen this and do like the extra coverage roof mounting offer. But I also run a fair bit of stuff on the roof and don't want to make it too hard getting the aerial folded up and down. I also don't mind having the aerial on the front left of the bar to use as a reference in tight spots.
 

Miltz

Grenadier Owner
Local time
3:45 AM
Joined
May 11, 2023
Messages
133
Reaction score
174
Location
Australia
Not sure if it is helpful for you, but there is a point at the end of the gutter that allows you to route a cable into the vent cover, under the rubber at the rear and then into the vehicle. There is an opens directly into the trim panels along the side at the bottom. No need to remove roof lining

I dont have an exact picture angle available but if you check it out you should be able to make sense of it. tThis is where I ran the roof mounted aerial cable, down the roof rack leg and into vehicle..
G'day,

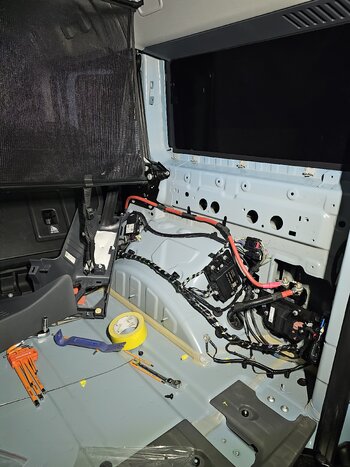
So how exactly do I get this wheel arch trim panel off, I've got it half off but managed to drop one of the clips from below the rear side window down into the space in the process...


Cheers,

Paul
 

Miltz

Grenadier Owner
Local time
3:45 AM
Joined
May 11, 2023
Messages
133
Reaction score
174
Location
Australia
G'day,

So how exactly do I get this wheel arch trim panel off, I've got it half off but managed to drop one of the clips from below the rear side window down into the space in the process...


Cheers,

Paul
Never mind, eventually got it all apart!

I'm not going to go this option for a few reasons, the significantly longer run length (double), additional electronics it has to pass and ease of access (especially once drawers are in) should I need to get to it in the future.

Didn't get as far as running it down the C-pillar today, by the time I got the car back together I was done in the 40 degree heat...


Cheers,

Paul
 

Jean Mercier

GG#920
Grenadier Owner
Lifetime Supporter
Local time
6:15 PM
Joined
Sep 10, 2022
Messages
2,636
Reaction score
9,416
Location
Sint-Martens-Latem, Belgium
Before installing my CTEK250SE, I had been thinking how I could have a connector on the outside, something like the Deutsch DTP plugs on the roof.

And then I saw this on the fantastic pictures of @Chaosdog:
PXL_20231109_235021470.MP-DC.jpg


And I thought: “Eureka, why not use one of the Deutsch DTP plugs itself”. They are “disconnectable”, inside the car, because connected through another Deutsch DTP! (See the red circle on the picture).

Probably that’s what @bakepl did (see post #86) of this thread.

I have 4 connectors on the roof, I will never use the 4 at the same time, I guess. Therefore, which one should I choose?
  • The front right 25A/EXT2 switch powered outlet could be used for a light bar, therefore, not an option.
  • The rear left one, 25A/EXT3 switch is suitable if you want to attach a light on the rear ladder, no option either.
  • Therefore, or the front left one, or the rear right one.
My rear left panels were dismounted (still searching for a water infiltration), therefore, let’s be pragmatic: rear left.

By removing the grid on the roof in the back left side I could insert my hand and disconnect the “inside” Deutsch DTP.
20240205_104027.jpg

  1. I made a male dummy Deutsch DTP plug
  2. I put the “inside” female connector back at is “clipping” location (together with the dummy)
  3. I rerouted the male Deutsch connector towards the front of the car
  4. and attached a cable of 3 meter (4 mm²) to it with a female Deutsch connector (DTP).
  5. I strapped the new cable around the existing cable and /or other fixation points. This was the most difficult task, because I didn’t remove the roof trim, and had to do it by feeling.
  6. I routed it behind the rear seat belt down on the “C” pillar
    20240211_120813 cable rooting.jpg
    20240211_123229 routing.jpg
  7. And down to the battery compartment
    20240211_123624 routing.jpg
  8. I did put two 8 mm eyelets on the other end of the cable (and used for the first time my invertor to power my heat gun)
    20240211_143758 shrinking.jpg
  9. And connected it to the CTEK D250SE
    20240211_145149 connected.jpg
This was last Sunday. Did I test it? No, apart from a multimeter conduction test.

Today my cheap Ali Express solar panel arrived, 17 € without controller, as the CTEK is a controller. 300 Watt they say, I am curious. There was some sun, and everything worked. The following pictures speak for themselves

20240213_125446.jpg

20240213_125546.jpg
20240213_141814.jpg


Conclusion: I will not have to open my bonnet or door or window to connect a solar panel to my Grenadier and the installed CTEK D250SE. And now I can search for a more decent solar panel 😊

And thanks to all the previous posters for stealing some of their ideas
 

bakepl

Grenadier Owner
Local time
3:15 AM
Joined
Feb 11, 2022
Messages
542
Reaction score
1,001
Location
Brisbane, Australia
Before installing my CTEK250SE, I had been thinking how I could have a connector on the outside, something like the Deutsch DTP plugs on the roof.

And then I saw this on the fantastic pictures of @Chaosdog:
View attachment 7843946

And I thought: “Eureka, why not use one of the Deutsch DTP plugs itself”. They are “disconnectable”, inside the car, because connected through another Deutsch DTP! (See the red circle on the picture).

Probably that’s what @bakepl did (see post #86) of this thread.

I have 4 connectors on the roof, I will never use the 4 at the same time, I guess. Therefore, which one should I choose?
  • The front right 25A/EXT2 switch powered outlet could be used for a light bar, therefore, not an option.
  • The rear left one, 25A/EXT3 switch is suitable if you want to attach a light on the rear ladder, no option either.
  • Therefore, or the front left one, or the rear right one.
My rear left panels were dismounted (still searching for a water infiltration), therefore, let’s be pragmatic: rear left.

By removing the grid on the roof in the back left side I could insert my hand and disconnect the “inside” Deutsch DTP.
View attachment 7843947
  1. I made a male dummy Deutsch DTP plug
  2. I put the “inside” female connector back at is “clipping” location (together with the dummy)
  3. I rerouted the male Deutsch connector towards the front of the car
  4. and attached a cable of 3 meter (4 mm²) to it with a female Deutsch connector (DTP).
  5. I strapped the new cable around the existing cable and /or other fixation points. This was the most difficult task, because I didn’t remove the roof trim, and had to do it by feeling.
  6. I routed it behind the rear seat belt down on the “C” pillar
    View attachment 7843949View attachment 7843950
  7. And down to the battery compartment
    View attachment 7843951
  8. I did put two 8 mm eyelets on the other end of the cable (and used for the first time my invertor to power my heat gun)
    View attachment 7843952
  9. And connected it to the CTEK D250SE
    View attachment 7843953
This was last Sunday. Did I test it? No, apart from a multimeter conduction test.

Today my cheap Ali Express solar panel arrived, 17 € without controller, as the CTEK is a controller. 300 Watt they say, I am curious. There was some sun, and everything worked. The following pictures speak for themselves

View attachment 7843954
View attachment 7843955View attachment 7843956

Conclusion: I will not have to open my bonnet or door or window to connect a solar panel to my Grenadier and the installed CTEK D250SE. And now I can search for a more decent solar panel 😊

And thanks to all the previous posters for stealing some of their ideas
Yes. However I replaced the deutsch pins (with cable to the 250SE) in the outside roof socket as I did not know at the time there was male/female deutsch connector as you have shown a little further inside. I most certainly would have done it your way if this info was available. All good. Great explanation by the way... 😀
 

TheDocAUS

Grenadier Owner
Lifetime Supporter
Local time
4:15 AM
Joined
Mar 8, 2023
Messages
2,422
Reaction score
4,240
Location
Eromanga
I looked at that too, but fitted a higher rated cable (10g) through the grommet of the rear connector - (front was gone - to a light bar) and the rear is on a 3 way with 2 other connectors and power. Ran the cable along the roof line inside the vehicle and down the B pillar of the drivers door - the roof hood xmas tree lining plug gave me grief - broke one of them, just hole in which it is fitted so tight its one way (the one above the drivers head) - have some spares on order now AUD 7.28 from the dealer)

Whole job took the weekend (including fitting the D250SE with the black sheep panel). Upset the grenadier pulling g files to hook the alerbnator wire back to the fuse panel - took a drive and some kms for the ABS/ESC to decide it was alright after I tested removing the fuse for that checking what was live on that segment with the key on. (Fuse FI35 Run Crank - Steering / ESC / 7.5 Brake Fluid Sensor ). I ended up tapping into the power mirror circuit with a micro fuse tap.

Attached photos:
  • Looking above the roof liner (backwards right hand side) - can see the first from connector wiring coming in
  • The B pillar - looking up from the bottom (removing the first dark plastic pannel)
  • The solar D250SE fitting:( I did the black sheep connector plate using the money saved from buying D250SE on sale)
  • The panel (Kings on sale 160W) - see how it goes
Cheers, Doug.
Hey Douggie

WARNING: newer models of the Kings 160W solar panel are now rated at 23.37 volts exceeding the specs of the CTEK250SE (the older panel you and I used was rated at 22.87 volts).

What a bummer. I know because I bought a spare panel while on special and noticed the new specs.
 

Miltz

Grenadier Owner
Local time
3:45 AM
Joined
May 11, 2023
Messages
133
Reaction score
174
Location
Australia
Hi all,

I've had my fixed 120W Redarc panel and 20A solar regulator (hooked up to starter battery) installed for a month or so now (done 2 trips, 1 for 3 nights, the other 5 nights, outside day temps over 45 and overnight temps over 30), a 55L fridge with ice maker running (wasn't making ice, the Dometic 55 IM fits 4x Paddle Pops in the ice maker compartment and keeps them frozen). So far so good!

First thing I noticed is that battery state (via the Grenadier screen) now shows "state of charge" hovering around the high 90% range vs high 70% to low 80% range without it when fully charged. I haven't seen the state of charge drop below high 70% since first thing in the morning and it quickly start gaining charge as the sun rises.

Still looking to make a lot of changes to the factory dual battery system though it works for now with the solar & regulator set up I have. Will install a full BMS/VMS and a 3rd Li battery but no longer in a huge rush to get rid of the CTEK system for current use. It works OK with what I have for week long trips and low power draw requirements but wouldn't rely on it at all for an overlanding/touring set up.


Cheers,

Paul
 

douggie

Grenadier Owner
Lifetime Supporter
Local time
3:15 AM
Joined
Apr 20, 2023
Messages
104
Reaction score
297
Location
Brisbane, AU
Hey Douggie

WARNING: newer models of the Kings 160W solar panel are now rated at 23.37 volts exceeding the specs of the CTEK250SE (the older panel you and I used was rated at 22.87 volts).

What a bummer. I know because I bought a spare panel while on special and noticed the new specs.
Thanks I’ll make a note to doublecheck when I need a replacement.
 

DenisM

Grenadier Owner
Lifetime Supporter
Local time
3:15 AM
Joined
Jan 26, 2022
Messages
2,208
Reaction score
4,406
Location
Brisbane, Queensland Australia
Hey Douggie

WARNING: newer models of the Kings 160W solar panel are now rated at 23.37 volts exceeding the specs of the CTEK250SE (the older panel you and I used was rated at 22.87 volts).

What a bummer. I know because I bought a spare panel while on special and noticed the new specs.
Not a problem @TheDocAUS ! Perfectly OK. You haven't "done your dough!"😉 The quoted open circuit voltage is a standardised value based on test lab. protocol. A mere 0.5V difference of a standardised open circuit rating is "in the noise". The actual voltage can vary by +/- 15V depending on the sunlight and ambient temp. The Ctek 250se will handle it.
 

Snow678

Grenadier Owner
Local time
6:15 PM
Joined
Aug 11, 2023
Messages
7
Reaction score
13
Location
Germany
Hello, I also working on the solution to run with my cables via the DEUTSCH Plug. Could someone pls tell me, how to remove the round clips in the ceiling, without breaking it? I tried and pulled and they are maybe 50% out but not sure if I have to pull them out completely if you know what I mean.
clips.jpg
 

das mo

Grenadier Owner
Lifetime Supporter
Local time
6:15 PM
Joined
Dec 5, 2022
Messages
392
Reaction score
1,318
Location
Germany

douggie

Grenadier Owner
Lifetime Supporter
Local time
3:15 AM
Joined
Apr 20, 2023
Messages
104
Reaction score
297
Location
Brisbane, AU
Hello, I also working on the solution to run with my cables via the DEUTSCH Plug. Could someone pls tell me, how to remove the round clips in the ceiling, without breaking it? I tried and pulled and they are maybe 50% out but not sure if I have to pull them out completely if you know what I mean.View attachment 7859659
They are what is known as a Christmas tree and in some locations on the Grenadier it is impossible to extract them without wrecking them - the hole size versus the plug is not a perfect match. The one above my drivers seat I cannot remove without killing it, the next one back can be haven’t tried the rearmost. And I am not changing the chassis hole size as I wouldn’t want to wreck my corrosion warranty.

I had to order spares from the dealer for the one I wrecked ( and got a couple extra to keep)

A panel tool (in plastic) should be able to remove them, but maybe somebody else has the magic touch. I ended up using a pry bar and some padding load distribution board to protect the ceiling for the reluctant one.
 

emax

Photo Contest Winner
Forum Moderator
Grenadier Owner
Lifetime Supporter
Local Group Moderator
Local time
6:15 PM
Joined
Feb 23, 2022
Messages
5,722
Reaction score
9,161
Location
Germany
Back
Top Bottom