The Grenadier Forum
Register Now for enhanced site access.
INEOS Agents, Dealers or Commercial vendors please contact admin@theineosforum.com for a commercial account.

Seat Move

bigleonski

Grenadier Owner
Local time
10:02 AM
Joined
Nov 5, 2022
Messages
2,165
Reaction score
4,787
Location
Brisbane QLD, Australia
I've a few metres of heavy duty grey carpet which I'll cut to size and get the edges "overlocked" at a business (Northside Overlockers" about 2 kliks from the Bris. Ineos agent in Stafford. If their prices are reasonable, I'll see what I can do to get a template to leave with them for repeat business
That'd be handy thank Denis. Not far from me.
I rarely take my fitted rubber mats (Sandgrabbers) out of my 200 so don't really use the carpet, but sometimes it would be handy to have I think.
 

Ever Pragmatic

Grenadier Owner
Local time
12:02 AM
Joined
Oct 3, 2022
Messages
656
Reaction score
2,985
Location
Thrapston
A big ‘Thank You’ to Mr Iain Thomson for posting the above series of mini videos on Facebook - Ineos Grenadier Owners Club.
There was enough information for me to have a go at relocating the rear seats of my Station Wagonnand I have just finished the job. It makes a hell of an improvement to an otherwise ridiculous set up.
Notes;
mechanical aptitude required and a level of fitness / strength.
Torx T45 and T50 drive bits are required, the T50 with a hole in the end is called ‘tamperproof’!!
The T50 bolts are very tight to get out but easier to put back in. (I used a ratchet).
Put the two conical nuts in first having pushed the seat back - they locate the seat.
The two Non-return plastic cross point clips in the lower side covers are a swine to get out.
The five similar clips on the rear plastic bits come out more easily, save the best for the lower side panels? I glued these defunct clips in their original holes for neatness.
To finish the task, you will have to cut 70mm off the back edge of the boot liner - good luck with that. Suggestion - measure and score a line with sharp point.
After nearly a year, did the seat move today. 90 minute job but wasted time as I forgot to screw in the blanks. Much improved rear seating and the job is a cinch.
 

EDWARDO

Grenadier Owner
Local time
12:02 AM
Joined
Mar 9, 2023
Messages
28
Reaction score
72
Location
BUCKS
After nearly a year, did the seat move today. 90 minute job but wasted time as I forgot to screw in the blanks. Much improved rear seating and the job is a cinch.
I still havnt done mine as kids arent that big but wont be long, did you manage to still have the wire guard between the seats and the boot area?
 

Cheshire cat

Grenadier Owner
Lifetime Supporter
Local time
12:02 AM
Joined
May 30, 2022
Messages
1,922
Reaction score
4,580
Location
Cheshire, UK
I moved my seats back and still use the rear guard. Some modifications as to how to fix it though. Nothing permanent, so not messing anything up.
 

Skydance

Grenadier Owner
Local time
12:02 AM
Joined
May 16, 2023
Messages
433
Reaction score
555
Location
MANCHESTER
After nearly a year, did the seat move today. 90 minute job but wasted time as I forgot to screw in the blanks. Much improved rear seating and the job is a cinch.
What did you use to fill up the flooring void next to the rear seat? Also the holes where the blanking plate used to be. Did you plug back in the black fasteners which are slightly loose. Needing ideas, thank you.
 

Mussels

Grenadier Owner
Lifetime Supporter
Local time
7:02 PM
Joined
Nov 25, 2021
Messages
72
Reaction score
129
What did you use to fill up the flooring void next to the rear seat? Also the holes where the blanking plate used to be. Did you plug back in the black fasteners which are slightly loose. Needing ideas, thank you.
Hi, I left the gap on the floor as a ‘feature’ - it was a very poor OEM joint anyway. I glued the black fasteners in place.
 

Ever Pragmatic

Grenadier Owner
Local time
12:02 AM
Joined
Oct 3, 2022
Messages
656
Reaction score
2,985
Location
Thrapston
What did you use to fill up the flooring void next to the rear seat? Also the holes where the blanking plate used to be. Did you plug back in the black fasteners which are slightly loose. Needing ideas, thank you.
I’ve not filled the flooring gap and will leave it as is. All the blanking holes are easy as you just move the bolts and screw them down.

The c pillar plastic blanks that you have to remove to move the seat back get discarded and the residual holes get covered by the seat. I’m not bothered to fill them either.

90 minute job, no special tools required. I did use a plastic trim removal tool to pop the c pillar blanks.

Do it…
 

Ever Pragmatic

Grenadier Owner
Local time
12:02 AM
Joined
Oct 3, 2022
Messages
656
Reaction score
2,985
Location
Thrapston
I still havnt done mine as kids arent that big but wont be long, did you manage to still have the wire guard between the seats and the boot area?
I’ve not remounted the steel cargo barrier yet but there is a work around on the forum somewhere. I’ve installed the net barrier I ordered from new. It just stops the dogs coming through and I’ll remount the steel barrier in the autumn for the shooting season. The current set up makes it easier for the various trips we’ve got planned for the summer..
 

Ever Pragmatic

Grenadier Owner
Local time
12:02 AM
Joined
Oct 3, 2022
Messages
656
Reaction score
2,985
Location
Thrapston
Update on the cargo barrier mounting ..

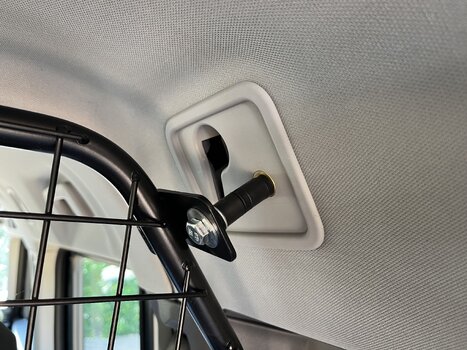
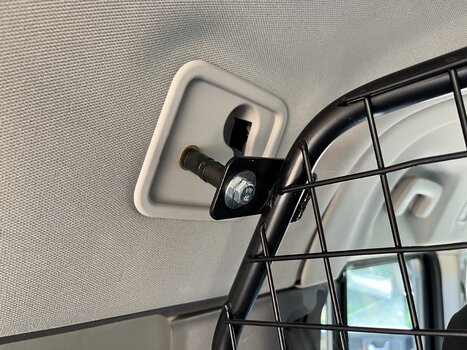
Using an m8 x 70mm bolt, a few plastic spacers and a m8 penny washer, the cargo barrier is affixed to the pre existing cabin mounting points. I had to then cut down the existing floor panel and refitted the cargo liner and rubber mat. Even cut a hole for the 12v power supply..

I’ll find a black plastic cover for the bolt heads and it’ll look lush. Or I could just leave them bare to show off their galvanised beauty..

Commercial to fieldmaster conversion is now complete..
 

Attachments

  • IMG_1265.jpeg
    IMG_1265.jpeg
    3.9 MB · Views: 39
  • IMG_1266.jpeg
    IMG_1266.jpeg
    4.4 MB · Views: 31
  • IMG_1267.jpeg
    IMG_1267.jpeg
    6.6 MB · Views: 37

Shaky

Grenadier Owner
Forum Donor
Local time
7:02 PM
Joined
Apr 28, 2022
Messages
1,494
Reaction score
3,138
Update on the cargo barrier mounting ..

Using an m8 x 70mm bolt, a few plastic spacers and a m8 penny washer, the cargo barrier is affixed to the pre existing cabin mounting points. I had to then cut down the existing floor panel and refitted the cargo liner and rubber mat. Even cut a hole for the 12v power supply..

I’ll find a black plastic cover for the bolt heads and it’ll look lush. Or I could just leave them bare to show off their galvanised beauty..

Commercial to fieldmaster conversion is now complete..

@Ever Pragmatic, can I be cheeky and ask for a photo of your cargo area please, as I note you have what I think is a Halfords rubber mat over some sort of made to measure liner. Looking for a more permanent protection system for mine.

Who supplied the liner ?? Thanks in advance
 

Ever Pragmatic

Grenadier Owner
Local time
12:02 AM
Joined
Oct 3, 2022
Messages
656
Reaction score
2,985
Location
Thrapston
@Ever Pragmatic, can I be cheeky and ask for a photo of your cargo area please, as I note you have what I think is a Halfords rubber mat over some sort of made to measure liner. Looking for a more permanent protection system for mine.

Who supplied the liner ?? Thanks in advance
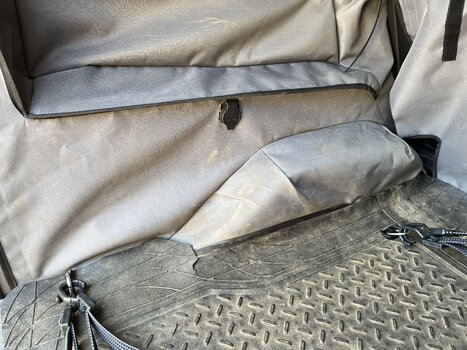
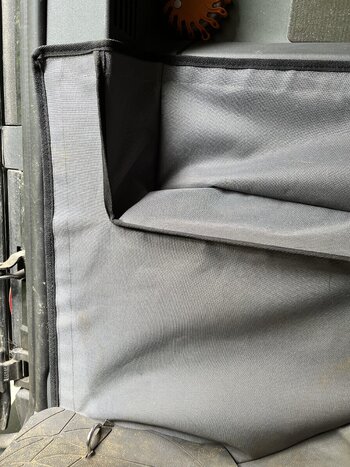
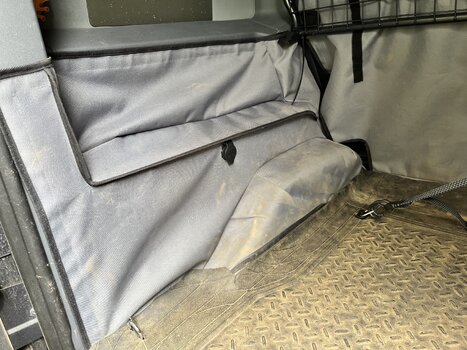
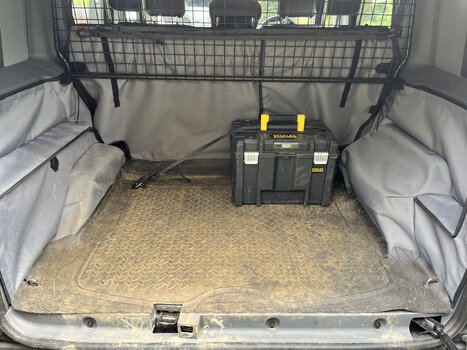
I got the liner from Titan covers. It’s custom fitted and great quality.. It’s held in by Velcro strips and has survived a full season of fieldwork and two Labradors without issue. Titan gave a great service and fitted it for me.. I live pretty close to their factory.

I used a Halfords rubber mat as nobody was making them for grens last year. Cheap as chips and just needed a Stanley knife to fettle it in. I’ve cut some strategic holes through it and the liner so I can get access to the L track and d loops so make strapping my boxes down.

I’ll ping you a photo of the cargo area in the week if that’s ok.,
 

Ever Pragmatic

Grenadier Owner
Local time
12:02 AM
Joined
Oct 3, 2022
Messages
656
Reaction score
2,985
Location
Thrapston
@Ever Pragmatic, can I be cheeky and ask for a photo of your cargo area please, as I note you have what I think is a Halfords rubber mat over some sort of made to measure liner. Looking for a more permanent protection system for mine.

Who supplied the liner ?? Thanks in advance
How about these photos.
 

Attachments

  • IMG_1269.jpeg
    IMG_1269.jpeg
    4.6 MB · Views: 20
  • IMG_1270.jpeg
    IMG_1270.jpeg
    5.5 MB · Views: 23
  • IMG_1272.jpeg
    IMG_1272.jpeg
    4.1 MB · Views: 21
Back
Top Bottom