The Grenadier Forum
Register Now for enhanced site access.
INEOS Agents, Dealers or Commercial vendors please contact admin@theineosforum.com for a commercial account.

Build Thread My Grenadier Trialmaster Utility Build

Znarfgh

Grenadier Owner
Local time
4:04 PM
Joined
Sep 11, 2022
Messages
251
Reaction score
473
Location
Melbourne
UHF Mount

Another small milestone today with the installation of the UHF body under the glovebox. No drilling required as there is a handy steel plate built in that holds a small footprint, remote head unit perfectly.
20231209_185540.jpg


20231209_165803 (1).jpg

Next job is to find the best position for the aerial and connect that.
 

Znarfgh

Grenadier Owner
Local time
4:04 PM
Joined
Sep 11, 2022
Messages
251
Reaction score
473
Location
Melbourne
As I move through the build, I'm finding that everything requires power and my list is at 16 items and growing. Clearly, the USB A and USB C sockets in the console will not suffice.

Whilst installing the UHF I looked for somewhere to mount a USB socket and found a space in front of the bonnet release handle

After extensive measuring and re-measuring I took the plunge and drilled a 29mm hole in the trim panel.

20231210_145744.jpg

There are actually two trim panels on the LHS and the hidden one also required a but of scalloping but I measured pretty well. The final result:

20231210_160129.jpg

The wiring runs through the floor to the rear battery compartment where it is connected to a 6-way fuse box which in turn is connected a 100Ah Lithium battery box.
20231210_160200.jpg

I'm planning to put in at least another 3 sockets with USB C's as well.
 

Znarfgh

Grenadier Owner
Local time
4:04 PM
Joined
Sep 11, 2022
Messages
251
Reaction score
473
Location
Melbourne
Not much has been happening on my build over the last 6 weeks due to surgery but I'm back in action again.

Airline tracks on the rear lid to stop gear sliding around on the skateboard surface that is the non-slip rubber mat. Also found somewhere to house the CelFi unit which is removable so I can use it in the caravan as well.

20240323_101848.jpg
 

Znarfgh

Grenadier Owner
Local time
4:04 PM
Joined
Sep 11, 2022
Messages
251
Reaction score
473
Location
Melbourne
Rear work light and UHF antenna mounted to the rear. Running the cables into the vehicle will be a bit of a challenge with some hole drilling required.
20240416_180843.jpg
 

Znarfgh

Grenadier Owner
Local time
4:04 PM
Joined
Sep 11, 2022
Messages
251
Reaction score
473
Location
Melbourne
Usually, we travel with a hybrid van in tow but as I have a desert trip coming up in June, I need some quick accommodation that does not involve the use of pegs, ropes and canvas.
20240409_103438.jpg

It just fits into the garage so no 2"lift for me at this stage.
IMG-20240411-WA0000s.jpg
 

Rupert

#4082
Grenadier Owner
Lifetime Supporter
Local time
11:04 PM
Joined
Oct 11, 2023
Messages
197
Reaction score
237
Location
Texas, USA
Rear work light and UHF antenna mounted to the rear. Running the cables into the vehicle will be a bit of a challenge with some hole drilling required.
View attachment 7853295
Bro I am loving that antenna mount. The rear light is even better! Did you fab that up or is that an aftermarket thing you bought somewhere?
 

Znarfgh

Grenadier Owner
Local time
4:04 PM
Joined
Sep 11, 2022
Messages
251
Reaction score
473
Location
Melbourne
Bro I am loving that antenna mount. The rear light is even better! Did you fab that up or is that an aftermarket thing you bought somewhere?
Something I made at home from some 20mm tube I had lying around.
 

Tazzieman

Grenadier Owner
Lifetime Supporter
Founding Guard
Local time
4:04 PM
Joined
Sep 30, 2021
Messages
6,821
Reaction score
13,500
Location
Tasmania

Znarfgh

Grenadier Owner
Local time
4:04 PM
Joined
Sep 11, 2022
Messages
251
Reaction score
473
Location
Melbourne

Znarfgh

Grenadier Owner
Local time
4:04 PM
Joined
Sep 11, 2022
Messages
251
Reaction score
473
Location
Melbourne
A rear mounted UHF aerial and work light are proving to be a lot of work.

But, the reception on the UHF will be much better than any bull bar mounted aerial. The wiring is through to the door but not into the cabin yet - that's the next job. Oh, and removing the trim piece to route the wires will result in lots of lost clips that drop into the rear door and can't be retrieved (I tried for ages and then gave up).

20240427_131358.jpg

20240426_180636.jpg

20240426_175728.jpg
 

Znarfgh

Grenadier Owner
Local time
4:04 PM
Joined
Sep 11, 2022
Messages
251
Reaction score
473
Location
Melbourne
The misaligned fuel flap has been annoying the c***p out of me every time I look at it. Today, I decided to remedy this.

Fuel Flap Fix.jpg


I used a tile spacer and some super glue. Not perfect but it won't annoy me (as much) anymore.

20240925_151814.jpg
 

grenadierboy

Grenadier Owner
Lifetime Supporter
Local time
4:04 PM
Joined
Apr 6, 2022
Messages
1,812
Reaction score
3,306
Location
Armadale Australia

Toot

Grenadier Owner
Lifetime Supporter
Local time
12:04 AM
Joined
May 25, 2024
Messages
99
Reaction score
104
Location
Sag Harbor, NY, USA
I have a pack of a zillion left over from a house build in 2019 and could not be bothered painting it :cool:
If anyone has CAD skills to design a fuel flap lifter I can 3d print them in black and send them off to people that want them? (I am just learning CAD now and by the that I mean I want to start learning CAD)
 

Max

Grenadier Owner
Lifetime Supporter
Local time
12:04 AM
Joined
May 9, 2022
Messages
1,385
Reaction score
2,717
Location
Sunshine Coast Queensland Australia


@bakepl @Krabby @Tazzieman
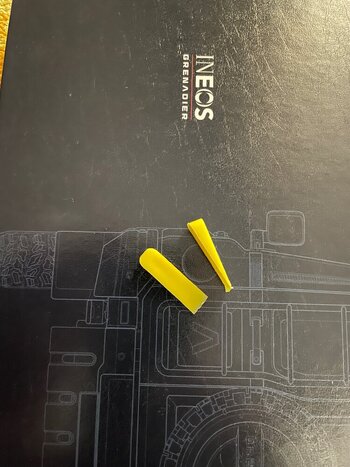
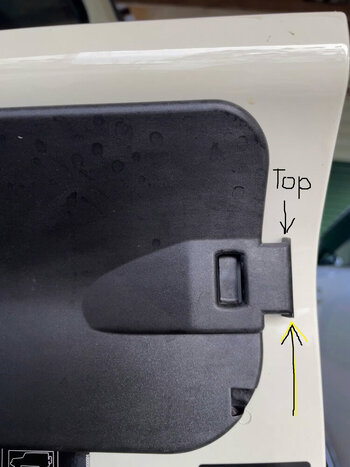
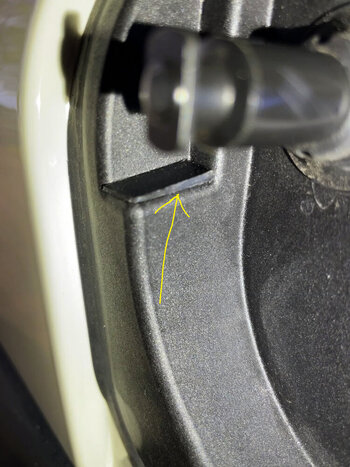
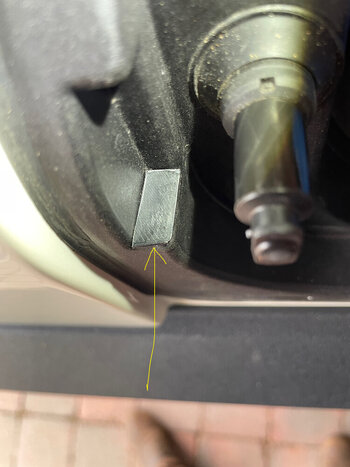
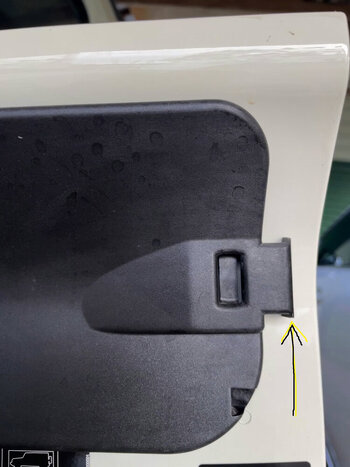
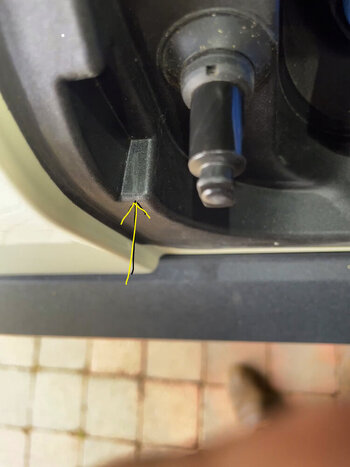
To all who have a saggy petrol cap cover...more defined on the lighter colours...I have been for some time now working on a solution to raise it without having to do too much...finally, it is still a wedge and in the first pic you can see the arrow pointing to a rub mark...second pic shows the little lug that runs along that surface...third a forth show you the wedge created to lift the petrol cap cover up as it moves in...pic five shows the top that has to be slightly rounded off because it binds on the top of its housing...

The wedge is 2mm at the thick end and can go to nothing on the other end...mine is a little under a mm...the yellow wedges I know will work and they are ceramic tiler wedges...I used a smear of Sikaflex to hold mine in place...which is black plastic cut, filed, and sanded to shape...double sided tape worked in one of my early prototypes but the thickness can then vary...with the wedges it will be cheaper and easier to get the right result...the yellow wedge can but cut with Wiss tin snips...hope this works for you (y) ;)


Attachments​


  • IMG_6636.jpg

    IMG_6636.jpg
    157.6 KB · Views: 203


  • IMG_6637.jpg

    IMG_6637.jpg
    101.3 KB · Views: 163


  • IMG_6630.jpg

    IMG_6630.jpg
    157.8 KB · Views: 160


  • IMG_6627.jpg

    IMG_6627.jpg
    103.8 KB · Views: 159


  • IMG_6637.jpg

    IMG_6637.jpg
    99.2 KB · Views: 163


  • IMG_6622.jpg

    IMG_6622.jpg
    77.7 KB · Views: 164


  • IMG_6590.jpg

    IMG_6590.jpg
    96.8 KB · Views: 167


Reply to Max

Report Edit Delete Attachment editor Convert to jpg Rotate


Quote Max Reply to Max

Report Edit Delete
 
Last edited:
Back
Top Bottom