The Grenadier Forum

Register a free account today to become a member! Once signed in, you'll be able to contribute to the community by adding your own topics, posts, and connect with other members through your own private inbox! INEOS Agents, Dealers or Commercial vendors please contact admin@theineosforum.com for a commercial account.

Build Thread Loc Nar's Build

Loc Nar

Grenadier Owner
Lifetime Supporter
Local time
10:53 AM
Joined
Apr 28, 2022
Messages
532
Location
Alabama, USA
It's time for me to start a build thread to help me organize my progress and thoughts on next steps. I'll incorporate hyperlinks to my posts in other threads detailing some of my mods to save time (and because valuable information for others contemplating similar mods will be in those threads).

Pre-mods:

20240303_170004.jpg


MOD 1: Adding Alu-Cab Gen 3-R tent and 270 degree Shadow Awning (shout out to Asheville Vehicle Outfitters for doing a great job with this!):

20240506_141827.jpg


MOD 2: Installing Xpel Black Universal Door Sill Guard

MOD 3: Installing Rival Engine and Transfer Skid Plates

MOD 4: Removed rear seat following Goose Gear's awesome instructions for its Rear Seat Delete Plate System and removed rear factory mat and rails following Goose Gear's awesome instructions for its Rear Plate System

MOD 5: Modifying and Installing Ram Mounts in the panel spaces where heated seat dials would be

MOD 6: Cobbled together Maxtrax Mounts to add to the top of the Gen 3-R RTT

MOD 7: Adding RedArc SMSP1200 200w Solar Panel using Alu-Cab 1250mm load bars and GP-Factor Solar Mounting Brackets:

20240902_122307.jpg

20240902_122319.jpg

20240902_134241.jpg

20240902_134245.jpg

20240902_143714.jpg


MOD 8: Wiring up the Solar Panel

One thing I've very much enjoyed along the way is learning how to craft good cables. I did enough research to get over my trepidation about diving into doing it, and identifying, buying, and learning how to use the right tools for the job made it fun. I learned all about DTP, DT, Anderson 50A, Anderson Power Pole, and battery cable lug connectors, and created cables to run from the solar panel to the solar panel input in the 3R tent, and converted some split Anderson Power Pole connection cables to my needs. Here's some pics of what I made along the way:

10AWG Anderson to DTP connection cables to run from Gen 3R tent power out and solar out to the Grenadier roof outlets

20241110_154438.jpg


The cables used to attach to the long 10AWG cable run to the battery bay (I used a Y split cable, because I wanted the option of connecting solar only to the D250SE, only my Ecoflow standalone battery bank (which uses an XT60i connector), or both):

20241201_094313.jpg


With the 30A fuse added for the positive solar cable running to the D250SE (will need to do more research on my Ecoflow unit to see if I need to add a similar inline fuse to the cable going to it - if someone already knows the answer to that, please let me know):

20241201_095007.jpg


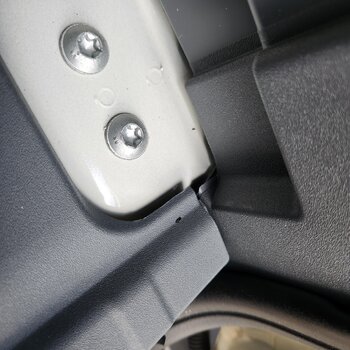
After I made my Solar Panel cable running from the roof top tent to the right rear roof DTP outlet, I next had to get up under the headliner and detach the DTP cable from that outlet so that I could attach a new 10AWG DTP cable to it to route it along the frame to the battery bank. In short, I wanted to follow the method @Jean Mercier followed and I ran into an interesting surprise as detailed in my post in this separate thread with pics: Internal Connectors for Roof Power Outlets (U.S.) - Discovery, Investigation, and Question. As detailed in that post, I replaced the Yazaki connector I found with a DTP connector and then attached my 10AWG solar cable to it and started my run through the headliner, down the frame, and on to the battery bank - as shown in the pics below - using some handy 3M cable clips:

20241201_145606.jpg

20241201_145502.jpg

20241201_145450.jpg

20241201_145405.jpg

20241201_145344.jpg


I found a great place to attach the 30A fuse for the positive solar cable going into the D250Se - after removing the 120S negative cable from its attachment point (which involves cutting a zip tie and peeling away some tape), I found the zip tie clip point, which rotates - shown here:

20241201_141028.jpg


There's just enough room between all the cables to snug the 30A fuse box down here with a couple daisy chained zip ties:

20241201_145327.jpg


Here's a pic showing the Y cable connected and I've tucked away the Anderson connector I will use to run a cable to my Ecoflow battery bank:

20241201_145313.jpg


MOD 9: Installing D250SE and Victron 500 amp SmartShunt Battery Monitor

I installed the CTEK D250SE following @Ragman's awesome Installation Video.

I installed the Victron 500 amp SmartShunt Battery Monitor and found the perfect place to mount it (note M5 20mm machine screws, washers, and lock nuts get the job done). This is looking at the passenger side of the dual battery setup in a NA vehicle - the perfectly placed holes are circled in blue below.

20241005_112741 - Victron mount holes.jpg


I needed and received some patient and very helpful guidance from @anand that helped me understand the proper way to install the Smartshunt. What threw me is that I locked onto the ground Chassis point circled in blue below as a good place to route the negative out from the 120S Smartpass. D250SE, and the System Minus cable from the Smartshunt, with a separate negative cable running from the negative of the auxiliary battery to the battery minus input on the Smartshunt, and I overlooked the fact that if I routed a negative cable from the aux battery to the battery minus input of the Smarthunt, I needed to remove the OEM aux battery negative cable from the chassis ground point circled in blue below. Otherwise, I'd have two negative out cables going from the aux battery to ground - one to the Smartshunt and one to the chassis ground - and that would impact the Smartshunt's ability to accurately read the battery. In other words, I needed to think of the Smartshunt like an inline switch that needs to be between the only negative out from the battery to ground.

20241013_124508 Chassis Ground.jpg


So, I (1) removed the OEM aux negative battery cable from the chassis ground circled above, wrapped the lug in electrical tape, then some duct tape for good measure, and slid it to the side and zip tied it to a 3M cable clip to keep it out of the way, (2) ran a new cable from the negative of the aux battery to the battery minus input on the Smartshunt, (3) attached the negative cables for the 120S, D250SE, and Smartshunt system minus to the chassis ground, and (4) attached the thin red positive battery monitor cables to the Smartshunt and aux and starter batteries as per Victron's instructions. Here's a pic showing everything wired up:

20241205_181032.jpg


After all of this work, I received the gratifying bonus of this on my display when I cranked back up:

20241205_181645.jpg


Why didn't I see the normal Christmas tree light error message display that requires driving around a short while for them to clear? My working hypothesis is that I did not receive the host of error lights when restarting because, before disconnecting the starter and aux negative cables to do this work, I opened both rear doors and the passenger rear doors and let the vehicle sit for a while to allow the the interior lights to shut off and hope the car had entered sleep mode again. I think it sat for ten minutes or so. Or I may just have gotten licky. In any event, I will try to repeat this process the next time I do some electrical work, which won't be too far down the road.

MOD 10: Added work lights to roof - see this post in the Work Light Roof Grab Bar thread.

NOTE: If you've made it this far and have questions about what I purchased/used to do any of these mods (e.g. wires, tools, etc.), just let me know.
 
Last edited:
Part One of my Installation Guide (Book?) - Utilizing 67 Designs Wolfbox G900 Adapter Kit, Wolfbox Fuse Tap Hardwire Kit (connecting to the front fuse panel near the steering wheel), and Exterior Roof Mounting

I wanted to go with an exterior install, because (1) I plan on attaching a Molle panel to my large rear door window, (2) I have privacy glass, (3), Wolfbox's manual recommends an exterior install for better picture quality, and (4) I planned on mounting it below my roof top tent so that it would have some protection.

Preface: Man, this can be an intimidating install before you begin . . . removing the mirror and some trim panels, wiring up fuse taps, running and hiding wires, figuring out how and where to run for an exterior install. It can be a little overwhelming. My 67D Adapter kit with my G900 and fuse tap hardwire kit sat in my closet for a long time before I finally read enough posts here and elsewhere and watched enough YouTube videos to gather the confidence to start this project. The key, for me anyway, was to break everything down into small, manageable bites and do thorough research before tackling each step. So this is going to be a long post and it's written for those who, like me, were hesitant about jumping in the water and like to measure twice and cut once. The good news is that if I can do it, you can do it - and by doing it yourself, you'll learn a lot about your vehicle and gain skills that will help you with other mods down the road - and save some cash. You also will get a hell of a nice sense of accomplishment when you finish.

Step Zero: Test your G900 to ensure it works before installing

As explained in Wolfbox's Install video.

Step One: Update firmware and install larger SD Card if desired

I replaced my stock one with a Sandisk 256GB High Endurance micro SDXC card from Amazon. Follow Wolfbox's Firmware Update Instructions.

Step Two: Install 67 Designs Adapter Kit onto G900

You can find the Adapter kit here. 67D has a pretty good installation guide here. I did see an error in the guide under Step 3 where it says, "For left-hand drive vehicles, position the metal 20mm ball towards the passenger side at about the 4 o'clock position." I eventually discovered I needed to position the ball at the 8-9 o'clock position to get the desired mirror location. There's also an install video (not an official 67D video) here, but please note that while this video is an entire installation, I did not follow it step by step - it's sort of a rough and tumble brute force approach, which is not my style, and it includes some unnecessary steps.

Step Three: Remove OEM Mirror and attach G900 Mirror in its place

67D respectfully declines to give you any guidance on how to remove the OEM mirror, because, you know, they don't want you to sue them if you screw this step up. So here's how you do it.

1. Hop in the driver's side and tilt the mirror towards the passenger side and down so that you expose the ball connector and spot the metal collar that grips it in place.
2. Using a flathead screwdriver, position the tip just below the open left corner of the collar (which is a weak spot for the collar) and pry it up and over the ball. Pic for reference right after I popped it up over the plastic rim underneath it.

20241228_101029.jpg


Another pic showing the fully popped collar and the matching plastic rim it sits on:

20241228_101112.jpg


3. Remove the OEM mirror by repositioning it to face squarely towards the center rear of the vehicle and pull straight back towards the rear with pressure. Note - if you watch the full install video I linked above, you will see that just before the 67D install section, the installer just horsed the OEM mirror off the ball without removing the metal retaining clip. Don't do that. He also removed the plastic housing right behind the mirror - no need to do that.

4. Go back to the 67D installation guide and pick up with Step 3 (noting my correction above). Rather than using painter's tape or an elastic band to hold the pieces in place while I screwed them in, I found that using a Velcro strap did the trick well:

20241228_102408.jpg


20241228_102523.jpg


20241228_102942.jpg


5. Follow steps 4-7 of the 67D Guide and you'll be done with this step. Congrats! Next up - Removing Trim Panels and Fuse Tap Power Install.

20241228_103801.jpg


Step Four: Removing Trim Panels and Wiring Up Fuse Tap Power

You will need the 4 Fuse Tap Hardwire Install Kit from Wolfbox. You will likely be able to purchase the dashcam with the fuse tap hardwire kit in a bundle. While you are waiting for that to arrive in the mail, let's watch some videos to learn about Fuse Taps - how they work and how to install them correctly.

This one was particularly good:


Also helpful:


I hooked my Fuse Taps into the fuse panel in the dash, because that was the closest one to the camera and I could install it without having to extend the wires that came with the camera and fuse tap kit. To properly route the power cable, we will need to remove some trim panel pieces along the way.

I learned a lot from many posts in this thread and elsewhere about removing trim panels, and @AndyT's 4/30/24 Install Post was particularly helpful. I recommend you review it before proceeding. Here are my notes on removing the panels needed to easily run and hide the power cable and hook up the fuse tap connections.

Left A Pillar

Watch this Design Build Go video that shows how to install a grab handle to the left A pillar. It goes over how to remove the trim piece. I used a thin flathead screwdriver at the corner of the plug to pop it out. You can go ahead and remove it, but be careful not to pop the wings of the tab. Then use a T30 Torx bit to back out the screw. Then, pull out at the top of the trim piece towards the cabin and pull up - as shown in the video. Be mindful not to jostle the air bag.

Now, take some time to uncoil and straighten out the power, GPS, and video cables. Routing them will go much easier if you do this.

Put on some nitrile gloves and go ahead and attach the power cable to the G900 and start routing it along the upper left side of the plastic housing below the mirror and up into the headliner seam. When messing around with the headliner, you want to wear gloves so you don't leave smudges on it. The orange trim pry tool that comes with the G900 also helps with this task. You'll be able to hide the cable easily.

I just started wedging the power cable into the left side of the plastic housing behind the mirror and then just started pressing the cable into the headliner running left towards the A pillar. Note - you will want to leave enough slack near the mirror to allow room to adjust it. Sit in the driver's seat and adjust it to your liking when you start your run. Pic for reference:

20250301_074157.jpg


Keep routing the cable up into the headliner seam to the left towards the A pillar. When you near the corner of the A pillar, pressing the cable into the seam can get tight - just press harder and if you reach a point that your fingers aren't getting the job done, use the wide side of the orange pry tool while positioning it slightly perpendicular to the cable when pressing and it will go in (I had to do this). After you reach the corner, start routing the cable down the pillar and be sure to route it behind the airbag and behind the black metal brackets. I used a couple zip ties to hold the cable in place, but be sure not to attach a zip tie to a hole needed by the trim piece clips/screws. Here's a pic showing a zip tie I added just below the lower metal bracket:

20250105_151521.jpg


Lower Panels

Now it's time to remove some lower panels. I followed @AndyT's order of removal - which was super helpful and essential. I'll add some notes about the removal of these pieces and will be referring to AndyT's numbering system. For reference, here is his pic of the numbered panels.

20240430_095812 (3).jpg


Panel 1 notes: Place the fat end of the orange Wolfbox panel removal tool at the upper right corner of this piece and pull back towards you to pop that corner out.

20250104_090801.jpg


Then, reposition the tool at the lower right corner holding it with your right hand. Then, with your left hand, grab the popped out upper right corner and simultaneously pull back with your left and right hand. This should pop it out.

20250104_090816.jpg


Now you can get some leverage in the upper left corner and tug the panel out. When removed, check the trim piece to ensure all the retainer clips are still in place (this goes for any removed trim piece).

20250104_091127.jpg


Panel 2 Notes: You'll need to remove three screws (all T20) - two at the bottom corners and one on the left connecting panel 2 to panel 3. Having a catch bucket for the lower screws - and a 3" extension for your rachet wrench for the lower ones helps. You only need the wrench to get the bolts started and then they easily spin out with the torx bit. A head lamp also helps with the lower right one.

Left middle and lower left screws:

20250104_092138 - highlighted.jpg


Lower right screw:

20250104_091342.jpg


After removing the screws, start removing it from the left side, prying back with your fingers, then run your fingers along the bottom edge - prying back as you go. NOTE - the right side is connected to a cable. So, do not pull back hard on the right side. Leave the cable connected. After removing the panel, inspect for retainer clip retention. Pics:

20250104_092836.jpg


20250104_092904.jpg


Close up of the cable and box to which it is connected.

20250104_092917.jpg


Panel 3 notes: Four screws to remove, all T20.

20250104_093156.jpg


You don't need the ratchet wrench here. I was able to just use the torx bit with the wrench adapter to get them going.

To pop this panel out, I stuck the narrow end of the orange pry tool just inside the upper area of the panel gap around the ignition slot and held and pulled straight back on that with my right hand while simultaneously pulling straight back on the left side of the panel with my left hand. Pics:

20250105_145409.jpg


20250104_093515.jpg


20250104_093843.jpg


20250104_093835.jpg


Take a break - you've earned it.

Routing the Power Cable:

Now, it's time to route the power cable down to where we need it. The power cable unfortunately has a rather large plastic box in it that makes routing tricky. After some experimenting, I found a way to run it through to keep the wire and box hidden nice and neat. I started by running the cable along and behind the door seal and then spotted a gap that looked just big enough to squeeze the box through to get to the inner shelf providing a direct run to the fuse box. After some test fits, I was able to squeeze it through. Pics showing this route:

20250105_133450.jpg


Here's a pic showing the opening of the gap I used to fish the cable and box through. My memory is that it has to be pushed down and to the right.

20250105_133604 - highlighted.jpg


Here's a pic after I pushed it through into the shelf area:

20250105_134433.jpg


And a better pic of the gap with it fully pushed through that also shows the perfect place to mount the box with some Velcro tape:

20250105_135435 - highlighted.jpg


20250105_141243.jpg


Attaching the Ground Wire:

After some looking around, I chose to connect to this bolt as my ground connection since it appeared to be the only one nearby that connected to the frame of the vehicle:

20250105_142322.jpg


Go ahead and connect this and then we'll hook up the fuse tap connections.

Hooking Up the Fuse Tap:

I will expand upon my post in the Wolfbox Fuse Tap thread. I recommend you have a multimeter handy for this step. I picked up a Kaiweets TRMS 6000 from Amazon. Videos about it are here and here. Also, here is a general video about how to use a multimeter.

In addition to getting squared away about how to use a multimeter, I also HIGHLY ADVISE watching these two videos on what fuse taps are, how they work, and how they must be connected and oriented (pigtails to the right in our setup) to function properly:


Now that your homework is done, let's get to it. Let's start by taking a good close look at the fuse panel with the manual, as a reference, oriented to match the fuse panel layout:

20250104_094703.jpg


And here is the full description of the fuse functions from the manual:

20250104_094456.jpg


I installed the hardwire kit to FC04 (yellow wire to always on) and FC23 (red accessory wire to only on when ignition is on), because I wanted the Parking monitor feature available and I confirmed with my multimeter that FC04 is on even with the ignition off (which you would expect since it supports the "clock/theft alarm/logistics" features) and FC23 (rear 12v cigarette power socket) is off when the ignition is off. This way, I have the parking feature enabled if I want it. The Parking mode can easily be disabled in the mirror settings if you want to do that. I'd rather have that ability when needed. I also tested FC21 (front 12v cigarette socket outlet) with the multimeter and I recall it tested just like FC23 as only on when the ignition was on UNLESS I flipped the ceiling panel Power switch (which would turn on both the front and rear 12v cigarette socket outlets - FC21 and 23, respectively, with the ignition off). I chose FC23 instead of FC21 for the fuse tap just for cable routing neatness.

Also, following the guidance in the Fuse Tap videos above, I made sure to use piggyback fuses that are lower rated than the vehicle fuses (Mini Blade Fuse Set from Amazon):

20250105_105714.jpg


20250105_111251.jpg


Now, let's route the power cable to the fuse panel. You can zip tie any excess power cable and route it behind the three large vertical cables on the left side of the shelf area:

20250105_143950.jpg


Then route over to the fuse panel. I found it easiest to install the fuse taps and then route the cables to them through the gap just below the fuse panel - note the orientation of the pigtails to the right - this is essential, as explained in the fuse tap videos above and as discussed elsewhere in this thread and in the Wolfbox Fuse Tap thread linked via my post above):

20250105_141806.jpg


20250105_115103.jpg


After connecting the fuse taps and connecting the GPS module (details lower in this post) and enabling the GPS collision detection in the mirror software (in the mirror settings, turn on GPS collision monitoring to low, medium, or high), I confirmed the Parking monitor icon popped up in my mirror console settings. You can then adjust the Parking monitor settings in a variety of flavors should you so choose - or leave it disabled which is the original setting as I recall. This is also covered in the Wolfbox manual if more info is needed.

Pic showing everything connected and cables tucked away:

20250105_143927.jpg


All right - now you can reassemble the trim panels (lower panels and left A-pillar panel). Note when reassembling the lower trim panels - do not use a ratchet wrench or drill to tighten the screws, because it would be easy to overtighten them to the point they bite too far into the trim panel plastic. Just hand tighten them. Time for another break. In Part Two, we'll connect the GPS and rear video camera cables and route them.
 
Last edited:
Part Two of my Wolfbox G900 Installation Guide.

Routing the GPS and Rear Video Camera Cables:

Note before starting - I used this 10' video camera cable extension as part of this install.

Remove the right A pillar trim piece following the same instructions above in Part One for removing the left A pillar trim piece (you will need to remove the grab handle first by popping the covers up with a flat head screwdriver and removing the bolts - watch the full Design Build Go video I linked above when discussing removing the left side A pillar panel - it covers adding a grab handle to the left A pillar, which will help you understand how to remove one). Connect the GPS and rear video camera cables to the mirror and route them into the plastic housing and then start tucking them along the headliner towards the right A pillar (again - leaving enough slack for mirror adjustment - you can tuck some slack into the plastic housing):

20250302_095025.jpg


Route the GPS cable over and then down being mindful to stay behind the air bag. You can follow the same route you used for the power cable on the left side and zip tie as needed along the way. When you get to the bottom, you will have some excess cable that can be zip-tied. Then tuck the excess cable down in gaps and position the GPS device so that it is in the upper right corner with the cable going towards the windshield. Other than making sure the GPS device is oriented with the top side facing up, it does not matter which way the unit is facing (confirmed with Wolfbox):

20250105_155450.jpg


I mounted mine with some Velcro tape. Here's a pic post install to show where I placed it:

20250302_093502.jpg


Turning to the rear video camera cable, it's going to be routed along the headliner. So, while you have the A pillar trim piece removed, go ahead and start tucking it down and around the headliner part that extends down the A pillar and then tuck into the rubber door seal and continue on - using the orange pry tool to assist as needed. You can reattach the A-pillar trim piece now. Here is a pic showing progress after passing the A pillar and just before I finished installing the trim piece:

20250118_134814.jpg


More pics along the way showing the path I took. I had already removed the right passenger seat belt trim piece and the rear right window trim piece for a solar power cable run to the battery bank You should not have to remove these pieces to run the video cable. With them removed, you will, however, have a better look at what's underneath.

20250118_135250.jpg


This pic also shows my stuck nitrile glove.

20250118_135406.jpg


20250118_135806.jpg


20250118_135924.jpg


20250118_140135.jpg


20250118_140304.jpg


20250118_140448.jpg


20250118_140528.jpg


After you get to this point with the right rear trim panel piece, it's time to remove another trim panel piece - the right rear wheel well panel piece. Design Build Go's video on installing the GP Factor rear door table plus a work light covers how to remove this piece starting at the 6:16 mark.

Part Three will continue this install. Gotta stop here for now - time to grill.

Other Resources:

Wolfbox's Installation Guides
 
Last edited:
Part Three (and Final Part) of my Wolfbox G900 Installation Guide.

Now that you have removed the wheel well trim panel piece, go ahead and run the video cable along and inside the rear door rubber seal (and tuck it behind the plastic if you can using the orange pry tool) all the way to the floor.

20250118_140843.jpg


Now look behind the trim panel near the door and remove the highlighted nut so that we can lift the trim enough to tuck the plastic connector of the video cable underneath it:

20250118_140937 - highlighted.jpg


20250118_141748.jpg


Pull the cable through and tuck the wire into the corner of the trim pieces. This highlighted bit is all you can see of the cable after tucking (view from the tailgate area):

20250118_142124 - highlighted.jpg


You'll have some excess video cable wire after you pull it through. I just cinched it up with a Velcro strap and parked it here. At this time, I was not interested in wiring up the red wire for the reverse arrows, etc., since I have the OEM reverse camera for that, but if the OEM camera ever fails, this is where you will hook up the red wire (as detailed elsewhere in another post by someone). Go ahead and replace the nut you removed to pull the video cable under the trim piece. Now it's time to pull the extension cable from outside the vehicle to this rear corner.

Start by removing the outside rubber gasket that starts the cable run to the large rear door. You can use a flat head screwdriver for this. Just start by gently prying up a corner and then grabbing it with your finger to hold it in place while you reach in with the screwdriver to pry more rubber out - rinse and repeat until you have it popped out:

20250118_142607.jpg


Now, unwind a wire coat hanger, and bend an end with a downward curve, and from the inside of the vehicle, you'll be able to poke the hanger down and through the hole near the unseated gasket. Looking down the coat hanger:

20250118_143645.jpg


After a little fishing - bingo!

20250118_143637.jpg


Securely tape the extension cable to the coat hanger and pull it through to connect it to the video cable.

20250118_145514.jpg


Now you can go ahead and connect it to the video cable and cinch up the excess from the original cable.

20250302_185512.jpg


Now - take a time out and hook up the rear camera to the extension cable to ensure everything works. Hopefully, it will!

Assuming it works, unhook the rear camera. Now, you have a decision to make, and it's an important one, and that is how much of the extension cable do you need to make your run to the exterior roof mount. This is important, because after you follow the route I'm taking, it won't be easy to take up slack. If you have cross bars, or a roof rack, it's not that big of a deal, since you should be able to route excess around them to take up slack. For now - put the bookmark here and read the rest of how I installed mine to get a sense for what you will need. Then, run some string along the route you want to take to get a better idea of how much of the extension cable you will need outside the vehicle.

Since I have cross bars and a roof top tent, I chose to go with the maximum amount of the 10 foot cable and left no excess inside the vehicle. So, where are we going? See this lovely trim piece with the helpful safety vest reminder?

20250118_145601.jpg


We're going up and behind it. Note - for those mounting a Weboost cell phone booster at the rear of the vehicle, this route should also be a great way to run the RG58 coaxial cable into the Grenadier in a manner that would avoid having to close a door on the cable. The trim piece is plastic and fairly flexible after you remove the seven T25 bolts holding it down. Peel back the door seal slightly to get a good bite on them.

20250118_150527.jpg


I confirmed there is a clear channel in the corner from top to bottom by running my wire hanger down it:

20250118_151851 (1).jpg


The next step is to duct tape the female end of the extension cable to the end of your coat hanger and then pull it up that channel - while using your handy dandy orange pry tool to create enough space to pull it up and through (I tried the slide the cable sideways into the gap method without having to pull the cable through, but that did not work - too tight):

20250118_152453 (1).jpg


20250118_152544 (1).jpg


Hell yeah:

20250118_152629 (1).jpg


Note the removal of the T25 bolt at the gutter level. That's where we're going. You can just slide the cable in sideways here.

20250118_152847 (1).jpg


Go ahead and pull the slack cable up and through the channel. Now let's replace the rubber gasket. The trick to doing this is using a box cutter to make a slice on the inner ring of the gasket so that the rubber can press around the video cable and reseat nicely into the hole. Note - you are not cutting a piece out of the gasket. Instead, you are just making a slice no deeper than the width of the cable. I made a slice in the lower left corner where my cable popped out - highlighted below.

20250118_151837 - highlighted.jpg


Also, be mindful not to nick any of the wires in the sheath with your box cutter. I also added a 3M cable clip here to channel the cable better.

20250118_153855.jpg


Here's the gasket reseated around the video cable - perfect fit:

20250201_135605.jpg


Now back to routing the video cable you've pulled through the corner channel. Use your pry tool to help route the cable into the back side of the gutter trough trim piece:

20250118_154029 (1).jpg


Once you round the corner and get to the gutter proper, you have a choice of routes. One option is to take the direct route up along a gap in the roof near the rear, press the cable down in it and then cover it with clear tape. Something like this would do the trick (I think tape would be needed to keep the cable in the gap - I tried pressing it further in, but could not get it to stick well). If you go this route, you will route the cable around the corner (using the pry tool as needed) and then up the gap (you will need a ladder):

20250118_154255.jpg


20250118_154500.jpg


20250118_154626.jpg


So, in my install, it was here that I figured out I had too much excess extension cable to make this route work well, and I did not feel like cutting the cable and patching it back together shorter. So, I backed out of this route and went along the gutter and followed my solar cable up through the Alu-Cab load bar feet, along a cross bar, and then dropped out from my rear work light right where I wanted to mount the camera, which I did with some thin, water resistant Velcro tape. I'm using Velcro tape so I can adjust the position of the camera until I get it exactly where I like it. It also will be handy to disconnect the camera as needed if I wash the vehicle or if the camera ever breaks and needs to be replaced. If it ends up being too jittery there, I will go with some VHB tape.

20250201_145420.jpg


20250303_073304.jpg


Now you can put the bolts back in the trim panel and do a final test of your camera. That's it! Let me know if you have any questions.

20250118_161000.jpg
 

Attachments

  • 20250118_142124.jpg
    20250118_142124.jpg
    2.4 MB · Views: 3
Last edited:
Back
Top Bottom