The Grenadier Forum
Register a free account today to become a member! Once signed in, you'll be able to contribute to the community by adding your own topics, posts, and connect with other members through your own private inbox! INEOS Agents, Dealers or Commercial vendors please contact admin@theineosforum.com for a commercial account.
You are using an out of date browser. It may not display this or other websites correctly.
You should upgrade or use an alternative browser.
You should upgrade or use an alternative browser.
DIY Rear Cargo Shelf
- Thread starter 123456789
- Start date
-
- Tags
- cargo cargo shelf storage
Do you know much the aluminum and laser cutting would typically cost?
That’s awesome! I’m gonna try to find someone local. ThanksI was able to do the lot with powder coating and fasteners for AUD375ea when I did a run of ten.
The first one was $350 just in laser cutting before bending and coating etc.
Hi ninetubes, Impressive and Fit for Purpose. Quick question. Do you have the rear seat back recline brackets on? If not, would you be able to shorten the front portion by 55mm or 2.17", which is how far the back seat reclines at the top off the seat towards the rear if one installs the recline brackets. DaBullI just did a run of ten of these for local owners. Used 3.0mm for the tray which is very sturdy, definitely recommend it!
View attachment 7842831
Wow that attic rack is amazing. I wish I were close buy to get one.I just did a run of ten of these for local owners. Used 3.0mm for the tray which is very sturdy, definitely recommend it!
View attachment 7842831
Where did you get the floor load separator that locks into the airline tracks? That looks like a must have. Its brilliant. I also need a rubberized floor liner that works with the airline tracks so things just don’t slide around.
If any Arizona members are interested, I am in Phoenix. If we can get a few in on it, I have a guy.
Not my car sorry, mine is in the first post with the draws etc in it.Wow that attic rack is amazing. I wish I were close buy to get one.
Where did you get the floor load separator that locks into the airline tracks? That looks like a must have. Its brilliant. I also need a rubberized floor liner that works with the airline tracks so things just don’t slide around.
Believe the load separator is ineos, no idea on the mat.
I don’t, bu that last car pictured does. Owner sent me that photo and reported it fitted fine.Hi ninetubes, Impressive and Fit for Purpose. Quick question. Do you have the rear seat back recline brackets on? If not, would you be able to shorten the front portion by 55mm or 2.17", which is how far the back seat reclines at the top off the seat towards the rear if one installs the recline brackets. DaBull
You could easily move the shelf forward/backwards on the side brackets by simply drilling new holes if needed.
Hey mate does your top shelf work with the factory cargo barrier?
Negative. It covers the slot. One bloke that bought one is planning to cut the side bracket to gain access to the cargo barrier slot again.Hey mate does your top shelf work with the factory cargo barrier?
Super clean install.I sketched up a rear cargo shelf and had it laser cut, bent and powder coated.
Looks great, so thought I'd share the cad file for anyone that is so inclined. Sorry about the .zip, it wouldn't let me upload a .dwg
Most sheet metal shops could make it happen for you by sending them the cad file.
I made it from 2.0mm alum. I'h very happy, but some may prefer to go to 2.5 or 3.0mm.
You’ll also need:
Ten M6x10 nut/bolt/washers to bolt the parts together. You can also use M6 rivnuts if you prefer.
Four M8x25 bolts to bolt it to the car
Four 10mm thick washers, I used a hole saw to cut them from some 10mm plastic bread board. The outside diameter needs to be 40-50mm and the hole in the middle 9-10mm.
To fit, simply pop the four trims out of the roof and attach to those bolt holes with the big washers in there so the brackets don’t squash the roof lining – done.
Cheers, Dan
Looks great
Only just seen this thread and I am mightily impressed with your work buddy. I have been going back and forth with the idea of getting one of these type of shelves from a European supplier who is currently doing something almost identical.
That a a raised/false floor would be me sorted for the rear of the vehicle. No one seems to be doing a raised floor to level out the space when the seats are folded flat which I find bizarre tbh, so I am planning on building my own.
Anyone know any different on the floor scenario ?
That a a raised/false floor would be me sorted for the rear of the vehicle. No one seems to be doing a raised floor to level out the space when the seats are folded flat which I find bizarre tbh, so I am planning on building my own.
Anyone know any different on the floor scenario ?
Hi Shaky, Goose Gear has a raised floor that goes along with their drawer system. Exceptional Quality! DaBullOnly just seen this thread and I am mightily impressed with your work buddy. I have been going back and forth with the idea of getting one of these type of shelves from a European supplier who is currently doing something almost identical.
That a a raised/false floor would be me sorted for the rear of the vehicle. No one seems to be doing a raised floor to level out the space when the seats are folded flat which I find bizarre tbh, so I am planning on building my own.
Anyone know any different on the floor scenario ?

Goose Gear Ineos Grenadier 2024-Present 1st Gen.
Goose Gear Ineos Grenadier 2024-Present 1st Gen.
Thanks Dabull. I had literally just stumbled onto the GG thread and seen that.
Their shelf looks like it’s is made something very similar to Ekoply, which is available just up the road from me, and has given me some more ideas.
Their shelf looks like it’s is made something very similar to Ekoply, which is available just up the road from me, and has given me some more ideas.
Thanks mate, appreciate the feedback!Only just seen this thread and I am mightily impressed with your work buddy. I have been going back and forth with the idea of getting one of these type of shelves from a European supplier who is currently doing something almost identical.
That a a raised/false floor would be me sorted for the rear of the vehicle. No one seems to be doing a raised floor to level out the space when the seats are folded flat which I find bizarre tbh, so I am planning on building my own.
Anyone know any different on the floor scenario ?
I put a lot of time into the car feeling my way along with no information (especially the electricals) mid last year. Figured I should share some of that so popped this and a build thread together. Hopefully some of it is helpful to folks
Nothing special. Garden variety 5005.Thanks for sharing this, would you know the grde of aluminium ally used please?
Sadly at 1258mm wide you just miss out on getting 4 per sheet. With this amount of waste, more exotic grades gets expensive.
Thank you, I guess with careful planning from the metal shop the parts could be placed to try to at least maximise a sheet somewhat.
Appreciate the sharing of the details and file. Now to check out what and or who might be able to do the laser cutting etc.
Appreciate the sharing of the details and file. Now to check out what and or who might be able to do the laser cutting etc.
Bonsoir à tous.
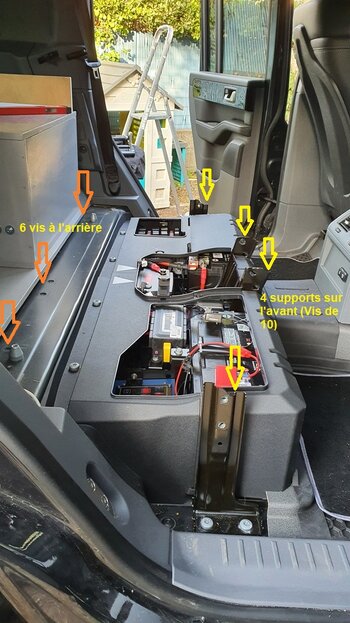
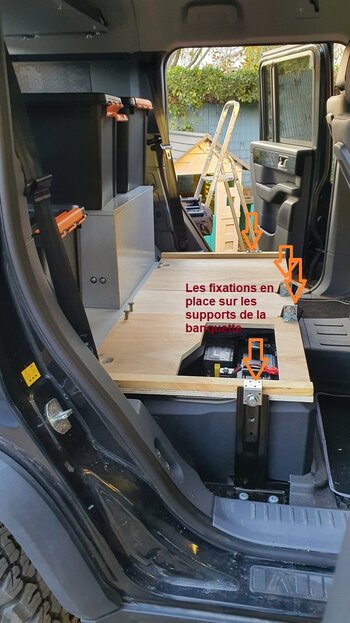
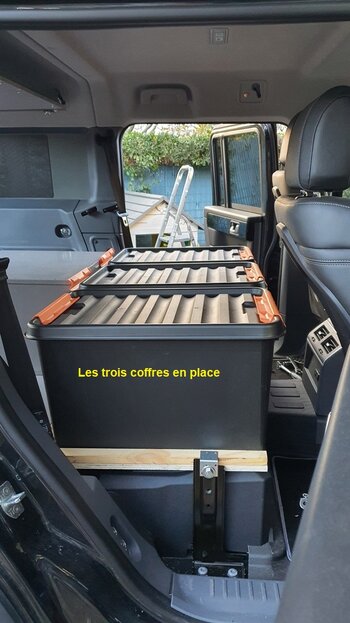
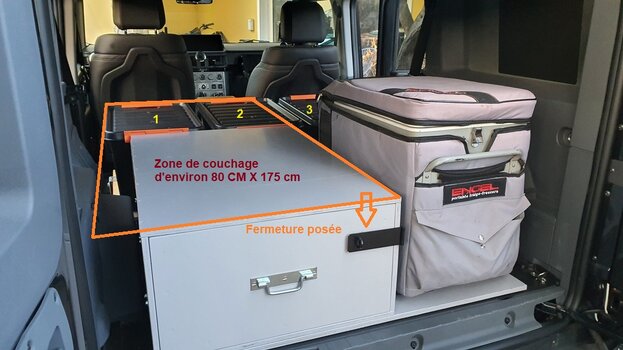
Poursuite des travaux d'aménagement du Grenadier dans l'objectif de disposer d'un couchage intérieur en raid. Suite à mon passage dans un centre de bricolage, j'ai opté pour des coffres en plastique rigide (qui font exactement la hauteur nécessaire pour faire un plancher plat dans le plongement du coffre arrière en bois). J'ai donc retiré la banquette arrière. 6 vis TORX (T50) de deux diamètres différents montées au frein filet sur l'arrière de la banquetteet 8 vis TORX sur l'avant de la banquette. Attention c'est très lourd à sortir. Ensuite réalisation d'un plancher composé de trois plaques de CP de 15 mm reprises sur les ancrages existants avec une découpe pour conserver l'accès à la batterie auxiliaire et au tableau électrique que j'ai installé à côté de la batterie (Alimentation du frigo , de la VHF, de la CB, etc.). Pose des coffres plastiques avec des tasseaux sur les côtés, devant et derrière pour empêcher les mouvements de translation et fixation de chaque coffre avec une sangle reprise sur des brides ancrées dans le plancher bois, de part et d'autre de chaque coffre (pas encore en place). En regardant la photo de l'arrière, j'envisage de rajouter un petit coffre bois sous le coffre n°3.

Poursuite des travaux d'aménagement du Grenadier dans l'objectif de disposer d'un couchage intérieur en raid. Suite à mon passage dans un centre de bricolage, j'ai opté pour des coffres en plastique rigide (qui font exactement la hauteur nécessaire pour faire un plancher plat dans le plongement du coffre arrière en bois). J'ai donc retiré la banquette arrière. 6 vis TORX (T50) de deux diamètres différents montées au frein filet sur l'arrière de la banquetteet 8 vis TORX sur l'avant de la banquette. Attention c'est très lourd à sortir. Ensuite réalisation d'un plancher composé de trois plaques de CP de 15 mm reprises sur les ancrages existants avec une découpe pour conserver l'accès à la batterie auxiliaire et au tableau électrique que j'ai installé à côté de la batterie (Alimentation du frigo , de la VHF, de la CB, etc.). Pose des coffres plastiques avec des tasseaux sur les côtés, devant et derrière pour empêcher les mouvements de translation et fixation de chaque coffre avec une sangle reprise sur des brides ancrées dans le plancher bois, de part et d'autre de chaque coffre (pas encore en place). En regardant la photo de l'arrière, j'envisage de rajouter un petit coffre bois sous le coffre n°3.
Attachments
Similar threads
- Replies
- 11
- Views
- 1K
- Replies
- 27
- Views
- 2K
Latest posts
-
-
Vehicle mounted twin air compressor
- Latest: IslandFalconer
-
Trump announces 25% tariff on all imported vehicles!
- Latest: drinkmorejava
-


