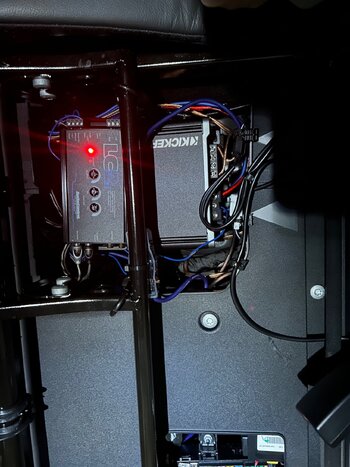
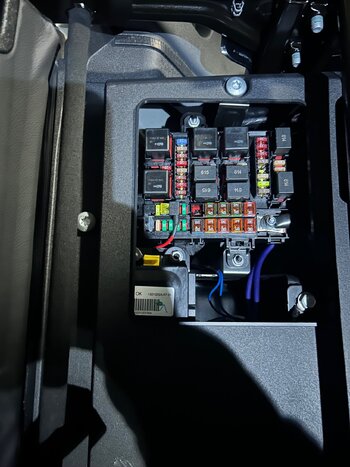
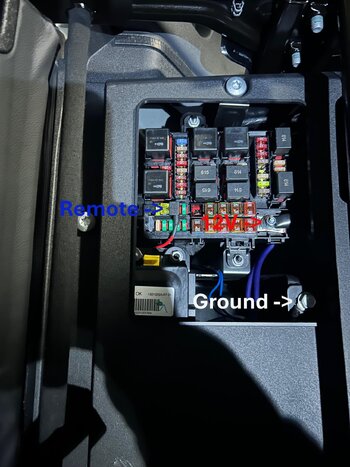
Since I removed the aftermarket subwoofer and bracket and installed a sub enclosure under the rear right seat, I needed a place for the amplifier. I reused the bracket that is attached to the JBL Nano, but just to top of it that is 4 metal "legs" and a flat surface. I placed that under the middle seat agaisnt the sheet metal, straddling over the emergency brake cable. I actually put one sided foam tape on the bracker first and then attached it with heavy duty zip ties. That is my amp mounting location. I went with a small mono amp and just tapped the harness for the JBL nano for speaker wires and the battery terminal and a nearby bolt that was being used for a ground for the power and ground locations. For the remote turn on wire, I found an empty fuse slot that you can see in the 2nd picture. This one is switched to the vehicle and is powered when you open the door and run the vehicle. It turns off a few minutes after closing the doors when the lights go out. You may notice that I have an LC2 line controller sitting on top of the amp. Well, best laid plans...the sound was just not great for the low octaves with the speaker wires directly into the amp. I have used LC2s in the past and should have just planned for it from the start. Now it sounds much better and has the very low deep bass which is easily adjusted by lifting the seat and adjustng the knobs on the LC2. I could have rand another wire to a gain knob, but I keep it turned down so that I don't have to constantly fool with it. This set up is night and day better than stock and really was not that hard to do if you have installed aftermarket stereos before. Access to the battery and the harness for the rear speakers could not be easier.
The Grenadier Forum
Register a free account today to become a member! Once signed in, you'll be able to contribute to the community by adding your own topics, posts, and connect with other members through your own private inbox! INEOS Agents, Dealers or Commercial vendors please contact admin@theineosforum.com for a commercial account.
Installing aftermarket line controller and subwoofer amp
- Thread starter mji111
- Start date
-
- Tags
- aftermarket subwoofer
Sorry I didn't see this before asking in the other thread. So you tapped into the two "speaker level" wires in the JBL wiring harness but they didn't put out enough voltage to run the Kicker? I assume the Kicker had an option for speaker level inputs. I know the wires going to the JBL sub are the L-R rear. You can tell when you fade to the front speakers the sub is getting less of an input signal. I tend to run front at about 70% and rear at about 30% to keep the soundstage from being pulled back toward the rear "fill" speakers. I was thinking of adding a 5 channel amp (one I've had for years) and my hope was the voltage would be adequate. Since the factory head unit only puts out about 4.8v, did you try running the Kicker with the input on line level?
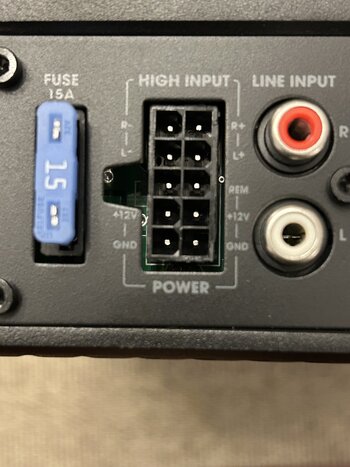
Yes that is correct. The 10 pin harness for the JBL Nano has left and right rear positive and negative, 2 power, 2 ground wires and two empty slots. The kicker amp has enough power to push one 10" sub, but the signal from the head unit is a little weak. The amp has both line and speaker level inputs, so I figured the speaker level inputs that would be the easy route to set it up. That generated too much distorition and a lack of low bass. Adding the LC2 and running the line level inputs with RCA cords made more of a difference than I expected. I also spliced the the JBL nano harness to add another harness with extended wires to move the Nano under the driver seat. It is not really needed, but I figured I would just keep it since it fits and I am already running wires and such.
To get access to the battery, do you have to do anything other than take out the two small screws on the panel covering the battery? Its not that simple is it? Or, did you wire up to the fuse block?
It is accessable without removing any covers. This is the view after lifting up the rear left seat while sitting on the right rear seat. I added that fuse connection wire for the remote turn on lead. The other conenctions already had ring terminals for other power and ground wires under the nuts, so I just added mine to those. If you have ever wired an amp before, this will be a piece of cake except for one step. The JBL Nano harness wires are relatively short between the harness and where it is covered with fabric tape and fastened to the floor board. I find short wires to be a little frustrating to work with when stripping and crimping on connectors, but there is enough to make it work.
Attachments
This is a huge help. Thank you so much for the pictures. One question for you. Do you have a picture of how you wired up the signal coming from the JBL harness to the sub? I’d like to keep the JBL and my new powered subwoofer going together if possible.
I don’t really have a picture of my wire connections as they are all taped up and tucked away. I took this picture of the jbl sub to have as a reference on my phone which wires to cut and splice additional wires to the original harness. I cut each one from the original harness individually and referenced this picture as I connected the new longer ones. I bought a new harness on Amazon for the jbl nano since the remaining wires on the original connector were very short and a pain to reconnect. My power and ground wires for the new amp were from the battery terminal and ground point, not the jbl harness. I only tapped into that for the speaker wires for the amp. So all wires were spliced from the old harness to the new harness so it would reach under the driver’s seat. Only the speaker wires from the old harness were used for the new amp. I hope that makes sense.
Attachments
Awesome. Thank you. I’m just trying to decide how I want to wire this up to add the JL microsub while keeping the JBL in place. I’m thinking I should be able to just piggyback off of those signal wires. Everything should be here in the next couple days so we shall see
Similar threads
- Replies
- 2
- Views
- 366
- Replies
- 8
- Views
- 745
- Replies
- 14
- Views
- 525
- Replies
- 4
- Views
- 438
- Replies
- 10
- Views
- 412


