The Grenadier Forum
Register Now for enhanced site access.
INEOS Agents, Dealers or Commercial vendors please contact admin@theineosforum.com for a commercial account.

Build Thread FL450's Build

Local time
6:36 AM
Joined
Jul 5, 2024
Messages
12
Reaction score
26
Location
Napa Valley, CA, USA
Selling my 1993 NAS Land Rover Defender #99 has got to be one of the greatest regrets I may have ever had. What an icon that car was.

IMG_1291.JPG

IMG_1296.JPG


As fantastic as that truck was to build, it seemed no level of meticulous restoration could achieve the reliability, safety, and comfort we come to expect in a modern vehicle. On one of the many days the Defender looked at me the wrong way, a customer of mine made me an insane offer and I let it go.

So off I went to replace it with something more modern. Surely something out there exists that could be better right?

IMG_1377.JPG

IMG_2169.JPG

IMG_0189.jpeg


They were all great...but let's be honest...they will never have the heritage or nostalgia of the 110. Will the Grenadier be just another one like the rest?
 
Local time
6:36 AM
Joined
Jul 5, 2024
Messages
12
Reaction score
26
Location
Napa Valley, CA, USA
View attachment IMG_0076.jpeg
Something tells me this one is different.

I ordered my Grenadier almost 14 months ago. After almost giving up hope I finally got a call that it was ready for delivery. A new dealership in the Bay Area had formed and I guess my car was part of the original seed stock. At around $93,000 sticker price, the Trialmaster was fully loaded but still missing many of its apparently dealer installed options. It took about 3-4 days to get the rest of the gear in stock but the dealer did a great job installing the factory options and my truck was finally ready for delivery.

Finally it came home.
IMG_1909.jpeg
 
Local time
6:36 AM
Joined
Jul 5, 2024
Messages
12
Reaction score
26
Location
Napa Valley, CA, USA
Now for the build stuff. Normally I'm usually inclined to a modest 30mm lift but the Grenadier didn't seem to need it. I changed the rubber for 285/70 R17s in the Toyo R/Ts. I actually really like the stance as it is and there is plenty of clearance. Even loaded down it has a logical stance.

IMG_1929.jpeg

My plan is the following:
  • 285/70 R17 Toyo R/Ts
  • OWL Outdoor Rosen Sun Shades
  • OWL Outdoor ARB Twin Compressor
  • GP Factors Rear Cubby Table System
  • Diabolical Rear Drawer System
  • S2 Baja Lights on Rack
  • Grenadier Stock Light Bar on stock Rhino Rack
  • OWL Outdoor LP4 Baja Design Aux Light Replacements
  • 67Designs Gear Accessory Rail
  • ICOM 5100 HAM Radio
  • Compactenna 2m x 70cm HAM Radio Antenna and front bumper mag mount
  • Dometic Fridge and Slide to mount on top of Diabolical Drawer System
 
Local time
6:36 AM
Joined
Jul 5, 2024
Messages
12
Reaction score
26
Location
Napa Valley, CA, USA
I started with the 67Designs 20 mm ball mount system. The little trim piece around the screen easily pops off so I modified the mount with counter sunk hardware and drilled into the trim piece for a more solid hold. I'm disappointed 67D didn't plan this like this originally. Either way with a little modification it works and you end up only having the drill the top trim piece which can be replaced easily if needed.
img_0056-jpeg.7872196

IMG_1935.jpeg

At the same time, I installed the ICOM 5100. It's my favorite HAM radio for remote applications. I installed the antenna on the front bumper via a very strong magnet with gasket. The ground plane isn't too bad actually...and supports my needs well.
img_1938-jpeg.7872198
 

Attachments

  • IMG_0056.jpeg
    3.7 MB · Views: 389
  • IMG_1938.jpeg
    3.7 MB · Views: 339
Local time
6:36 AM
Joined
Jul 5, 2024
Messages
12
Reaction score
26
Location
Napa Valley, CA, USA
Next came the drawers...an easy evening install and very well built. I like that it's one large drawer with dividers. It also levels out with the seats folded forward which makes for a nice flat platform.
img_1910-jpeg.7872199

Also the GPFactors rear drawer is fortunately compatible. This is a very nice piece of kit.
img_0057-jpeg.7872200

IMG_0058.jpeg
 

Attachments

  • IMG_1910.jpeg
    4.7 MB · Views: 305
  • IMG_0057.jpeg
    4.6 MB · Views: 303
Local time
6:36 AM
Joined
Jul 5, 2024
Messages
12
Reaction score
26
Location
Napa Valley, CA, USA
Installed the OWL Outdoor Sun Shades and the ARB Twin Compressor. Again super well made. Rosen makes very high quality sun shades that are optically tested. I'm a corporate jet pilot and have similar style shades in the PC24. Really nice equipment for a vehicle and nice to look through.
img_0055-jpeg
img_1977-jpeg.7872205

img_1974-jpeg.7872204
IMG_2029.jpeg
img_0055-jpeg.7872202
 

Attachments

  • IMG_1977.jpeg
    3.7 MB · Views: 296
  • IMG_1974.jpeg
    3.3 MB · Views: 300
  • IMG_0055.jpeg
    5 MB · Views: 303
Local time
6:36 AM
Joined
Jul 5, 2024
Messages
12
Reaction score
26
Location
Napa Valley, CA, USA
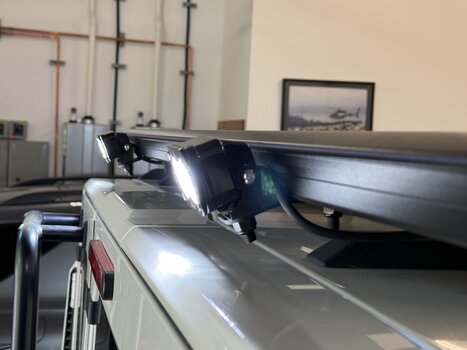
Now the lights... The dealer installed the factory light bar which took one of the 4 awesome roof accessory plugs. I was able to only use 2 more for the side and rear lights. Leaving one more for possibly a StarLink in the future.

The Rhino Rack offers lots of great locations to mount lights. There is even a cool rail on the bottom of the rack at the rear which made mounting below the roof line easy.

As for the LP4s I mounted them using OWLs really cool AUX light replacement kit. I used the factory wiring to trigger a relay since they draw a lot more amps. I did use EXT1 to run the day time running lights which are just cool.
img_0051-jpeg.7872206

img_0052-jpeg.7872207

img_0054-jpeg.7872208
 

Attachments

  • IMG_0051.jpeg
    3.4 MB · Views: 320
  • IMG_0052.jpeg
    IMG_0052.jpeg
    1.6 MB · Views: 339
  • IMG_0054.jpeg
    4.2 MB · Views: 321

nuclearmonkey

Grenadier Owner
Local time
9:36 AM
Joined
Feb 9, 2024
Messages
127
Reaction score
110
Location
South Florida
Nicely done! Of curiosity, what brackets did you use for the S2’s on the roof rack?
 
Local time
8:36 AM
Joined
Apr 9, 2024
Messages
8
Reaction score
3
Location
Dallas, TX, USA
I started with the 67Designs 20 mm ball mount system. The little trim piece around the screen easily pops off so I modified the mount with counter sunk hardware and drilled into the trim piece for a more solid hold. I'm disappointed 67D didn't plan this like this originally. Either way with a little modification it works and you end up only having the drill the top trim piece which can be replaced easily if needed.
img_0056-jpeg.7872196

View attachment 7872197
At the same time, I installed the ICOM 5100. It's my favorite HAM radio for remote applications. I installed the antenna on the front bumper via a very strong magnet with gasket. The ground plane isn't too bad actually...and supports my needs well.
img_1938-jpeg.7872198
I am looking to install a GMRS radio and was wondering how and where you ran the antenna wire?
 
Local time
6:36 AM
Joined
Jul 5, 2024
Messages
12
Reaction score
26
Location
Napa Valley, CA, USA
I am looking to install a GMRS radio and was wondering how and where you ran the antenna wire?
If you remove the trim pieces to the left of the brake pedal (left hand drive), you will see grommets for the firewall. Just pick one and pass your cable. Then once in the engine bay it's easy to move it around.
 
Local time
8:36 AM
Joined
Apr 9, 2024
Messages
8
Reaction score
3
Location
Dallas, TX, USA
I am also looking to install a GMRS radio but would like to mount the antenna on the rear ladder or rear side near roof.

Anyone know of any rear entry points they have used to run antennas wires . Any pictures would be great.

Not sure if any one has a diagram or list of all exterior entry points that are easily accessible from outside and or inside the Grenadier

Thanks.
 

Kujo

Grenadier Owner
Lifetime Supporter
Local time
8:36 AM
Joined
Jul 24, 2024
Messages
65
Reaction score
71
Location
St. Louis, MO, USA
FL450, great job. I suggest moving the lead weights placed on the outside of your wheels and attach them on the inside of the wheel. Hides them.
 
Back
Top Bottom