The Grenadier Forum
Register Now for enhanced site access.
INEOS Agents, Dealers or Commercial vendors please contact admin@theineosforum.com for a commercial account.

DC to AC Power Inverter

globalgregors

Photo Contest Winner
Grenadier Owner
Lifetime Supporter
Local time
12:31 AM
Joined
May 15, 2022
Messages
1,500
Reaction score
3,903
Location
Sydney NSW, Australia
I would be very interested to know where the original planed location was for the inverter . The location if the plug at the back of the center console was pretty solid choice .
Good question. If not the battery/electrical box I’d assumed it was under the centre console, albeit with a shallower compartment.
A 400W inverter is not large - my US-purchased 120V one was 200x150x80 or thereabouts.
 

Jean Mercier

GG#920
Grenadier Owner
Lifetime Supporter
Local time
2:31 PM
Joined
Sep 10, 2022
Messages
2,626
Reaction score
9,390
Location
Sint-Martens-Latem, Belgium
I didn’t install mine yet, I can put it under the seats in one of the two remaining holes, but it is a bit tight. Didn’t carry it on my trip either because I knew it wasn't a necessity
 

Jean Mercier

GG#920
Grenadier Owner
Lifetime Supporter
Local time
2:31 PM
Joined
Sep 10, 2022
Messages
2,626
Reaction score
9,390
Location
Sint-Martens-Latem, Belgium
Some months ago, before getting my Grenadier, I bought that cheap 12V DC – 220V A-C invertor, about 100 €.. See the start of this thread.

First, let’s be clear:
  • I don’t really need it.
  • I have no experience with an invertor, none whatsoever
  • I know about electricity, but in a moderate way
  • It is just playing around.
This means, as always … shoot! You can tell me it isn’t very professional, but only if you say why, this could help others who want a more decent solution. And in the previous posts I already saw some alternatives 👍

I bought this one because of the dimensions, I thought to mount it in one of the following locations:

where to put the invertor.jpg


Second thing, although mine is rated 2800 Watt, this is “peak” power, continuous power is usually about half the peak power.

Why did I choose position 3?

  • 1 and 2 were a bit too tight, but not impossible
  • At position 3 there was enough space on top of the invertor even with the seat down for air circulation
  • I could use the battery fixation metal bar to fix my invertor, leaving a space of several mm between the invertor and the battery
  • I could, if necessary, use the 3 AC outlets of my invertor
  • Access to the on-off switch was easy with the rear seat up
  • I still can use location 1 and 2 under the seat for other usages (CTek Smartpass 250 in location 2 for instance).
  • The cooling fans are located at both longitudinal sides of the invertor
This is the positioning, the grey part under the invertor is a rubber foot for the stability (another one at the opposite side).
I connected the invertor directly to the auxiliary battery.
20230607_182451.jpg

Please don’t ask how I fixed it, it is really very “customized”, but anybody who meets me on the road is allowed to look at it, but is really based on some weird metal pieces in my box at home combined with the dimensions of my invertor … well, not copyable I think.
The final result:
20230607_190147.jpg

I tested it during more than half an hour with a load of about 1000 Watt (with a very old cooking device) and motor off!

20230610_184629.jpg


The invertor became quite hot, but not dramatically

20230610_190153.jpg


But did sometimes (I guess) go in thermal protection, because regularly the fan blew much harder and the power showed 0 watt, to go back to 1000 Watt after some minutes.
I repeat: my inverter doesn't touch the battery!

My water didn’t cook, although some bubbles were visible 😊

For me the test was OK.

Will I use the invertor? I don’t know but I am happy with my “do-it-yourself” solution.
 

Logsplitter

Photo Contest Winner
Grenadier Owner
Lifetime Supporter
Local time
1:31 PM
Joined
Oct 31, 2022
Messages
2,779
Reaction score
9,960
Location
🇬🇧
Some months ago, before getting my Grenadier, I bought that cheap 12V DC – 220V A-C invertor, about 100 €.. See the start of this thread.

First, let’s be clear:
  • I don’t really need it.
  • I have no experience with an invertor, none whatsoever
  • I know about electricity, but in a moderate way
  • It is just playing around.
This means, as always … shoot! You can tell me it isn’t very professional, but only if you say why, this could help others who want a more decent solution. And in the previous posts I already saw some alternatives 👍

I bought this one because of the dimensions, I thought to mount it in one of the following locations:

View attachment 7815946

Second thing, although mine is rated 2800 Watt, this is “peak” power, continuous power is usually about half the peak power.

Why did I choose position 3?

  • 1 and 2 were a bit too tight, but not impossible
  • At position 3 there was enough space on top of the invertor even with the seat down for air circulation
  • I could use the battery fixation metal bar to fix my invertor, leaving a space of several mm between the invertor and the battery
  • I could, if necessary, use the 3 AC outlets of my invertor
  • Access to the on-off switch was easy with the rear seat up
  • I still can use location 1 and 2 under the seat for other usages (CTek Smartpass 250 in location 2 for instance).
  • The cooling fans are located at both longitudinal sides of the invertor
This is the positioning, the grey part under the invertor is a rubber foot for the stability (another one at the opposite side).
I connected the invertor directly to the auxiliary battery.
View attachment 7815947
Please don’t ask how I fixed it, it is really very “customized”, but anybody who meets me on the road is allowed to look at it, but is really based on some weird metal pieces in my box at home combined with the dimensions of my invertor … well, not copyable I think.
The final result:
View attachment 7815950
I tested it during more than half an hour with a load of about 1000 Watt (with a very old cooking device) and motor off!

View attachment 7815951

The invertor became quite hot, but not dramatically

View attachment 7815952

But did sometimes (I guess) go in thermal protection, because regularly the fan blew much harder and the power showed 0 watt, to go back to 1000 Watt after some minutes.
I repeat: my inverter doesn't touch the battery!

My water didn’t cook, although some bubbles were visible 😊

For me the test was OK.

Will I use the invertor? I don’t know but I am happy with my “do-it-yourself” solution.
Have you put an inline fuse in 🤔
 

Logsplitter

Photo Contest Winner
Grenadier Owner
Lifetime Supporter
Local time
1:31 PM
Joined
Oct 31, 2022
Messages
2,779
Reaction score
9,960
Location
🇬🇧
No, there are fuses in the invertor itself I guess ...
It is designed to be connected directly to the battery.
Please correct me if I am wrong.
View attachment 7815958
I guess if it’s fused directly to the incoming live terminal then should be good. But would be easier with an inline use if it blew to replace rather than take the cover off.
 

AnD3rew

Inch deep and a mile wide.
Grenadier Owner
Lifetime Supporter
Local time
12:31 AM
Joined
Aug 24, 2022
Messages
2,433
Reaction score
6,034
I wouldn’t want an inverter sitting directly above my battery like that. Batteries don’t like getting too hot and inverters as you found can get very hot. They way you have yours set up which means you need to have the seat open when using it will help alleviate that a bit, but definitely wouldn’t try using it with the seat closed up. Also maybe some small risk of sparks and explosion if battery is gassing, shouldn’t happen if the inverter is in good condition and the batteries are vented outside I believe but still adding a small extra risk.
 

ADVAW8S

Global Grenadier 0044
Lifetime Supporter
Founding Guard
Local time
6:31 AM
Joined
Oct 11, 2021
Messages
1,965
Reaction score
2,870
Location
Kirkland, WA, USA
@Jean Mercier what is the wattage requirement for the hot plate/induction cooking? I have a battery bank with a built in 1800w inverter and it's only good for a hot plate.
 

bigleonski

Grenadier Owner
Local time
11:31 PM
Joined
Nov 5, 2022
Messages
2,157
Reaction score
4,762
Location
Brisbane QLD, Australia
I wouldn’t want an inverter sitting directly above my battery like that. Batteries don’t like getting too hot and inverters as you found can get very hot. They way you have yours set up which means you need to have the seat open when using it will help alleviate that a bit, but definitely wouldn’t try using it with the seat closed up. Also maybe some small risk of sparks and explosion if battery is gassing, shouldn’t happen if the inverter is in good condition and the batteries are vented outside I believe but still adding a small extra risk.
I must admit I had the same thought.
 

Jean Mercier

GG#920
Grenadier Owner
Lifetime Supporter
Local time
2:31 PM
Joined
Sep 10, 2022
Messages
2,626
Reaction score
9,390
Location
Sint-Martens-Latem, Belgium
@Jean Mercier what is the wattage requirement for the hot plate/induction cooking? I have a battery bank with a built in 1800w inverter and it's only good for a hot plate.
It's a very old plate by the way, belonged to my father or even my grand-parents. It is rated 800 Watt. I don't like to trash old working stuff, that's why I still have it and never us it. It was just for testing, I don't think I will ever put it in my trunk while travelling.
 
Local time
11:31 PM
Joined
Mar 21, 2023
Messages
405
Reaction score
715
Location
Australia
No, there are fuses in the invertor itself I guess ...
It is designed to be connected directly to the battery.
Please correct me if I am wrong
What size cable is connecting the inverter to the battery? You must use a fuse inline between the battery & inverter. The fuse is there to protect the cable not the inverter. If there's a short in the cable the battery will deliver all the power it has which could melt the cable & risk a fire. Having an inline fuse prevents this - the fuse will blow and break the connection.

One photo shows the cooker is drawing 1000w so cable size should be 16 or 21mm² ( 4- 5 B&S or 4-5 AWG ). At 1000w the load is around 100A, that's a substantial load. These EFB batteries are in no way designed to handle that sort of load and it will shorten its life dramatically. You need minimum of 2 x AGM batteries ( or a lithium ) if using a large inverter like that. It's Ok to run say a 12V fridge at 5A or a small 3-400w inverter for short periods off the EFB batteries but that's about their limit.
You can also see the voltage of the battery at 1000w drops off a cliff down to 10.6V. The inverter would likely be cutting out at that voltage. This voltage drop is telling you the battery is not happy with that load.
With respect, you're asking for trouble mounting the inverter on top of the battery. This is not best practice and would be frowned upon by any decent installer.
 

Jean Mercier

GG#920
Grenadier Owner
Lifetime Supporter
Local time
2:31 PM
Joined
Sep 10, 2022
Messages
2,626
Reaction score
9,390
Location
Sint-Martens-Latem, Belgium
@MarkH and others, OK, OK too many disapprovals :unsure: :)

I will dismount it and see if I can put it in location "1", next to the auxiliary battery, with an inline fuse.

But I will have to make some holes in the plastic under the seat and perhaps some other modifications.

Anyway, thanks for the comments 👍:love: and go on!
 
Last edited:

DCPU

Grenadier Owner
Local time
1:31 PM
Joined
Jul 27, 2022
Messages
6,005
Reaction score
13,342
I was going to suggest taking the power feed to your inverter from the output on the CTEK Smartpass, as that can handle up to 120A. That way you would have got the benefit of the protection it offers. However, I think they are disconnected if the voltage falls to lower than 11.5V to avoid battery damage.
 

Jean Mercier

GG#920
Grenadier Owner
Lifetime Supporter
Local time
2:31 PM
Joined
Sep 10, 2022
Messages
2,626
Reaction score
9,390
Location
Sint-Martens-Latem, Belgium
Some weeks ago I finished my invertor install in my Grenadier.

Due to improved knowledge, the location is totally different from what I tried in June last year. In fact I used the space where Ineos is putting the invertor! But it is NOT an Ineos clone.

1707684292446.png


What I bought [all prices rounded and including shipping]:
  • Chinese Invertor rated 2800 Watt peak, but with 120A fuse, therefore1400 Watt flat. [95 €]
  • Relay 12V, 120A [9 €] > got my money back, the casing was broken, but I repaired it.
  • One long red + cable, 50 mm², 1.40m [22€ ]
  • One short red cable, 16 mm², 0.10m [4 €]
  • One black cable short, 16 mm², 0.32m [6 €] but finally I used the Chinese one
  • One fuse splitter [1 €]
  • One fuse 1A [2 € for 10 pieces]
  • One 100A fuse (Littelfuse 3298100.Z-ND) [13 €]
Total price: about 150 €.
  1. I dismounted (opened) the invertor and dismounted the 3 AC outlets, power switch and LCD screen
  2. I placed a thin metal recuperation sheet in the two big lateral holes (previously fort he power outlets)
  3. I short circuited the wires of the on-off switch
  4. I dismounted the rear left trim and disconnected the 12V cigarette lighter output connector
  5. Mounted the invertor in the car
  6. Mounted the relay behind the invertor
  7. Wired the positive feed (n°85) of the relay through a fuse split tot he unused “1 pin” fuse “FI17” (my car is a petrol) and placed a 1A micro fuse in it.
  8. I made holes in the trim besides the jack fort he switch, one power outlet and LCD screen
  9. Did also make some wiring and connectors to reconnect those tot he invertor
  10. I drilled some supplementary holes in the trim for added heat evacuation
  11. I routed my long positive cable tot he middle position of the fuse box inert he rear left seat
  12. I changed the unused and installed 60A fuse by the 100 fuse. (why not a 120A fuse? Because I guess the 100 A will be sufficient, and I don’t want to blow the internal 120 fuse of the invertor. Experience will tell me if if I have to replace it by a 125 A fuse, Littlefuse doesn’t have a 120A fuse]
  13. I connected all the other power cables
  14. I did bring in the rear left trim and connected the wiring fort he power outlet, LCD screen, and switch, and also reconnected the 12V outlet, and put the trim back in place.
Below some pictures. Definitely not very beautiful inside, and not 100% satisfied myself by the outside, especially the positioning of the LCD screen was a miscarriage, but OK, it works, see some pictures below.
20231231_204104.jpg

20240106_152612.jpg

20240106_215733.jpg
20240106_232334.jpg
20240130_150441.jpg

20240130_152701.jpg

20240130_150654.jpg
20240130_152134.jpg


And finally today, I really used it! I had to heat shrink some cable for something else (will be another post) and instead of taking an extension cable from my garage to the car, I used the invertor. The heat gun is rated 300 Watt, and indeed, 300Watt!
20240211_143842.jpg

[The white wire in the hole of the trim is a temperature probe: no significant rise of the temperature, but of course it is only 300 Watt]

Like my previous attempt some 9 months ago: all comments are welcome!
 
Last edited:

JMP

Grenadier Owner
Local time
2:31 PM
Joined
Nov 18, 2023
Messages
12
Reaction score
22
Location
Saverdun, France
Il y a quelques semaines, j'ai terminé l'installation de mon onduleur dans mon Grenadier.

Grâce à l'amélioration des connaissances, le lieu est totalement différent de celui que j'ai essayé en juin de l'année dernière. En fait, j'ai utilisé l'espace où Ineos met l'onduleur ! Mais ce n'est PAS un clone d'Ineos.

View attachment 7843611

Ce que j'ai acheté [tous les prix arrondis et frais de port compris] :
  • Onduleur chinois évalué à 2 800 watts en crête, mais avec un fusible de 120 A, donc 1 400 watts à plat. [95 €]
  • Relais 12V, 120A [9 €] > j'ai été remboursé, le boîtier était cassé, mais je l'ai réparé.
  • Un long rouge + câble, 50 mm², 1,40m [22€ ]
  • Un câble rouge court, 16 mm², 0,10 m [4 €]
  • Un câble noir court, 16 mm², 0,32m [6 €] mais finalement j'ai utilisé le chinois
  • Un répartiteur de fusible [1 €]
  • Un fusible 1A [2 € pour 10 pièces]
  • Un fusible 100A (Littelfuse 3298100.Z-ND) [13 €]
Prix total : environ 150 €.
  1. J'ai démonté (ouvert) l'onduleur et démonté les 3 prises secteur, l'interrupteur d'alimentation et l'écran LCD
  2. J'ai placé une fine tôle de récupération dans les deux gros trous latéraux (précédemment pour les prises électriques)
  3. J'ai court-circuité les fils de l'interrupteur marche-arrêt
  4. J'ai démonté la garniture arrière gauche et débranché le connecteur de sortie allume cigare 12V
  5. Monté l'onduleur dans la voiture
  6. Monté le relais derrière l'onduleur
  7. J'ai branché l'alimentation positive (n°85) du relais à travers un fusible divisé en fusible "1 pin" "FI17" inutilisé (ma voiture est une essence) et j'y ai placé un micro fusible de 1A.
  8. J'ai fait des trous dans la garniture en plus du jack pour l'interrupteur, une prise de courant et un écran LCD
  9. J'ai également réalisé du câblage et des connecteurs pour les reconnecter à l'onduleur.
  10. J'ai percé quelques trous supplémentaires dans la garniture pour une meilleure évacuation de la chaleur.
  11. J'ai acheminé mon long câble positif jusqu'à la position médiane de la boîte à fusibles inerte le siège arrière gauche
  12. J'ai changé le fusible 60A inutilisé et installé par le fusible 100. (pourquoi pas un fusible de 120A ? Car je suppose que le 100 A sera suffisant, et je ne veux pas faire sauter le fusible interne de 120 A de l'onduleur. L'expérience me dira si si je dois le remplacer par un fusible de 125 A, Littlefuse n'a pas de fusible de 120 A]
  13. J'ai connecté tous les autres câbles d'alimentation
  14. J'ai apporté la garniture arrière gauche et connecté le câblage de la prise de courant, de l'écran LCD et de l'interrupteur, j'ai également reconnecté la prise 12 V et remis la garniture en place.
Ci-dessous quelques photos. Certainement pas très beau à l'intérieur, et je ne suis pas satisfait à 100% par l'extérieur, surtout le positionnement de l'écran LCD était une fausse couche, mais OK, ça marche, voir quelques photos ci-dessous.View attachment 7843616
View attachment 7843617
View attachment 7843618View attachment 7843619View attachment 7843620
View attachment 7843624
View attachment 7843621View attachment 7843622

Et finalement aujourd'hui, je l'ai vraiment utilisé ! J'ai dû thermorétracter un câble pour autre chose (ce sera un autre article) et au lieu de prendre une rallonge de mon garage à la voiture, j'ai utilisé l'onduleur. Le pistolet thermique est évalué à 300 watts, et en effet, 300 watts !
View attachment 7843625
[Le fil blanc dans le trou de l'enjoliveur est une sonde de température : pas d'augmentation notable de la température, mais bien sûr ce n'est que 300 Watt]

Comme ma précédente tentative il y a environ 9 mois : tous les commentaires sont les bienvenus !
Bonjour,
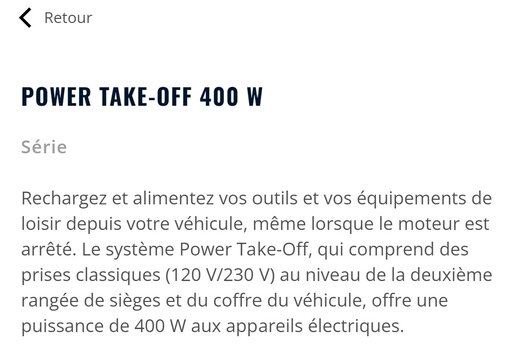
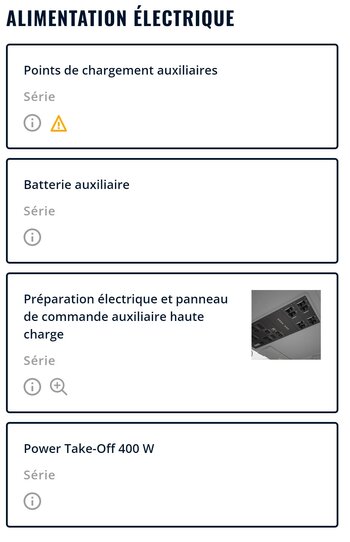
Je vois que vous avez la version Trailmaster : en France, c'est indiqué comme étant une option incluse dans la version Trailmaster ; comment se fait il que vous ne l'ayez pas ?
J'attends mon Trailmaster 2 places, je compte bien sur la présence du "Power Take Off 400w" ; mais quand je vois que vous n'en etes pas équipé sur le votre, ça m'inquiète ...


Hello,
I see that you have the Trailmaster version: in France, it is indicated as being an option included in the Trailmaster version; How come you don't have it?
I'm waiting for my 2-seater Trailmaster, I'm counting on the presence of the "Power Take Off 400w"; but when I see that you are not equipped with one on yours, that worries me...
 

Attachments

  • Power Take Off 01.jpg
    Power Take Off 01.jpg
    140.7 KB · Views: 18
  • Power Take Off 02.jpg
    Power Take Off 02.jpg
    92.7 KB · Views: 44

JMP

Grenadier Owner
Local time
2:31 PM
Joined
Nov 18, 2023
Messages
12
Reaction score
22
Location
Saverdun, France
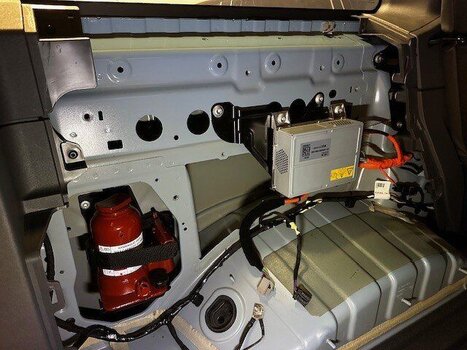
I would be very interested to know where the original planed location was for the inverter . The location if the plug at the back of the center console was pretty solid choice .
I found this photo on Facebook that should answer your question:
 

Attachments

  • Emplacement Onduleur dans l aile ARG.jpg
    Emplacement Onduleur dans l aile ARG.jpg
    69.2 KB · Views: 47

Jean Mercier

GG#920
Grenadier Owner
Lifetime Supporter
Local time
2:31 PM
Joined
Sep 10, 2022
Messages
2,626
Reaction score
9,390
Location
Sint-Martens-Latem, Belgium
Bonjour,
Je vois que vous avez la version Trailmaster : en France, c'est indiqué comme étant une option incluse dans la version Trailmaster ; comment se fait il que vous ne l'ayez pas ?
J'attends mon Trailmaster 2 places, je compte bien sur la présence du "Power Take Off 400w" ; mais quand je vois que vous n'en etes pas équipé sur le votre, ça m'inquiète ...


Hello,
I see that you have the Trailmaster version: in France, it is indicated as being an option included in the Trailmaster version; How come you don't have it?
I'm waiting for my 2-seater Trailmaster, I'm counting on the presence of the "Power Take Off 400w"; but when I see that you are not equipped with one on yours, that worries me...
Il ne faut pas vous inquieter: j'ai reçu mon Grenadier en mai dernier, et à ce moment ils ne le livraient pas (encore) avec l'invertisseur.
Je suppose que ce n'est que depuis la version 2024 qu'ils le font + quelques autres améliorations.

Don't worry: I received my Grenadier last May, and at that time they did not (yet) deliver it with the inverter.
I guess it's only since the 2024 version that they do this + some other improvements.
 
Back
Top Bottom