- Local time
- 5:38 PM
- Joined
- Jul 14, 2022
- Messages
- 119
As has been discussed, the premium sound option in the US is nothing more than a 6"x8" sub/amp combo mounted under the rear passenger seat. It's the weakest part of the audio system (to my ears) and I miss the thump of a real subwoofer. I enjoy doing my own installations and this was one was pretty easy since the premium sound already has the high level speaker wires going to the existing sub. Nobody is going to mistake this for anything resembling a professional installation, but I enjoy doing it 
I had this 12" sub laying around from a previous build:
 www.pioneerelectronics.com
I purchased this amp as it has plenty of power, is compact enough to fit in the same spot as the factory sub and takes high level speaker inputs:
 rockfordfosgate.com
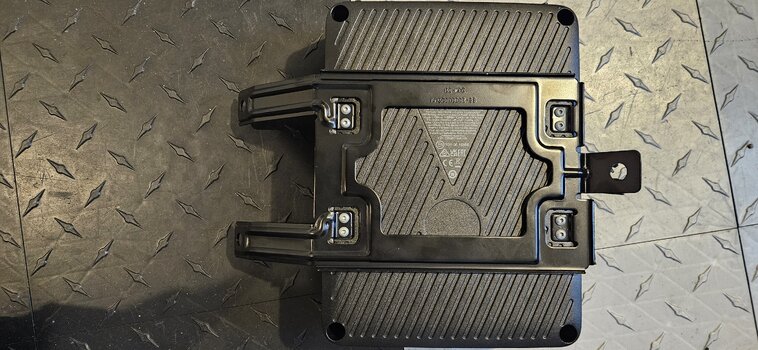
After disconnecting the battery, I unplugged the single connector to the existing sub and removed it while keeping it attached to the bracket. Here's the underside of the sub on the bracket. You just need to remove the 8 screws to free it.
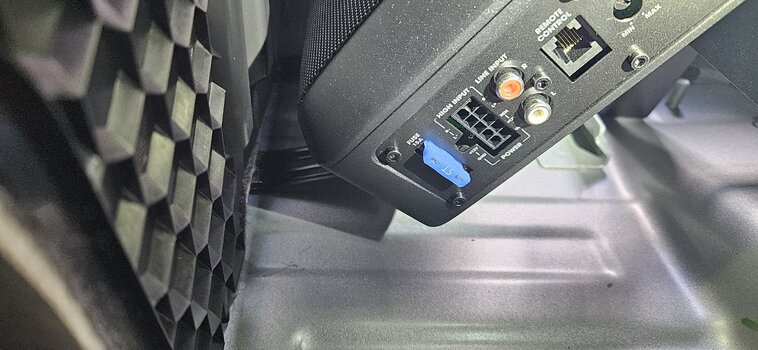
After removing the sub from the bracket, I installed it back under the seat. There wasn't a great way to mount the new amp to the bracket since the holes didn't line up but I managed to get one bolt through a mounting hole and was able to firmly secure it to the bracket using this, double sided tape and a zip tie. The amp also rests against the tabs at the bottom and help hold it in place. I covered these tabs in foam weather stripping to prevent any scratching or clanking. It certainly doesn't look perfect, but it's mounted securely! I ran the power directly to the + battery post, the ground to a bolt under the seat and used F138 (power mirrors) for the ACC connection using a fuse tap.
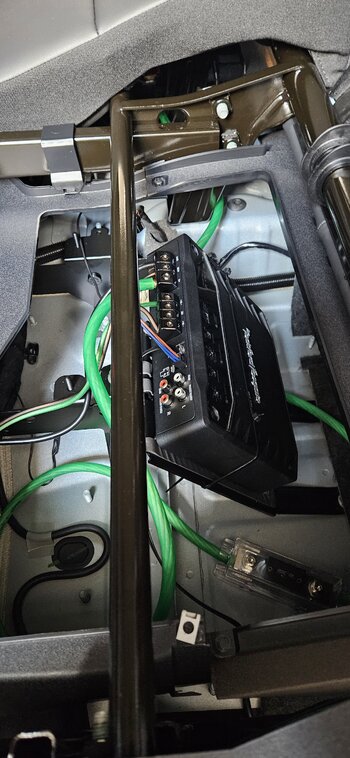
The Rockford Fosgate amp comes with a connection to the amp that has 4 speaker wires on the other end ready to connect. ( R+/_ and L+/_ ) You can connect these either directly to the plug included in the premium sound , or you could cut the premium sound plug and connect the wires directly. I kept the existing plug and just inserted the new wires into it and secured the connections. This will make it simple to reverse this. Here's the new amp mounted under the seat and connected.
I ran the bass control knob and mounted it here:

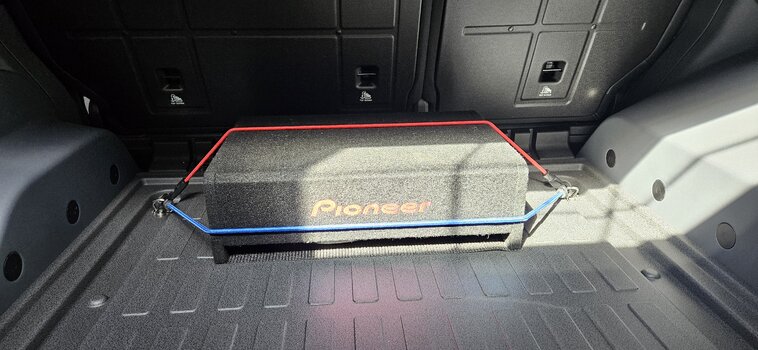
The 12" sub is in the trunk and comes out in 10 seconds if I need the space. It doesn't move around at all with the bungies and no slip pad underneath.
The bass from this setup is very impressive. I played a few tracks of my son's favorite artist Yeat and he was literally blown away! Now I need to decide if I'm going to change out the 4 speakers, but I'll listen to it like this for a while before I decide.
I had this 12" sub laying around from a previous build:
Pioneer Electronics | Car Audio, Speakers, Subs & Amps
For over 85 years, Pioneer has been a global leader in car audio innovation. Discover our legacy of premium sound systems and elevate your in-car entertainment experience.
 www.pioneerelectronics.com
I purchased this amp as it has plenty of power, is compact enough to fit in the same spot as the factory sub and takes high level speaker inputs:
Prime 500 Watt Mono Amplifier | R2-500X1 | Rockford Fosgate ®
The R2-500X1 is a powerful 500W Class-D subwoofer amplifier with C.L.E.A.N. circuitry, P.O.W.E.R. supply, Punch EQ, and remote level control for adjustable bass.
After disconnecting the battery, I unplugged the single connector to the existing sub and removed it while keeping it attached to the bracket. Here's the underside of the sub on the bracket. You just need to remove the 8 screws to free it.


After removing the sub from the bracket, I installed it back under the seat. There wasn't a great way to mount the new amp to the bracket since the holes didn't line up but I managed to get one bolt through a mounting hole and was able to firmly secure it to the bracket using this, double sided tape and a zip tie. The amp also rests against the tabs at the bottom and help hold it in place. I covered these tabs in foam weather stripping to prevent any scratching or clanking. It certainly doesn't look perfect, but it's mounted securely! I ran the power directly to the + battery post, the ground to a bolt under the seat and used F138 (power mirrors) for the ACC connection using a fuse tap.
The Rockford Fosgate amp comes with a connection to the amp that has 4 speaker wires on the other end ready to connect. ( R+/_ and L+/_ ) You can connect these either directly to the plug included in the premium sound , or you could cut the premium sound plug and connect the wires directly. I kept the existing plug and just inserted the new wires into it and secured the connections. This will make it simple to reverse this. Here's the new amp mounted under the seat and connected.

I ran the bass control knob and mounted it here:

The 12" sub is in the trunk and comes out in 10 seconds if I need the space. It doesn't move around at all with the bungies and no slip pad underneath.

The bass from this setup is very impressive. I played a few tracks of my son's favorite artist Yeat and he was literally blown away! Now I need to decide if I'm going to change out the 4 speakers, but I'll listen to it like this for a while before I decide.

