The Grenadier Forum
Register Now for enhanced site access.
INEOS Agents, Dealers or Commercial vendors please contact admin@theineosforum.com for a commercial account.

270 degree Foxwing awning with NO roof rack????

Local time
6:25 PM
Joined
Jun 10, 2023
Messages
45
Reaction score
130
Location
Sydney
Here is my first go at a build post, feel free to read and follow my process, or just skip ahead to the pictures šŸ˜‰

Since seeing the original designs I was very interested in the addition of the side tie down rails on the roof of the grenadier. This with the ability for the roof to take some load was a big factor back when I decided to put my deposit down as this to me would cover 90% of my needs should I be able to find a way to mount my foxwing without a roofrack in place.

Initially I found some brackets that looked plausible from and American supplier who made similar for fj cruiser style roof racks, these were around $200 plus shipping.
I also looked to black sheep as they had proven the side roof rails to indeed be load rated / capable. The high lift jack mounts they have looked perfect to be fair, however the $500 plus shipping to land them in Sydney Australia was a bit too much for me to risk it should it not work as needed.

Then a few weeks ago the soultion came to me in the from of Rhino Rack themselves.
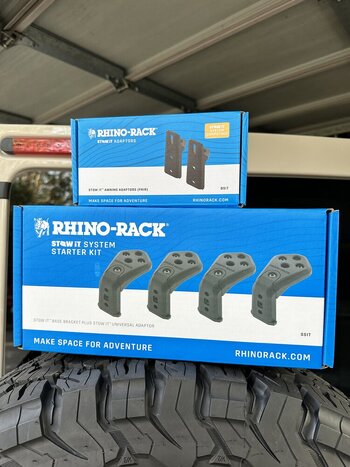
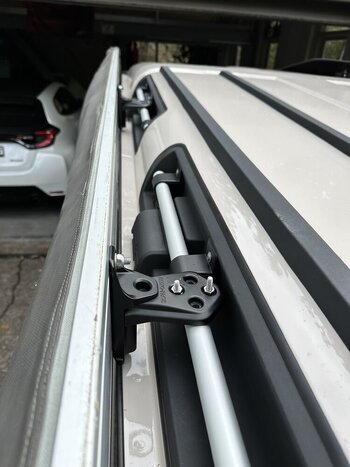
They offer a new modular system called ā€œStow Itā€
It starts as a base pack of 4 legs with additional pieces to then be purchase as needed.

I went to a local bcf where the staff were most kind in allowing me to check if my theory would worth with one of the stow it brackets out in the car park.

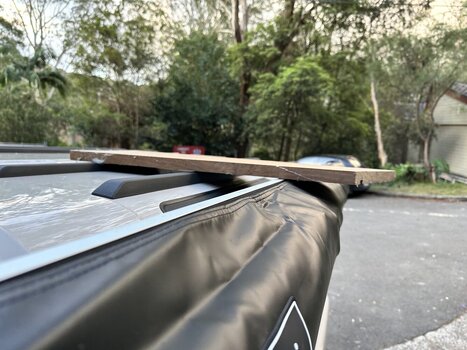
I almost couldnā€™t believe it but it seemed to my eye to no only fit and not foul or rub on anything but to actually fit being supported on the side of the roof gutter and remain level!!!

Happy enough I took the plunge and purchased the base kit ā€œSSITā€ and the additional awning adapter 2 pack ā€œBSITā€

Next stop was to Bunnings to find a suitable ubolt.
The tie down rail is 25mm in diameter but after a quick test fit in store the 26 and even 28mm u bolts didnā€™t quite fit into the stow it bracket. I then found the solution in the form of Taskmaster 51 x 28.4mm 316 Stainless Steel U Bolt. Yes the 0.4mm extra made all the difference. They are not an easy bolt to find in stock and I had to go to 3 stores to finally get 4 of them. Note: only needed 2 for the awning side and used the other 2 to mount up another rhino rack item from my past vehicle.

Getting home I got straight into it and decided on the mounting points for each bracket. The gap between was approx 910-915mm which spread the load evenly enough and didnā€™t cover or restrict access to the roof power points.
When mounting the brackets to the car I also purchased some spring washers to help raise up the nuts enough to allow space to tighten them, I setted with 1 washer closest to the roof and 3 closet to the awning. The actual job was a very easy and fast one with the help of an 11mm spanner and Something to
Stand on helps.

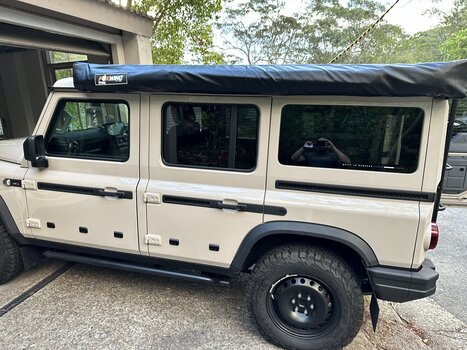
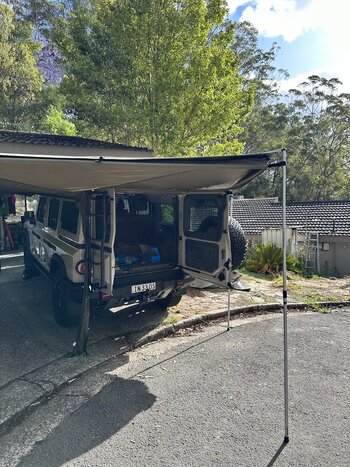
Taking the new BSIT brackets I mounted them to the foxwing and with some quick measurements I decided I wanted the rear of the awning to be a few cm past the back of the car, the idea being it would allow the awning to open in full and not snag the rear doors but still be close enough to ideally provide a near 100% waterproof cover above the rear when setup.

Once the brackets locations were trippled measured checked and tightened I lifted the foxwing up to see it it would fit. All looked good so I added the top bolt onto each mount to secure the foxwing and set it up.

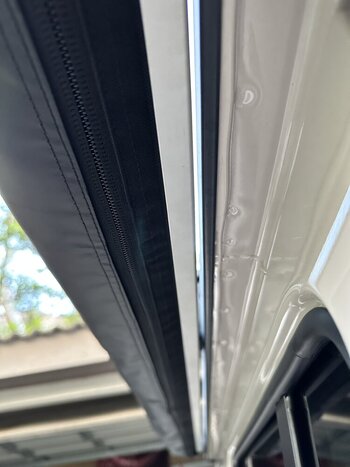
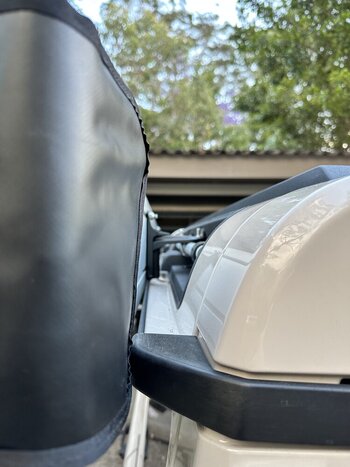
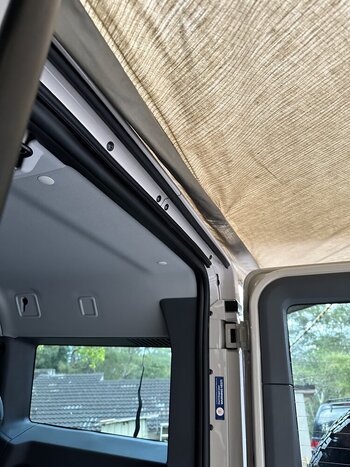
The foxwing setup as easily as usual and once the supporting poles were added the rear doors could be opened and apart from a bit of the foxwing fabric nothing hit or got in the way.

For less than $250 I have a better than I could have imagined outcome that if / as needed I can add and remove the awning. Even when mounted the tie down points are easily accessible behind to still tie down a swag and so on.

I tried to take as many pictures along the way and when all was proven and done, I couldnā€™t help but just stand and admire the results.
The foxwing fits like factory with no clearance issues with the biggest bonus of all being that it added zero additional height to the vehicle.

Hopefully the above process makes sense and the pics can tell the rest of the story. Comments and questions welcomed.

Cheers

Alan
 

Attachments

  • 70D47FD2-2E5B-4CB1-8C93-54A49DD560C9.jpeg
    70D47FD2-2E5B-4CB1-8C93-54A49DD560C9.jpeg
    137.2 KB · Views: 477
  • 1C2CD0E4-BC6B-49EF-A4C0-D48BDC2A8614.jpeg
    1C2CD0E4-BC6B-49EF-A4C0-D48BDC2A8614.jpeg
    220.4 KB · Views: 453
  • 84AFD905-6E98-4141-9B98-0179B34FF972.jpeg
    84AFD905-6E98-4141-9B98-0179B34FF972.jpeg
    79.5 KB · Views: 446
  • FE6D9F9C-419D-43BB-B44F-BC853C3D9F5D.jpeg
    FE6D9F9C-419D-43BB-B44F-BC853C3D9F5D.jpeg
    99.4 KB · Views: 455
  • 736F8F79-BDFB-410B-8C9A-D01EBBCAAC27.jpeg
    736F8F79-BDFB-410B-8C9A-D01EBBCAAC27.jpeg
    318.9 KB · Views: 460
  • F2BC7468-8E8F-4F46-95B3-A1A472D3CA3F.jpeg
    F2BC7468-8E8F-4F46-95B3-A1A472D3CA3F.jpeg
    171.2 KB · Views: 454
  • 9957F19C-85DD-4DF1-A9AB-9ED205BDB582.jpeg
    9957F19C-85DD-4DF1-A9AB-9ED205BDB582.jpeg
    295.7 KB · Views: 475
  • F778B7EE-2E10-4B87-A0BE-3151BCFF4A5A.jpeg
    F778B7EE-2E10-4B87-A0BE-3151BCFF4A5A.jpeg
    95 KB · Views: 496
  • 0FFFF5A4-1948-4813-A8A9-4D0288028EA3.jpeg
    0FFFF5A4-1948-4813-A8A9-4D0288028EA3.jpeg
    140.1 KB · Views: 489
  • 3C467730-85A9-4ADC-8968-0C5452669923.jpeg
    3C467730-85A9-4ADC-8968-0C5452669923.jpeg
    140.6 KB · Views: 485

bigleonski

Grenadier Owner
Local time
5:25 PM
Joined
Nov 5, 2022
Messages
2,223
Reaction score
4,921
Location
Brisbane QLD, Australia
Nice improvisation. How do you bookmark threads again??

Are those arms just resting on the lip of the gutter though? Shame they arenā€™t secured more like roofrack arms for extra support and stability. Particularly given the gutters seem to be fairly flexible at the edges.
 
Local time
6:25 PM
Joined
Jun 10, 2023
Messages
45
Reaction score
130
Location
Sydney
Nice improvisation. How do you bookmark threads again??

Are those arms just resting on the lip of the gutter though? Shame they arenā€™t secured more like roofrack arms for extra support and stability. Particularly given the gutters seem to be fairly flexible at the edges.
Yes and no, technically they are resting but if you tilt them up they stay up, as they are solid on the rail and the entire hand rail twists up too. I have thought about a spacer and or way to secure to the gutter as well as spread the load slightly.
i will see how it goes and can always remove it when not in use if long term load is of concern.
 
Local time
6:25 PM
Joined
Mar 7, 2023
Messages
29
Reaction score
42
Location
Australia
Here is my first go at a build post, feel free to read and follow my process, or just skip ahead to the pictures šŸ˜‰

Since seeing the original designs I was very interested in the addition of the side tie down rails on the roof of the grenadier. This with the ability for the roof to take some load was a big factor back when I decided to put my deposit down as this to me would cover 90% of my needs should I be able to find a way to mount my foxwing without a roofrack in place.

Initially I found some brackets that looked plausible from and American supplier who made similar for fj cruiser style roof racks, these were around $200 plus shipping.
I also looked to black sheep as they had proven the side roof rails to indeed be load rated / capable. The high lift jack mounts they have looked perfect to be fair, however the $500 plus shipping to land them in Sydney Australia was a bit too much for me to risk it should it not work as needed.

Then a few weeks ago the soultion came to me in the from of Rhino Rack themselves.
They offer a new modular system called ā€œStow Itā€
It starts as a base pack of 4 legs with additional pieces to then be purchase as needed.

I went to a local bcf where the staff were most kind in allowing me to check if my theory would worth with one of the stow it brackets out in the car park.

I almost couldnā€™t believe it but it seemed to my eye to no only fit and not foul or rub on anything but to actually fit being supported on the side of the roof gutter and remain level!!!

Happy enough I took the plunge and purchased the base kit ā€œSSITā€ and the additional awning adapter 2 pack ā€œBSITā€

Next stop was to Bunnings to find a suitable ubolt.
The tie down rail is 25mm in diameter but after a quick test fit in store the 26 and even 28mm u bolts didnā€™t quite fit into the stow it bracket. I then found the solution in the form of Taskmaster 51 x 28.4mm 316 Stainless Steel U Bolt. Yes the 0.4mm extra made all the difference. They are not an easy bolt to find in stock and I had to go to 3 stores to finally get 4 of them. Note: only needed 2 for the awning side and used the other 2 to mount up another rhino rack item from my past vehicle.

Getting home I got straight into it and decided on the mounting points for each bracket. The gap between was approx 910-915mm which spread the load evenly enough and didnā€™t cover or restrict access to the roof power points.
When mounting the brackets to the car I also purchased some spring washers to help raise up the nuts enough to allow space to tighten them, I setted with 1 washer closest to the roof and 3 closet to the awning. The actual job was a very easy and fast one with the help of an 11mm spanner and Something to
Stand on helps.

Taking the new BSIT brackets I mounted them to the foxwing and with some quick measurements I decided I wanted the rear of the awning to be a few cm past the back of the car, the idea being it would allow the awning to open in full and not snag the rear doors but still be close enough to ideally provide a near 100% waterproof cover above the rear when setup.

Once the brackets locations were trippled measured checked and tightened I lifted the foxwing up to see it it would fit. All looked good so I added the top bolt onto each mount to secure the foxwing and set it up.

The foxwing setup as easily as usual and once the supporting poles were added the rear doors could be opened and apart from a bit of the foxwing fabric nothing hit or got in the way.

For less than $250 I have a better than I could have imagined outcome that if / as needed I can add and remove the awning. Even when mounted the tie down points are easily accessible behind to still tie down a swag and so on.

I tried to take as many pictures along the way and when all was proven and done, I couldnā€™t help but just stand and admire the results.
The foxwing fits like factory with no clearance issues with the biggest bonus of all being that it added zero additional height to the vehicle.

Hopefully the above process makes sense and the pics can tell the rest of the story. Comments and questions welcomed.

Cheers

Alan
Thanks for the photos - great idea
 

AnD3rew

Inch deep and a mile wide.
Grenadier Owner
Lifetime Supporter
Local time
6:25 PM
Joined
Aug 24, 2022
Messages
2,440
Reaction score
6,050
Nice idea, would be interested to see how it holds up on a corrugated road etc. I have used the Stow It for mine, but attached to the roof bars, not the rails.
 
Local time
6:25 PM
Joined
Jun 10, 2023
Messages
45
Reaction score
130
Location
Sydney
Nice idea, would be interested to see how it holds up on a corrugated road etc. I have used the Stow It for mine, but attached to the roof bars, not the rails.

Yes totally agree as i have seen your setup Andrew when we meet at st ives coffee and cars.

My thoughts here are its possible when and if i need it and parking at home would be fine even with 2.2mtrs had i chosen to buy a full roof rack. My previous vehicle and its roof rack foxwing and the obligatory lift and bigger rubber added 1.5ltrs per 100. So am less keen to add a potential 2ltrs per 100km ā€œincaseā€ i go camping.
The real magic of this setup is a genuine less than 5 mins to remove or add it back on.

In saying thatā€¦ for me the foxwing stays on for now as my garage is too full as it is and it makes the grenadier look even tougher than it already is
 

IG_in_AZ

Global Grenadiers #1372
Grenadier Owner
Lifetime Supporter
Local time
12:25 AM
Joined
Dec 30, 2022
Messages
793
Reaction score
1,733
Location
Tucson, AZ, USA
That a nice setup. Thanks for sharing. I didn't get the roof rack but would like a 270 degree awning, so I'll have to copy your lead if I decide to get one.
 

bemax

Grenadier Owner
Lifetime Supporter
Local time
8:25 AM
Joined
May 12, 2022
Messages
2,595
Reaction score
5,020
Location
Germany
Nice idea for people like me who have garage that is built for the Defender without a rack.
This solution would fit in šŸ‘
 

Jetjockey

Grenadier Owner
Forum Donor
Local time
8:25 AM
Joined
Sep 27, 2023
Messages
37
Reaction score
69
Location
Germany
Here is my first go at a build post, feel free to read and follow my process, or just skip ahead to the pictures šŸ˜‰

Since seeing the original designs I was very interested in the addition of the side tie down rails on the roof of the grenadier. This with the ability for the roof to take some load was a big factor back when I decided to put my deposit down as this to me would cover 90% of my needs should I be able to find a way to mount my foxwing without a roofrack in place.

Initially I found some brackets that looked plausible from and American supplier who made similar for fj cruiser style roof racks, these were around $200 plus shipping.
I also looked to black sheep as they had proven the side roof rails to indeed be load rated / capable. The high lift jack mounts they have looked perfect to be fair, however the $500 plus shipping to land them in Sydney Australia was a bit too much for me to risk it should it not work as needed.

Then a few weeks ago the soultion came to me in the from of Rhino Rack themselves.
They offer a new modular system called ā€œStow Itā€
It starts as a base pack of 4 legs with additional pieces to then be purchase as needed.

I went to a local bcf where the staff were most kind in allowing me to check if my theory would worth with one of the stow it brackets out in the car park.

I almost couldnā€™t believe it but it seemed to my eye to no only fit and not foul or rub on anything but to actually fit being supported on the side of the roof gutter and remain level!!!

Happy enough I took the plunge and purchased the base kit ā€œSSITā€ and the additional awning adapter 2 pack ā€œBSITā€

Next stop was to Bunnings to find a suitable ubolt.
The tie down rail is 25mm in diameter but after a quick test fit in store the 26 and even 28mm u bolts didnā€™t quite fit into the stow it bracket. I then found the solution in the form of Taskmaster 51 x 28.4mm 316 Stainless Steel U Bolt. Yes the 0.4mm extra made all the difference. They are not an easy bolt to find in stock and I had to go to 3 stores to finally get 4 of them. Note: only needed 2 for the awning side and used the other 2 to mount up another rhino rack item from my past vehicle.

Getting home I got straight into it and decided on the mounting points for each bracket. The gap between was approx 910-915mm which spread the load evenly enough and didnā€™t cover or restrict access to the roof power points.
When mounting the brackets to the car I also purchased some spring washers to help raise up the nuts enough to allow space to tighten them, I setted with 1 washer closest to the roof and 3 closet to the awning. The actual job was a very easy and fast one with the help of an 11mm spanner and Something to
Stand on helps.

Taking the new BSIT brackets I mounted them to the foxwing and with some quick measurements I decided I wanted the rear of the awning to be a few cm past the back of the car, the idea being it would allow the awning to open in full and not snag the rear doors but still be close enough to ideally provide a near 100% waterproof cover above the rear when setup.

Once the brackets locations were trippled measured checked and tightened I lifted the foxwing up to see it it would fit. All looked good so I added the top bolt onto each mount to secure the foxwing and set it up.

The foxwing setup as easily as usual and once the supporting poles were added the rear doors could be opened and apart from a bit of the foxwing fabric nothing hit or got in the way.

For less than $250 I have a better than I could have imagined outcome that if / as needed I can add and remove the awning. Even when mounted the tie down points are easily accessible behind to still tie down a swag and so on.

I tried to take as many pictures along the way and when all was proven and done, I couldnā€™t help but just stand and admire the results.
The foxwing fits like factory with no clearance issues with the biggest bonus of all being that it added zero additional height to the vehicle.

Hopefully the above process makes sense and the pics can tell the rest of the story. Comments and questions welcomed.

Cheers

Alan
Thank you for this great build post. I was going to get the "Swiss Solution" when I discovered your post.
All the blacksheep gear I've seen so far is of paramount quality, but I have the factory roof bars as well (not planning to use them often since they keep the car out of the garage) and the rhino kit is of double use here.

Still need to find the u-bolts, so if a fellow reader from Germany is reading this, I'd be grateful for a hint.

@AlanJ : How do you attach the end of the awning to the car so it stays securely open? I'm getting an Ostrich 270Ā° awning from bigcountry4x4 (SA) and they usually use a metal hook you bolt to the roof bar / rack where you hook the last strut into. One could always use an elastic strap and hook it to the tie down rail on the other side, but you might have a better solution already. The Foxwing might not have that though, never saw one.

Thank you again and y'all have a great weekend.
 
Local time
6:25 PM
Joined
Jun 10, 2023
Messages
45
Reaction score
130
Location
Sydney
Thank you for this great build post. I was going to get the "Swiss Solution" when I discovered your post.
All the blacksheep gear I've seen so far is of paramount quality, but I have the factory roof bars as well (not planning to use them often since they keep the car out of the garage) and the rhino kit is of double use here.

Still need to find the u-bolts, so if a fellow reader from Germany is reading this, I'd be grateful for a hint.

@AlanJ : How do you attach the end of the awning to the car so it stays securely open? I'm getting an Ostrich 270Ā° awning from bigcountry4x4 (SA) and they usually use a metal hook you bolt to the roof bar / rack where you hook the last strut into. One could always use an elastic strap and hook it to the tie down rail on the other side, but you might have a better solution already. The Foxwing might not have that though, never saw one.

Thank you again and y'all have a great weekend.
Yes itā€™s an adjustable strap with buckle, from what I have seen all 270 style awnings come with them, and yes I just used the rear roof tie down handle to get the awning tensioned tightly and then add in the supporting legs / poles
 

HT

Local time
2:25 AM
Joined
May 11, 2022
Messages
88
Reaction score
127
Location
Brisbane, Australia
Here is my first go at a build post, feel free to read and follow my process, or just skip ahead to the pictures šŸ˜‰

Since seeing the original designs I was very interested in the addition of the side tie down rails on the roof of the grenadier. This with the ability for the roof to take some load was a big factor back when I decided to put my deposit down as this to me would cover 90% of my needs should I be able to find a way to mount my foxwing without a roofrack in place.

Initially I found some brackets that looked plausible from and American supplier who made similar for fj cruiser style roof racks, these were around $200 plus shipping.
I also looked to black sheep as they had proven the side roof rails to indeed be load rated / capable. The high lift jack mounts they have looked perfect to be fair, however the $500 plus shipping to land them in Sydney Australia was a bit too much for me to risk it should it not work as needed.

Then a few weeks ago the soultion came to me in the from of Rhino Rack themselves.
They offer a new modular system called ā€œStow Itā€
It starts as a base pack of 4 legs with additional pieces to then be purchase as needed.

I went to a local bcf where the staff were most kind in allowing me to check if my theory would worth with one of the stow it brackets out in the car park.

I almost couldnā€™t believe it but it seemed to my eye to no only fit and not foul or rub on anything but to actually fit being supported on the side of the roof gutter and remain level!!!

Happy enough I took the plunge and purchased the base kit ā€œSSITā€ and the additional awning adapter 2 pack ā€œBSITā€

Next stop was to Bunnings to find a suitable ubolt.
The tie down rail is 25mm in diameter but after a quick test fit in store the 26 and even 28mm u bolts didnā€™t quite fit into the stow it bracket. I then found the solution in the form of Taskmaster 51 x 28.4mm 316 Stainless Steel U Bolt. Yes the 0.4mm extra made all the difference. They are not an easy bolt to find in stock and I had to go to 3 stores to finally get 4 of them. Note: only needed 2 for the awning side and used the other 2 to mount up another rhino rack item from my past vehicle.

Getting home I got straight into it and decided on the mounting points for each bracket. The gap between was approx 910-915mm which spread the load evenly enough and didnā€™t cover or restrict access to the roof power points.
When mounting the brackets to the car I also purchased some spring washers to help raise up the nuts enough to allow space to tighten them, I setted with 1 washer closest to the roof and 3 closet to the awning. The actual job was a very easy and fast one with the help of an 11mm spanner and Something to
Stand on helps.

Taking the new BSIT brackets I mounted them to the foxwing and with some quick measurements I decided I wanted the rear of the awning to be a few cm past the back of the car, the idea being it would allow the awning to open in full and not snag the rear doors but still be close enough to ideally provide a near 100% waterproof cover above the rear when setup.

Once the brackets locations were trippled measured checked and tightened I lifted the foxwing up to see it it would fit. All looked good so I added the top bolt onto each mount to secure the foxwing and set it up.

The foxwing setup as easily as usual and once the supporting poles were added the rear doors could be opened and apart from a bit of the foxwing fabric nothing hit or got in the way.

For less than $250 I have a better than I could have imagined outcome that if / as needed I can add and remove the awning. Even when mounted the tie down points are easily accessible behind to still tie down a swag and so on.

I tried to take as many pictures along the way and when all was proven and done, I couldnā€™t help but just stand and admire the results.
The foxwing fits like factory with no clearance issues with the biggest bonus of all being that it added zero additional height to the vehicle.

Hopefully the above process makes sense and the pics can tell the rest of the story. Comments and questions welcomed.

Cheers

Alan
Gday Alan,
Mate now that youā€™re a month down the track, howā€™s this set up going? Any further advice for a young player? Iā€™m about to follows your post to the letter.
 

DaBull

Grenadier Owner
Lifetime Supporter
Local time
11:25 PM
Joined
Dec 28, 2022
Messages
1,411
Reaction score
2,713
Location
California
Here is my first go at a build post, feel free to read and follow my process, or just skip ahead to the pictures šŸ˜‰

Since seeing the original designs I was very interested in the addition of the side tie down rails on the roof of the grenadier. This with the ability for the roof to take some load was a big factor back when I decided to put my deposit down as this to me would cover 90% of my needs should I be able to find a way to mount my foxwing without a roofrack in place.

Initially I found some brackets that looked plausible from and American supplier who made similar for fj cruiser style roof racks, these were around $200 plus shipping.
I also looked to black sheep as they had proven the side roof rails to indeed be load rated / capable. The high lift jack mounts they have looked perfect to be fair, however the $500 plus shipping to land them in Sydney Australia was a bit too much for me to risk it should it not work as needed.

Then a few weeks ago the soultion came to me in the from of Rhino Rack themselves.
They offer a new modular system called ā€œStow Itā€
It starts as a base pack of 4 legs with additional pieces to then be purchase as needed.

I went to a local bcf where the staff were most kind in allowing me to check if my theory would worth with one of the stow it brackets out in the car park.

I almost couldnā€™t believe it but it seemed to my eye to no only fit and not foul or rub on anything but to actually fit being supported on the side of the roof gutter and remain level!!!

Happy enough I took the plunge and purchased the base kit ā€œSSITā€ and the additional awning adapter 2 pack ā€œBSITā€

Next stop was to Bunnings to find a suitable ubolt.
The tie down rail is 25mm in diameter but after a quick test fit in store the 26 and even 28mm u bolts didnā€™t quite fit into the stow it bracket. I then found the solution in the form of Taskmaster 51 x 28.4mm 316 Stainless Steel U Bolt. Yes the 0.4mm extra made all the difference. They are not an easy bolt to find in stock and I had to go to 3 stores to finally get 4 of them. Note: only needed 2 for the awning side and used the other 2 to mount up another rhino rack item from my past vehicle.

Getting home I got straight into it and decided on the mounting points for each bracket. The gap between was approx 910-915mm which spread the load evenly enough and didnā€™t cover or restrict access to the roof power points.
When mounting the brackets to the car I also purchased some spring washers to help raise up the nuts enough to allow space to tighten them, I setted with 1 washer closest to the roof and 3 closet to the awning. The actual job was a very easy and fast one with the help of an 11mm spanner and Something to
Stand on helps.

Taking the new BSIT brackets I mounted them to the foxwing and with some quick measurements I decided I wanted the rear of the awning to be a few cm past the back of the car, the idea being it would allow the awning to open in full and not snag the rear doors but still be close enough to ideally provide a near 100% waterproof cover above the rear when setup.

Once the brackets locations were trippled measured checked and tightened I lifted the foxwing up to see it it would fit. All looked good so I added the top bolt onto each mount to secure the foxwing and set it up.

The foxwing setup as easily as usual and once the supporting poles were added the rear doors could be opened and apart from a bit of the foxwing fabric nothing hit or got in the way.

For less than $250 I have a better than I could have imagined outcome that if / as needed I can add and remove the awning. Even when mounted the tie down points are easily accessible behind to still tie down a swag and so on.

I tried to take as many pictures along the way and when all was proven and done, I couldnā€™t help but just stand and admire the results.
The foxwing fits like factory with no clearance issues with the biggest bonus of all being that it added zero additional height to the vehicle.

Hopefully the above process makes sense and the pics can tell the rest of the story. Comments and questions welcomed.

Cheers

Alan
Hi Alan, Necessity is the Mother of Invention. That's what this whole forum is about. The discovery of solutions. It's fantastic when serendipity also steps in to create the perfect set up for your needs.
Carry on Mate. DaBull
 
Local time
6:25 PM
Joined
Jun 10, 2023
Messages
45
Reaction score
130
Location
Sydney
Gday Alan,
Mate now that youā€™re a month down the track, howā€™s this set up going? Any further advice for a young player? Iā€™m about to follows your post to the letter.

Havenā€™t used it in anger more than once but its still on the carā€¦ so for me its a winā€¦šŸ¤£

I am Sydney based and have done 2,500ish kms since new. Compared to my old setup on my amarok, it is great piece of mind knowing its level with the roofā€™s highest point (but still lower than if I have my safari windows opened)

Its a worthwhile project to take on and with a step ladder and level driveway is a very easy and fun weekend project. Good luck
 

Jetjockey

Grenadier Owner
Forum Donor
Local time
8:25 AM
Joined
Sep 27, 2023
Messages
37
Reaction score
69
Location
Germany
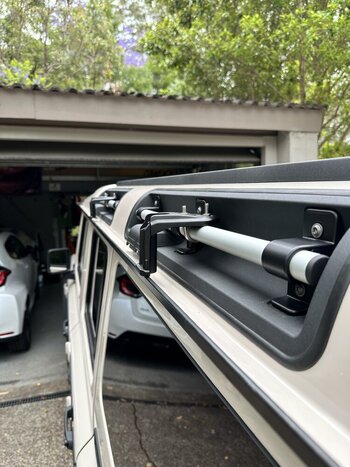
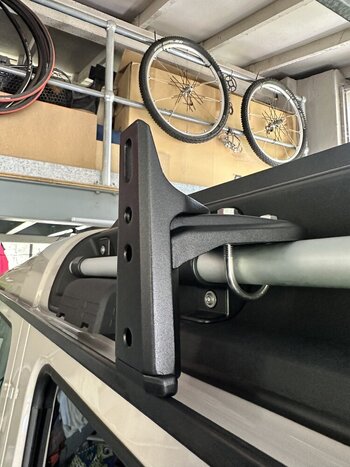
As I couldn't find the matching u-bolts in Germany, I'd a set of brackets made from stainless steel.
UnfortunateIy, won't find the time to fit the awning this year. However, someone might have the same problem finding fitting u-bolts, so I just thought I show you guys.
As I plan to use the same protective film I used on the door sills on the roof handles, there is an extra 2/10mm allowance all around the inside of the bracket.
IMG20231214123304.jpg
IMG20231214123313.jpg

IMG20231214123321.jpg
 

Gibby

Donny Grey, White Roof, Red Frame, much more.
Grenadier Owner
Lifetime Supporter
Local time
2:25 AM
Joined
Sep 5, 2023
Messages
133
Reaction score
185
Location
Allentown, Pennsylvania, USA
Here is my first go at a build post, feel free to read and follow my process, or just skip ahead to the pictures šŸ˜‰

Since seeing the original designs I was very interested in the addition of the side tie down rails on the roof of the grenadier. This with the ability for the roof to take some load was a big factor back when I decided to put my deposit down as this to me would cover 90% of my needs should I be able to find a way to mount my foxwing without a roofrack in place.

Initially I found some brackets that looked plausible from and American supplier who made similar for fj cruiser style roof racks, these were around $200 plus shipping.
I also looked to black sheep as they had proven the side roof rails to indeed be load rated / capable. The high lift jack mounts they have looked perfect to be fair, however the $500 plus shipping to land them in Sydney Australia was a bit too much for me to risk it should it not work as needed.

Then a few weeks ago the soultion came to me in the from of Rhino Rack themselves.
They offer a new modular system called ā€œStow Itā€
It starts as a base pack of 4 legs with additional pieces to then be purchase as needed.

I went to a local bcf where the staff were most kind in allowing me to check if my theory would worth with one of the stow it brackets out in the car park.

I almost couldnā€™t believe it but it seemed to my eye to no only fit and not foul or rub on anything but to actually fit being supported on the side of the roof gutter and remain level!!!

Happy enough I took the plunge and purchased the base kit ā€œSSITā€ and the additional awning adapter 2 pack ā€œBSITā€

Next stop was to Bunnings to find a suitable ubolt.
The tie down rail is 25mm in diameter but after a quick test fit in store the 26 and even 28mm u bolts didnā€™t quite fit into the stow it bracket. I then found the solution in the form of Taskmaster 51 x 28.4mm 316 Stainless Steel U Bolt. Yes the 0.4mm extra made all the difference. They are not an easy bolt to find in stock and I had to go to 3 stores to finally get 4 of them. Note: only needed 2 for the awning side and used the other 2 to mount up another rhino rack item from my past vehicle.

Getting home I got straight into it and decided on the mounting points for each bracket. The gap between was approx 910-915mm which spread the load evenly enough and didnā€™t cover or restrict access to the roof power points.
When mounting the brackets to the car I also purchased some spring washers to help raise up the nuts enough to allow space to tighten them, I setted with 1 washer closest to the roof and 3 closet to the awning. The actual job was a very easy and fast one with the help of an 11mm spanner and Something to
Stand on helps.

Taking the new BSIT brackets I mounted them to the foxwing and with some quick measurements I decided I wanted the rear of the awning to be a few cm past the back of the car, the idea being it would allow the awning to open in full and not snag the rear doors but still be close enough to ideally provide a near 100% waterproof cover above the rear when setup.

Once the brackets locations were trippled measured checked and tightened I lifted the foxwing up to see it it would fit. All looked good so I added the top bolt onto each mount to secure the foxwing and set it up.

The foxwing setup as easily as usual and once the supporting poles were added the rear doors could be opened and apart from a bit of the foxwing fabric nothing hit or got in the way.

For less than $250 I have a better than I could have imagined outcome that if / as needed I can add and remove the awning. Even when mounted the tie down points are easily accessible behind to still tie down a swag and so on.

I tried to take as many pictures along the way and when all was proven and done, I couldnā€™t help but just stand and admire the results.
The foxwing fits like factory with no clearance issues with the biggest bonus of all being that it added zero additional height to the vehicle.

Hopefully the above process makes sense and the pics can tell the rest of the story. Comments and questions welcomed.

Cheers

Alan
Thanks for thisDo you know if the Rhino Rack brackets you show for the foxwing are compatible with the full Rhino Rack sold through INEOS and not require any modifications? Thank you.
 

Jetjockey

Grenadier Owner
Forum Donor
Local time
8:25 AM
Joined
Sep 27, 2023
Messages
37
Reaction score
69
Location
Germany
Unfortunately, I don't have the full rack to try them out. The black bracket on the pictures is the "Stow It" Base Bracket from Rhino and the Stow It range is compatible with the Rhino Pioneer platform, which I believe is what Ineos sells.You might find further proof here: https://www.rhinorack.com/en-us/stow-it
 

Gibby

Donny Grey, White Roof, Red Frame, much more.
Grenadier Owner
Lifetime Supporter
Local time
2:25 AM
Joined
Sep 5, 2023
Messages
133
Reaction score
185
Location
Allentown, Pennsylvania, USA
Unfortunately, I don't have the full rack to try them out. The black bracket on the pictures is the "Stow It" Base Bracket from Rhino and the Stow It range is compatible with the Rhino Pioneer platform, which I believe is what Ineos sells.You might find further proof here: https://www.rhinorack.com/en-us/stow-it
Thank you!
 

Jetjockey

Grenadier Owner
Forum Donor
Local time
8:25 AM
Joined
Sep 27, 2023
Messages
37
Reaction score
69
Location
Germany
As I couldn't find the matching u-bolts in Germany, I'd a set of brackets made from stainless steel.
UnfortunateIy, won't find the time to fit the awning this year. However, someone might have the same problem finding fitting u-bolts, so I just thought I show you guys.
As I plan to use the same protective film I used on the door sills on the roof handles, there is an extra 2/10mm allowance all around the inside of the bracket.
View attachment 7835863View attachment 7835861
View attachment 7835862
Lil' update on the above Stow-it brackets. They fit perfectly. If one likes to mount the bracket flush with the handle's holders there is some milling needed (pic 1).

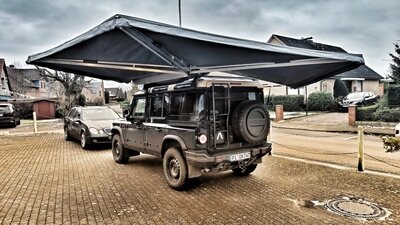
Unfortunately for the very sturdy BigCountry awning the strain on the gutter is too much. They seem to work very good with Fox- or Batwings (19.5kg) which have poles, but not with the 35kg self supporting Ostrich Wing Awning from BC.

So I'm back to the roots using the load bars. As I had a universal fitting kit from BC to spare, I used this. (pic 2) It works, but the awning sits very high (too high imho) and the packed bundle looks like an alien on the car (pics 3 & 4).

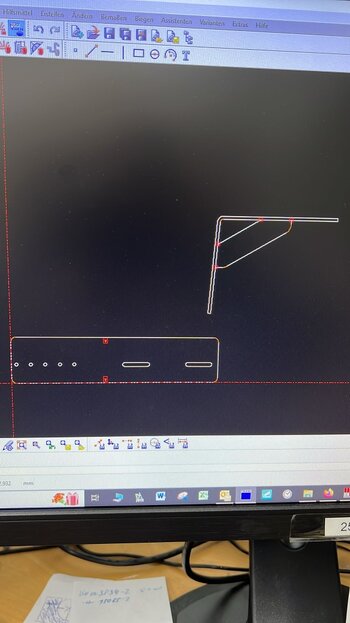
So my idea was to basically turn the mounting brackets 180 degrees, i.e. have them pointed downwards.

They're not ready yet, as I'd like to bring the car to the shop to test the fit before we weld the brace to the bracket.
You'll get an idea from pics 5, 6, & 7 and it might help somebody struggling with a similar problem. The brackets are asymmetrical to accommodate the brace.Y'all have a good weekend!
IMG20240127115723.jpg
IMG20240125125525.jpg
1000066461-01.jpeg
1000066459-01.jpeg

IMG-20240126-WA0000.jpg
IMG-20240126-WA0002.jpg
IMG-20240126-WA0003.jpg
 

Attachments

  • IMG-20240126-WA0000.jpg
    IMG-20240126-WA0000.jpg
    318.1 KB · Views: 217
  • 1000066459-01.jpeg
    1000066459-01.jpeg
    87.7 KB · Views: 228
Last edited:

skoller

Grenadier Owner
Local time
2:25 AM
Joined
May 16, 2022
Messages
17
Reaction score
8
Location
Yackandandah VIC, Australia
Here is my first go at a build post, feel free to read and follow my process, or just skip ahead to the pictures šŸ˜‰

Since seeing the original designs I was very interested in the addition of the side tie down rails on the roof of the grenadier. This with the ability for the roof to take some load was a big factor back when I decided to put my deposit down as this to me would cover 90% of my needs should I be able to find a way to mount my foxwing without a roofrack in place.

Initially I found some brackets that looked plausible from and American supplier who made similar for fj cruiser style roof racks, these were around $200 plus shipping.
I also looked to black sheep as they had proven the side roof rails to indeed be load rated / capable. The high lift jack mounts they have looked perfect to be fair, however the $500 plus shipping to land them in Sydney Australia was a bit too much for me to risk it should it not work as needed.

Then a few weeks ago the soultion came to me in the from of Rhino Rack themselves.
They offer a new modular system called ā€œStow Itā€
It starts as a base pack of 4 legs with additional pieces to then be purchase as needed.

I went to a local bcf where the staff were most kind in allowing me to check if my theory would worth with one of the stow it brackets out in the car park.

I almost couldnā€™t believe it but it seemed to my eye to no only fit and not foul or rub on anything but to actually fit being supported on the side of the roof gutter and remain level!!!

Happy enough I took the plunge and purchased the base kit ā€œSSITā€ and the additional awning adapter 2 pack ā€œBSITā€

Next stop was to Bunnings to find a suitable ubolt.
The tie down rail is 25mm in diameter but after a quick test fit in store the 26 and even 28mm u bolts didnā€™t quite fit into the stow it bracket. I then found the solution in the form of Taskmaster 51 x 28.4mm 316 Stainless Steel U Bolt. Yes the 0.4mm extra made all the difference. They are not an easy bolt to find in stock and I had to go to 3 stores to finally get 4 of them. Note: only needed 2 for the awning side and used the other 2 to mount up another rhino rack item from my past vehicle.

Getting home I got straight into it and decided on the mounting points for each bracket. The gap between was approx 910-915mm which spread the load evenly enough and didnā€™t cover or restrict access to the roof power points.
When mounting the brackets to the car I also purchased some spring washers to help raise up the nuts enough to allow space to tighten them, I setted with 1 washer closest to the roof and 3 closet to the awning. The actual job was a very easy and fast one with the help of an 11mm spanner and Something to
Stand on helps.

Taking the new BSIT brackets I mounted them to the foxwing and with some quick measurements I decided I wanted the rear of the awning to be a few cm past the back of the car, the idea being it would allow the awning to open in full and not snag the rear doors but still be close enough to ideally provide a near 100% waterproof cover above the rear when setup.

Once the brackets locations were trippled measured checked and tightened I lifted the foxwing up to see it it would fit. All looked good so I added the top bolt onto each mount to secure the foxwing and set it up.

The foxwing setup as easily as usual and once the supporting poles were added the rear doors could be opened and apart from a bit of the foxwing fabric nothing hit or got in the way.

For less than $250 I have a better than I could have imagined outcome that if / as needed I can add and remove the awning. Even when mounted the tie down points are easily accessible behind to still tie down a swag and so on.

I tried to take as many pictures along the way and when all was proven and done, I couldnā€™t help but just stand and admire the results.
The foxwing fits like factory with no clearance issues with the biggest bonus of all being that it added zero additional height to the vehicle.

Hopefully the above process makes sense and the pics can tell the rest of the story. Comments and questions welcomed.

Cheers

Alan
Hi Alan
great job. How is it all standing up to the rigours of travelling on rough roads etc, any slipping of the u bolts. If all is good this is my next project with the foxwing left over from my Defender days.
 
Back
Top Bottom